In this tutorial, we will show you the steps to unbrick your OnePlus 7T device using the MSM Download Tool. Well, nothing scares a user more than a non-functional device. Well, this could take many shapes. For example, there’s a bootloop and a soft-bricked. However, if you are into flashing ROMs and using custom recovery like TWRP, it must be part of your daily routine nowadays. The fix, in those cases, is pretty easy: just boot your device to Fastboot mode and flash the stock firmware.
However, the real danger is when you end up with your device in a hard-bricked state. When that happens, forget about TWRP, you can’t even access fastboot mode. This nullifies all the possible solutions, except for one. And in this guide, we will be sharing just this tip. With the help of the given instructions, you could now easily unbrick your OnePlus 7T and bring it back from the dead state. So without further ado, let’s check out the steps.
Apart from that, you could also replace your stock recovery with a custom recovery like TWRP. The benefits of this are aplenty. For example, you could create a Nandroid backup, flash ZIP and IMG files, use the MTP features, etc. Likewise, you could also get access to your system partition by rooting your device. Well, we could go on and on listing the benefits. However, things are as simple as it looks.
All these practices come with associated risks as well. The thing is since you are into the custom development scene, you already have an idea or two about how to get back your device into normal working conditions. Most of you might be aware of the fact that the best escape route involves booting your device to fastboot and then simply flashing the stock firmware. However, this trick only works when your device is in a bootloop or a soft-bricked state.

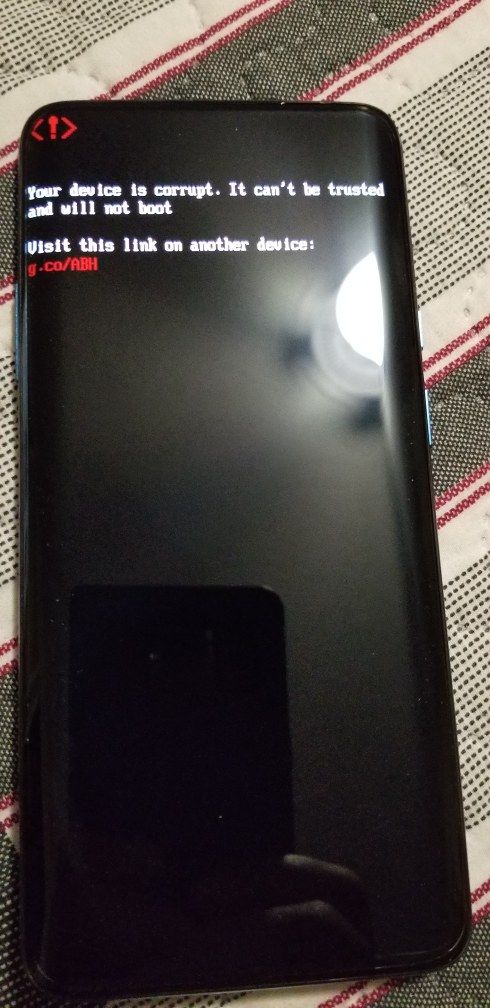
The good thing is most often than not, this fastboot-flash escape route works pretty well. But not always! If your device gets hard-bricked, then you wouldn’t be even able to flash the stocks firmware at that point in time. The reason? If your device is bricked then you can’t even boot your device to fastboot. Nor you could boot your device to TWRP recovery and flash any other custom ROM. So what could be done in such a case? Sometimes, you might also get this scary message that Your device is corrupt. It cannot be trusted and will not boot. Don’t worry, we will help you in getting this trust back!
Most of the users at this point in time just rushes to the nearby OnePlus service center. The thing is: what these developers do at the service center, you could do the same at your home as well. And the entire process is only software-related, we wouldn’ be tweaking any of the hardware parts. With that said, here are the complete instructions to Unbrick OnePlus 7T from a dead state. Let’s begin.
Table of Contents
How to Unbrick Your OnePlus 7T Device from Dead State
All the Qualcomm based devices come with a special boot mode controlled by the primary bootloader, dubbed as Emergency Download (EDL). OEMs generally bake this mode deep into the device, not accessible from even the tech geeks. One method to access this is via the Test Point method (which involves forcibly opening the back of your device and playing with one or two copper wires).
But in that process, there are tons of things involved, most of which are quite dangerous even from our point of view. And hey, we also promised that we wouldn’t be taking the hardware route. So the next and much easier method involves the use of the EDL Mode. Today we will make full use of this mode to unbrick your OnePlus 7T device from a dead state. So without further ado, let’s begin with the guide.
Prerequisites
Before we begin with the process, here are a few points to be kept in mind.
Well, we always begin by telling you to create a backup of your entire device, but in this case, that’s completely useless. Similarly, you can’t even enable USB Debugging as well. So the only requirement that we would suggest to you is that your device should be at least 60% charged. Since the device is in a bricked state and you wouldn’t be able to get a clue regarding the battery percentage, it is better to connect your device to a charger and wait for around 30-45 minutes.
Furthermore, we will be requiring the Qualcomm USB Drivers to be installed on your PC. However, Windows might conflict with the proper functioning of these drivers. Therefore, you will have to enable the Test Signing Mode before installing these drivers. For that, click on the Start menu, search for Command Prompt, and launch it as an administrator. Now type in the below command and hit Enter:
bcdedit /set testsigning on
That it. Now Reboot your PC. You have now successfully enabled Test Signing Mode. Now download the Qualcomm USB Drivers from the next section.
Downloads
Here are the files that you need to download in order to unbrick your OnePlus 7T.
- Qualcomm USB Drivers: This is the most important file, without it the entire process is null and void. The full name of this driver is Qualcomm HS-USB QDLoader 9008 Drivers. Download the drivers from below. This is the automatic installation setup files for the Qualcomm drivers.
- 32-bit version: QDLoader_HS-USB_Driver_32bit_Setup.exe | 64-bit version: QDLoader_HS-USB_Driver_64bit_Setup.exe
- There is also a Manual method for installing the Qualcomm HS-USB QDLoader 9008. if the automatic method fails n your case (which it shouldn’t as there is no reason for the same), then you could try the manual method. For that, download the Qualcomm-Driver.zip file.
- MSM Download Tool: We will be using this tool to bring your device back from dead. Download MSM Download Tool
- Stock ROM for your OnePlus 7T. Download it from below. Thanks to Some_Random_Username for the firmware files! It should work with HD1900 (Chinese variant), HD1901 (Indian variant) and 1905 (North America) models.
- HD65AA tools (International and Indian firmware):
- 10.0.4 HD65AA | 10.0.7 HD65AA (credits @viperbjk ) | 10.0.9 HD65AA
- HD65BA tools (European firmware):
- 10.0.4 HD65BA | 10.0.7 HD65BA (credits @viperbjk ) | 10.0.9 HD65BA
- HD65AA tools (International and Indian firmware):
- Whatever ROM you are downloading make sure to transfer it inside the folder where the MSM Tool is present. Otherwise, the tool wouldn’t be able to find the stock firmware file.
That’s it. These are all the files that you will be needing. Now follow the below steps to unbrick your OnePlus 7T device.
Instructions to Unbrick your OnePlus 7T
- Start by connecting your device to your PC via USB Cable.
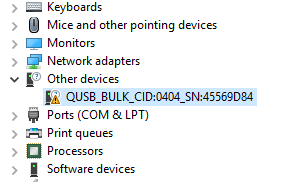
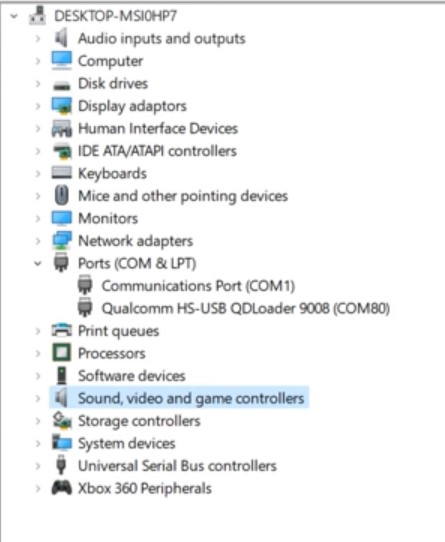
- Now search for Device Manager from the Start Menu. Head over to the Other Devices section. At that point in time, you should see your device listed something along the lines of QUSB_BULK_CID:0404 SN:45569D84.

- While the Serial number might differ for each one of you, the QUSB_BULK will be the same for all. At this stage, it signifies that the required drivers are missing.
- So go ahead and install the Qualcomm USB drivers on your PC.
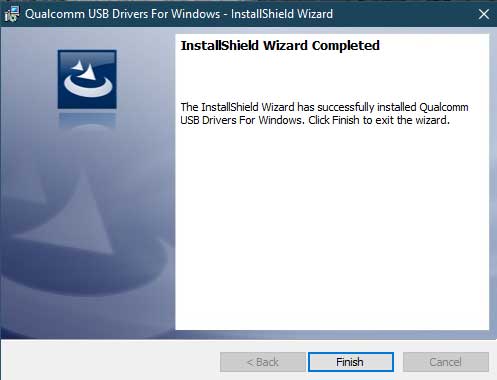
- If you downloaded the automatic setup, then simply launch the setup executable file and follow the on-screen instructions to complete the installation steps.
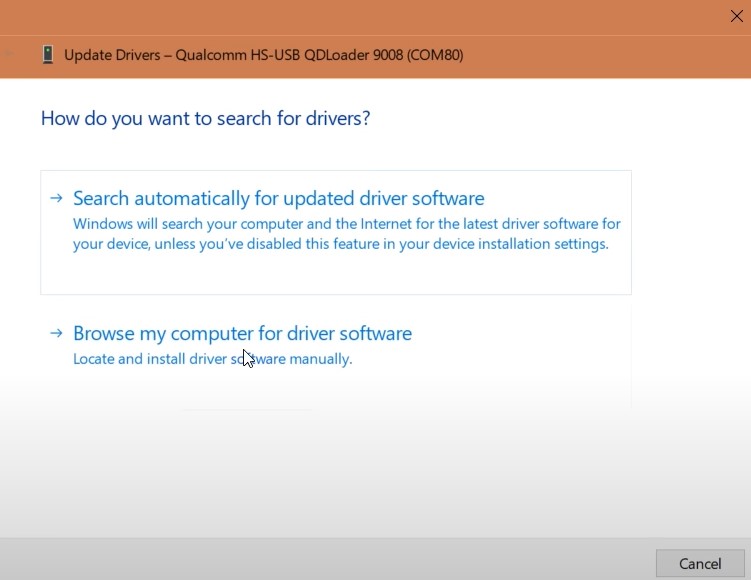
- On the other hand, if you have chosen the Manual method, then extract the content of the ZIP file and place it at a convenient location. Now right-click on QUSB_BULK_CID:0404 SN:45569D84 or similar name and select Update Drivers. Next up, select “Browse my computer for Driver Software” and browse to the location where you have extracted the Qualcomm Drivers ZIP file. Select it and hit OK.
- Once you have installed the Qualcomm USB Drivers, by any method, again head over to the Other Devices section, and this time, you should see Qualcomm HS-USB QDLoader 9008, rather than the earlier QUSB_BULK.
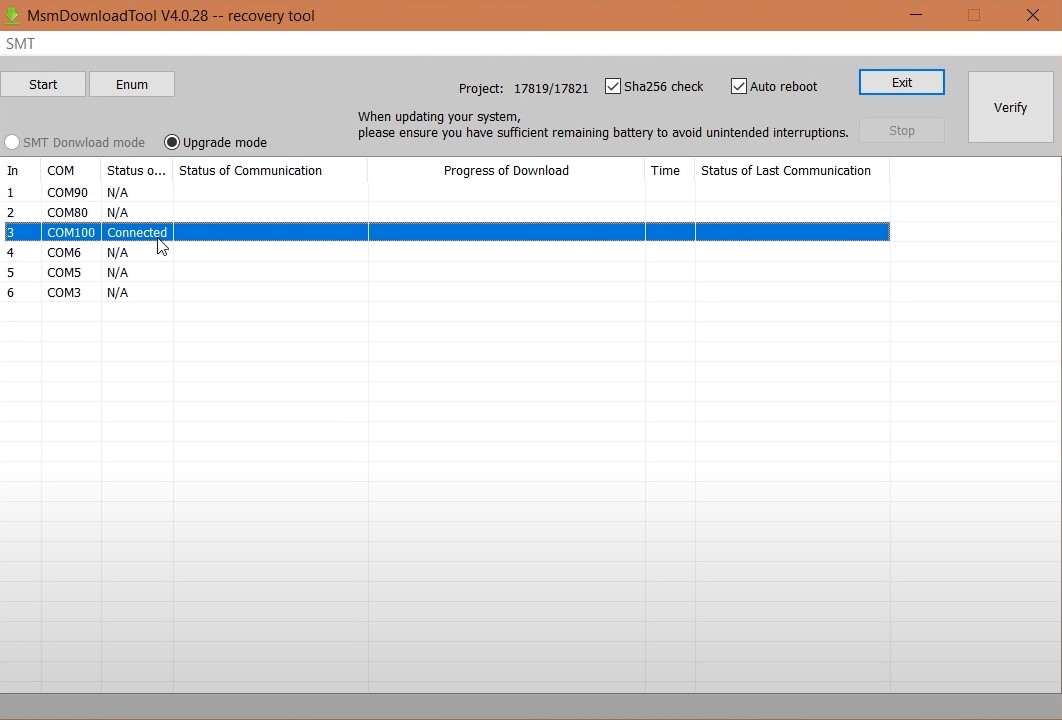
- Launch the MSM Download Tool as an administrator. Under the COM section of the application, you should see the COM keyword along with a number. In the Status section, it should show Connected.
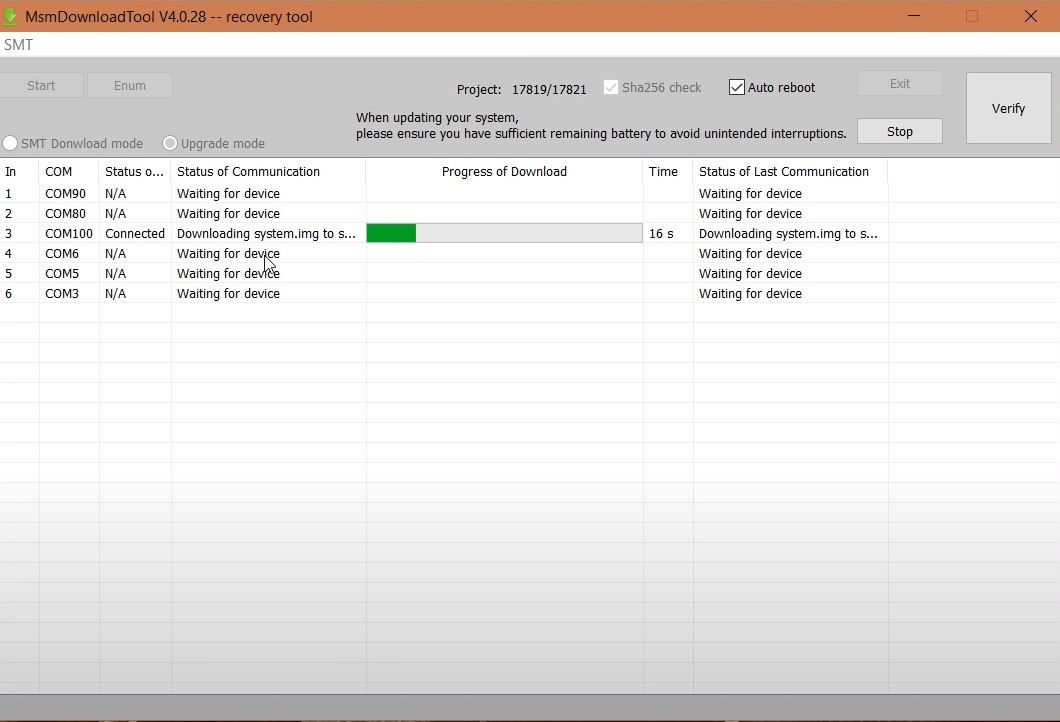
- Finally, hit the Start button and wait for the process to complete. Do not touch your device until the flashing process is going on.
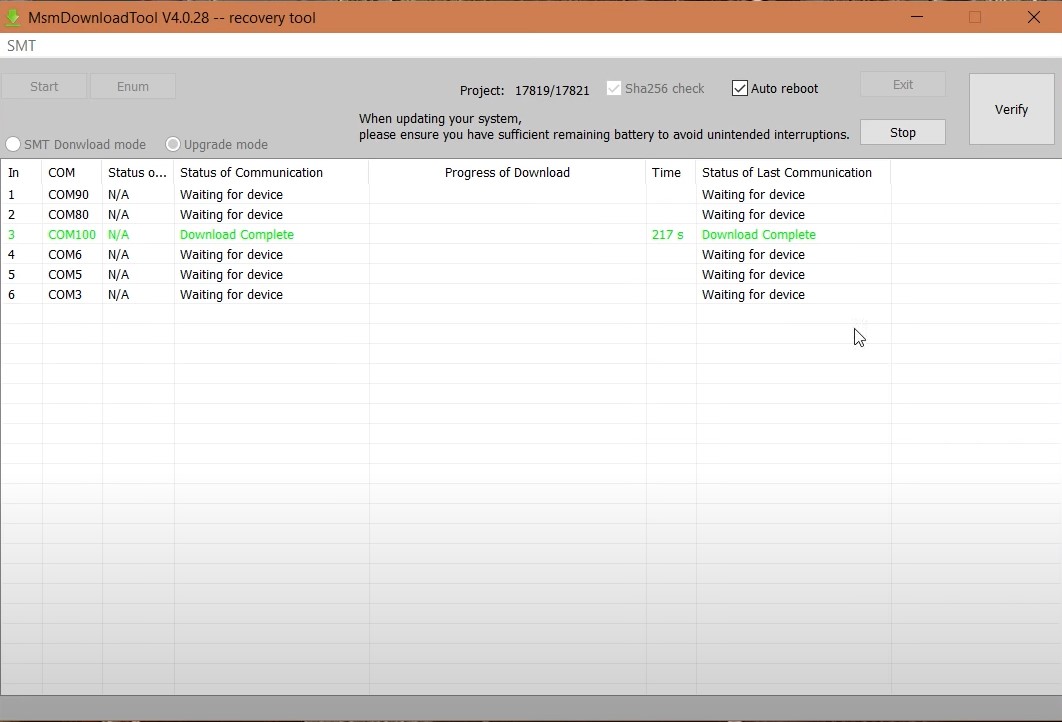
- When that is done, you should see the Download Complete message in green color. Furthermore, your device will now also reboot to Android OS. If it doesn’t you could do so yourself as well. Congrats, your device has just received a new lease of life!
Conclusion
With that, we conclude the guide on how to unbrick your OnePlus 7T and bring it back from dead. The steps might feel a little daunting at first, but just follow all the steps in the mentioned manner and it will be a cakewalk. On that note, we will like to your attention on the stock firmware file that we shared.
It might be belonging to an older date, but that is not an issue. Once your device boots, you will receive an OTA with the latest firmware. Simply install it right away. If you still have any doubts left, do drop in your queries in the comments section below, or or JOIN US ON TELEGRAM. We will get back to you with a solution. Likewise, here are some other root, recovery, and ROM articles that you should check out:


saad nadeem
sadique hassan bhai i have a major issue with my oneplus 7t it isnt showing in the other devices section please i have tried your every method but the device isnt showing plz can i get your contact details ? or can u gimme the solution here [email protected]
JOSE LUIS
Hola gracias, muchas gracias, creí que no podía recuperarlo ya, me daba error con la herramienta en un intento anterior y por mas que intentaba otros metodos nada. Y encontre este tutorial y funcionó de lujo. Cometia casi todos los errores descritos, pc con amd, usb 3.0 y win11 y al cambiar a otro pc funcionó.
Gracias por el aporte.
Atera
For me the trick was to change ports, preferably on you machine and not a hub. Thanks for the *Idiot proof guide.
Ghislaine Fernandes
Hello and thank you for your detailed post. I keep getting this error message firehose check rsp failed errno 258
Please let me know how I can fix this.
Thanks!
Michael Arkus
Sadique, I have tried this method a few times and I keep getting the error Param preload after 6 seconds. Is there a way to get around this error?
Thanks
Mike
[email protected]
Sadique Hassan
Apologies for the delay, Michael. I did an extensive result on this issue and found out a few tweaks that might help you out:
-Start the tool with Administrative privileges.
-Make sure you are using the tool that is built for your specific OnePlus model only.
-Also, it is recommended that you try these steps on Windows 10 PC
-Try changing ports and use the official USB cable.