In this guide, we will be providing detailed steps to patch a stock boot image file using Magisk and then to subsequently flash it via Fastboot commands. Thanks to the open-source nature of Android, there are a plethora of tweaks that you could try out. Once you have unlocked the device’s bootloader, the possibilities stand endless. From flashing custom ROMs such as Pixel Experience and AOSPs to replacing the stock recovery via TWRP, there is a lot to be achieved. Along the same lines, you could also root your device via Magisk.
Once rooted, you could then gain access to the system partition and carry out a plethora of tweaks. For example, you could install Substratum Themes, Xposed Frameworks, Magisk Modules. However, as far as rooting is concerned, it could be achieved via two different methods: via TWRP or without TWRP via the patched boot.img file. So before going on any further, let’s focus on the latter once it is going to be the crux of this article. [Update 1: Added a Fix for Android 11 Boot.img patch issues].
- How to Root Pixel 4, 4A, 4A XL running Android 11 without TWRP
- Update Magisk ZIP and Magisk Manager (without TWRP)
- How to Install OxygenOS OTA on Rooted OnePlus devices
- How to Root All Vivo Devices via Magisk without TWRP
Table of Contents
Why Root using Patched Boot.Img file
There exist two different methods to root any Android device. In the first one, you just have to flash the Magisk Installer ZIP file via TWRP and your device stands rooted. However, the next method calls for extracting the stock boot.img file from the stock firmware. Nowadays these stock ROMs themselves come in payload.bin or OZIP format. As a result, you will first have to decrypt this firmware packaged and then get hold of the stock boot.img. After this, you will have to patch this boot.img via Magisk.
This will in turn give you a patched boot.img file. Finally, you will have to flash this patched boot.img file Fastboot to gain root access. So all this begs for an important question- why choose this longer root method? Well, the thing there do exists many Android devices that don’t have a working TWRP build. And for them, this is the sole method to root their device. So with that said, let’s now get on with the guide to Patch Stock Boot Image via Magisk and Flash it using Fastboot.
- How to Fix TWRP Error 70 [With Screenshots]
- How to Fix TWRP Error 20 GApps after flashing LineageOS
- Fix TWRP Error 7 (While Flashing Custom ROM via TWRP)
- How to Boot into Recovery (TWRP/Stock) from Fastboot Mode
Patch Stock Boot Image via Magisk | Flash it via Fastboot
Before we list out the instructions, there are a few requirements and downloads that you need to check-mark. Make sure to go through them and then only proceed with the instructions. Droidwin and its members wouldn’t be held responsible in case of a thermonuclear war, your alarm doesn’t wake you up, or if anything happens to your device and data by performing the below steps.
Prerequisites
- Make a complete backup of all your data. While creating a patched boot.img file or flashing it via Fastboot doesn’t wipe the data partition, but it is still advisable to be on the safer side and take a backup beforehand.
- Next up, it goes without saying that you need to unlock the bootloader on your device. You may also refer to our guide on how to Unlock the Bootloader of Android Devices.
- Also, download and install Android SDK Platform Tools on your PC. This will provide you with the necessary ADB and Fastboot binaries.
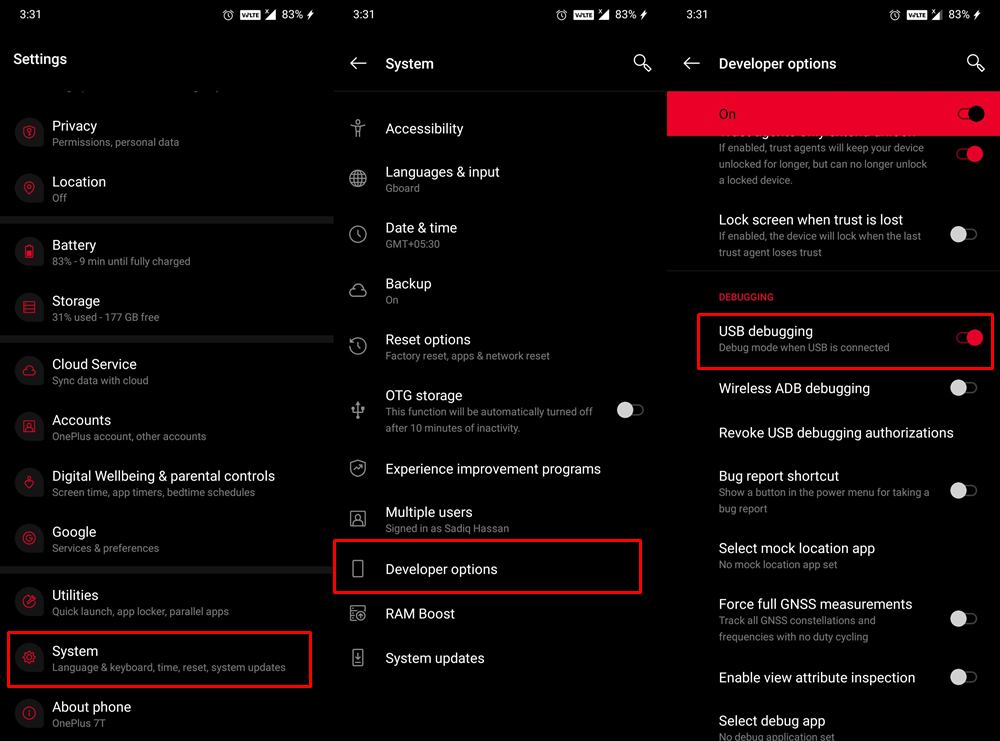
- Finally, enable USB Debugging on your device. This will be needed so that your device gets recognized by the PC in ADB Mode. This ADB Mode will be used later on to boot your device to Fastboot Mode. Hence go to ‘Settings’ > ‘About Phone’ > Tap on the ‘Build Number’ 7 times > Go back to ‘Settings’ > ‘Developer Options’ > Toggle on the ‘USB Debugging’. [Don’t Miss: How to Enable USB Debugging on a Broken Android Device’s Screen? ]

Downloads
- Download the latest Magisk Manager APK File. Since version 22, it is known as the Magisk App and comes bundled in with both the Magisk ZIP and Magisk APK.
- Then download the stock ROM for your device. You could get it from the respective OEMs website support or download section. We will explain in the next section how to get hold of the stock boot.img file from the stock ROM.
- NOTE: You could also get the stock boot.img file directly from your device, without even downloading the entire firmware. The only major prerequisite is that your device needs to have the TWRP Recovery installed (or ready for one-time boot). If you have it, then do check out our guide: Extract Boot.img Directly from Device Without Downloading Firmware.
Check for Ramdisk
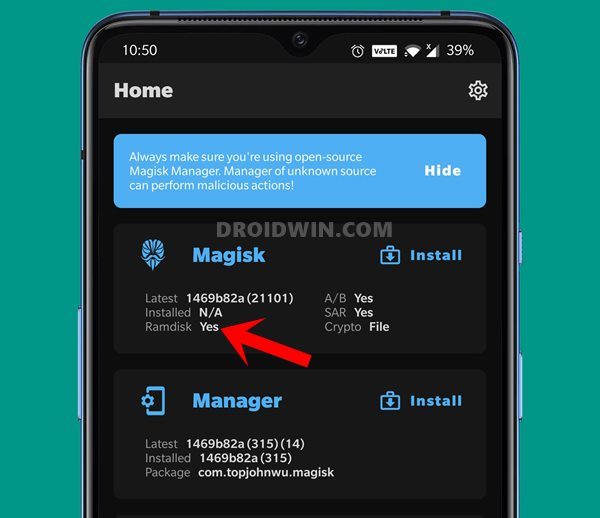
You would only be able to proceed with the below steps if your device has Ramdisk. To check for the same, launch the Magisk App, and refer to the section under Magisk. if it says, YES (see below image), you are good to proceed ahead with the below steps. However, if it says NO under Ramdisk, then the below steps wouldn’t work. In that case, you will have to refer to our other guide: Install Magisk in Recovery and Root Android [No Ramdisk].
That’s it. You may now proceed with the steps to Patch the Stock Boot Image via Magisk and Flash it using Fastboot.
STEP 1: Get Stock Boot.img File from Stock ROM
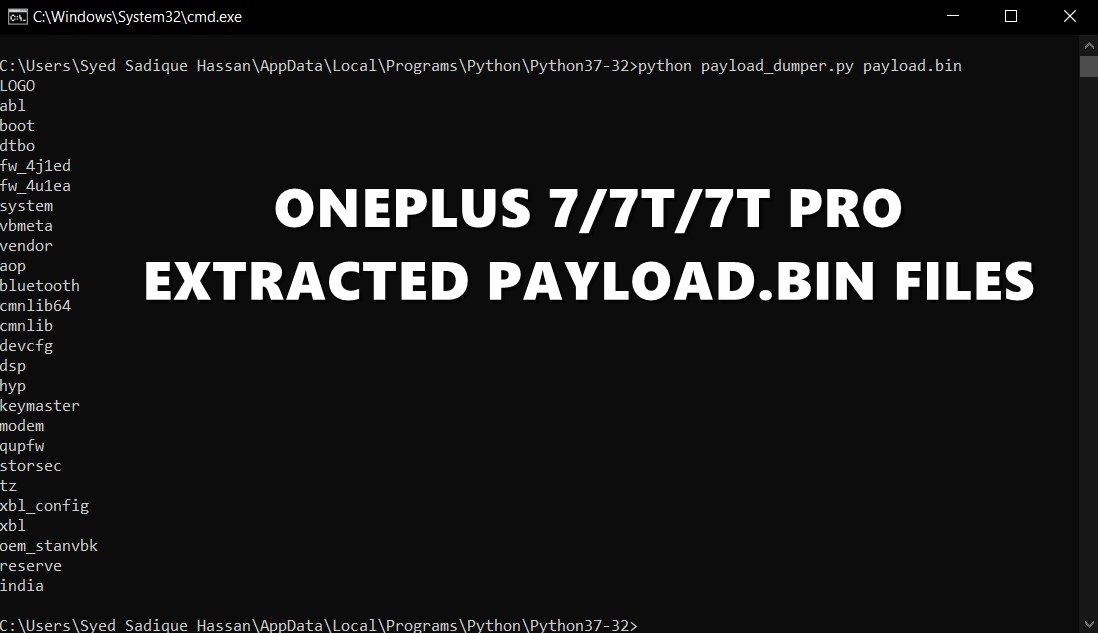
To begin with, you will have to extract the stock boot.img file. And as opposed to earlier times, the process is a little bit more complicated nowadays. You cannot simply extract the firmware and get the required partition files (such as vbmeta.img, system.img, boot.img, etc). The reason is that many OEMs packs the ROM’s IMG files inside an encrypted package. For example, OnePlus has these files inside payload.bin, Realme, and Oppo have their files inside the OZIP format, and so on. In that case, you may refer to our below guides to get the stock boot.img file:
- Extract payload.bin and get the stock boot image file
- How to Extract OZIP Realme/Oppo Stock ROM (Firmware)
- Extract Stock Boot.img from OnePlus OxygenOS Stock ROM
- How to Extract Sony Boot.sin and get the Stock Boot.img File
- How to Extract Boot.img from LG KDZ or DZ Firmware.
Now that you have got hold of the stock boot image file, it’s time to patch it via Magisk and flash it via Fastboot Commands. We have listed the steps for both the older as well as the newer build of Magisk Manager. As far as the difference between them goes, it’s just some UI tweaks here and there, the underlying functionality remains the same.
UPDATE 1: Quite a few Android 11 users are facing issues while patching the stock boot.img file via Magisk manager. Well, I have found the fix to this issue, please refer to our detailed guide on the same: Fix Magisk patched boot.img issue while Rooting Android 11. If you wish to save a click, then here’s the explanation in short:
You have to install the Magisk Canary build instead of the stable and then change the update channel to Canary from within the app itself. Once you have done the said change, you may then proceed with the below steps to patch the stock boot image file using Magisk and flash it via Fastboot commands.
STEP 2A- Patch the Stock Boot Image File using Older Magisk
- Download the stock firmware for your device.
- Extract the boot.img file from it.
- Transfer it to the device’s internal storage.
- Install the Magisk Manager App on your device.
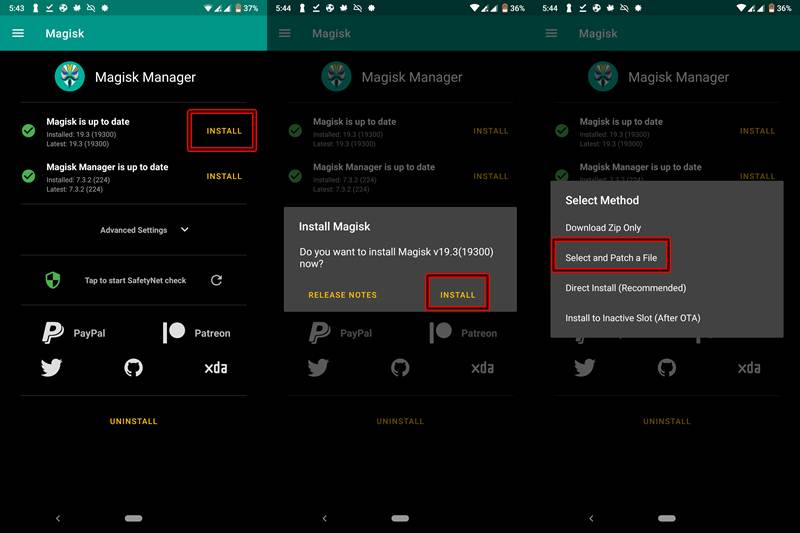
- Open it. Tap on the first ‘Install‘ button, next to Magisk status.
- In the next menu, again chose ‘Install‘.
- Now select ‘Select and Patch a File‘.
- Navigate to internal storage and select the stock boot.img file that you extracted earlier.
- Let Magisk do the patching process. When it’s done, copy this patched boot.img file, named as magisk_patched.img, from your device (will be present under Internal Storage > Downloads) to PC where you have installed the ADB and Fastboot Tools (inside the platform-tools folder).
- How to Update Magisk ZIP and Magisk Manager (without TWRP)
- Disable DM-Verity or Android Verified Boot without TWRP
- Fix Magisk Module Bootloop without TWRP Recovery
- How to Root Android Devices Without TWRP Recovery
STEP 2B: Patch Stock Boot Image File using Newer Magisk
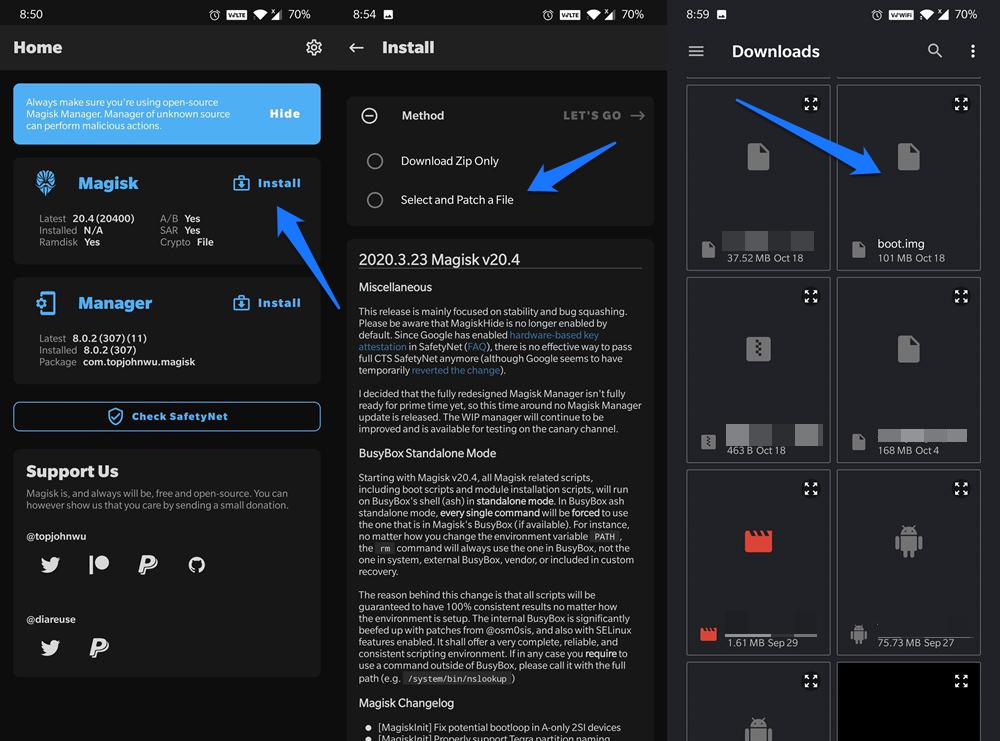
- Launch the Magisk Manager app on your device.
- Then tap on the Install button situated next to Magisk.
- From the Method section, choose Select and Patch a file.
- Browse to the extracted boot.img file and select it.
- Then tap on the Let’s Go option situated at the top right.
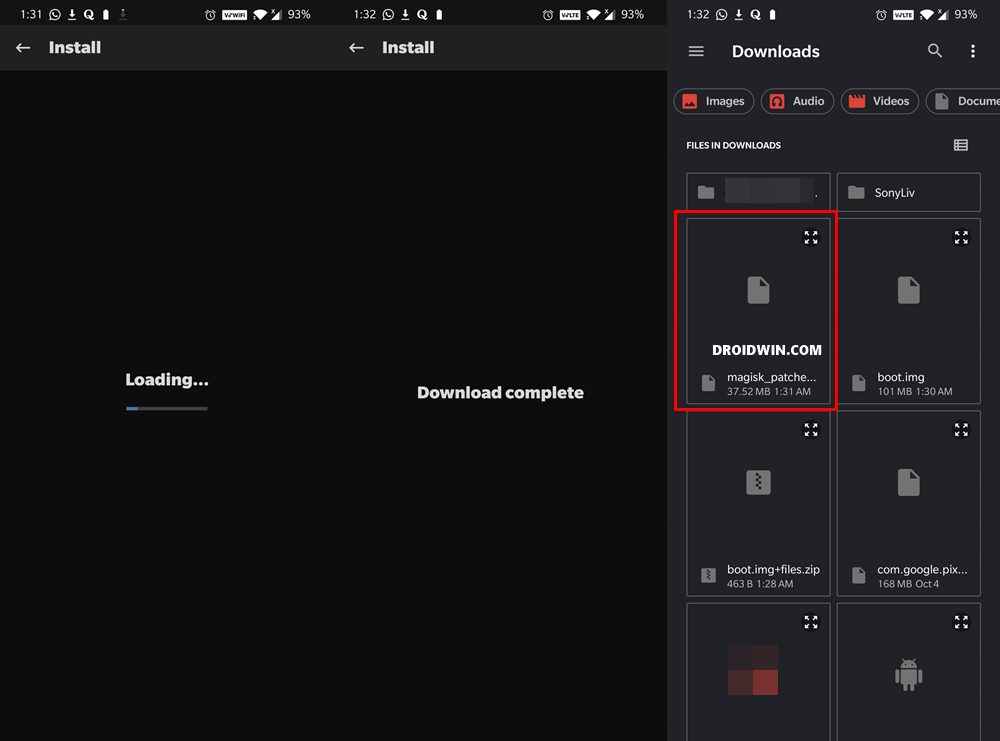
- Magisk will now load the boot.img file and will patch it accordingly. Once that is done, you would get the Download Complete message.
- The patched boot image file will be saved in Internal Storage > Downloads. The name of the file will be magisk_patched.img
STEP 3- Install the Patched Boot Image using Fastboot
Now that you have created the patched boot image file via Magisk, it’s time to flash it via Fastboot Commands. Follow along
- Connect the device to the PC via USB Cable.
- Now transfer the patched boot file from your device to the platform-tools folder on your PC.
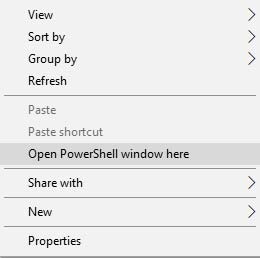
- Inside the same folder, right-click on an empty area while pressing the ‘Shift’ key.
- Select the option ‘Open PowerShell window here’.
- Or you could also head over to the platform-tools folder on your PC, type in CMD in the address bar, and hit Enter. This will launch the Command Prompt.
- Type in the below code to make sure the device is successfully connected (an alpha-numeric code suggests successful connection):
adb devices
- Now type in the below code to boot your device to fastboot/bootloader mode:
adb reboot bootloader
- Next, type the below code to flash the patched boot image file:
fastboot flash boot magisk_patched.img
- For devices with A/B partition, you need to flash the patched boot file to both partitions. Type the below code for the same:
fastboot flash boot_a magisk_patched.img

fastboot flash boot_b magisk_patched.img
- Now you may Reboot the device by typing the below code:
fastboot reboot

That’s it. You have successfully rooted your device. When the device reboots, you could open the Magisk Manager app and confirm that the installation is successful. With the device now rooted, try tweaking your device by editing the build.prop file, optimize the device’s battery by the Greenify app or manage your kernel via the Kernel Aduitor. There are countless other things you could do. Explore the endless possibilities. So this was the detailed guide on how to Patch Stock Boot Image and Flash it on Android Devices. If you face any error, do mention it in the comments section below. We will get back to you with a solution at the earliest.


Hitanshu Gaur
C:\Program Files\Android\platform-tools>fastboot flash boot magisk_patched.img
Sending ‘boot_b’ (40960 KB) OKAY [ 0.976s]
Writing ‘boot_b’ FAILED (remote: ‘not allowed in locked state’)
fastboot: error: Command failed
I am using ulefone power armour 18t
Hitanshu Gaur
This is the stock ROM of my phone:-
https://drive.google.com/file/d/1aq8f–ruq7Jf7rlKZGnd_eUeUGpSfJUD/view
Please help!
Hitanshu Gaur
Bro how can 2 patched files have the same name…. from the older magisk it had a code in the end and from the updated magisk one also had a different code in the end. In the instructions you’ve asked to ‘copy’ the old image file to the folder; should we copy it or cut paste it? and then should we rename the new magisk version patched file to magisk_patched.img?
The patched file from the older version would be in the platform tools folder and from the new version the patched file will be in the internal memory. Wouldn’t it clash while rooting due to the 2 patched files being from 2 different versions?
If you could make the instructions a bit more specific it’d solve the bootloop problem as well, coz that error is due to having too many files named magisk_patched.img and the system is unable to figure out which one is the appropriate one to use for rooting.
If you could amend the instructions to more specific one it’d help a long way man 🙂
Hamid
I’m getting the error:
FAILED (remote: Command not allowed)
Abhishek Singh
Sir Plzz help me after root video is not playing in my device because i patch wrong boot img kya me firse stock rom ka jo boot img hota hai use flash kar sakta hu plzz bataiye sir
Labear
MotoG7 w/ LineageOS19.1, both TWRP & Magisk previously (before OS19.1 upgrade) flashed, though not sure when I began to experience issues with TWRP opening the Sideload port and/or performing Backups….all since upgrading from OS18.1 to 19.1
Anyhow, this patch I was hoping would resolve my initial issues w/ TWRP.
The boot.img file extraction turned into about 23mb img file. I was able to load that into recently updated Magisk v24. Then upon flashing the same file to both boot-a & boot-b, and even if I tried just the boot (only, not a or b);
Everytime I get (bootloader) is-logical: boot_a: not found (or boot_b when I attempted to flash boot-b)
So I figured my efforts failed. Though when I open Magisk on my device (MotoG7) the “Magisk” section at the top of the app home display says “Installed : 4737c511 (25202). This was not there before I flashed it and this agrees with the “APP” section just below in same app home display.
So I guess the flashing worked???
I was also allowed this time to enable Zygisk, and after rebooting, even that now says its active.
So whats up – did I fix the patching issue?
For the hell of it I did try opening the TWRP by rebooting device into Recovery.
I did not get the TWRP application this timer.
Hmmm, now I’m confused.
Do I now need to re-flash TWRP and create a ramdisk again?
Crazy stuff – I feel like I’m going in circles, since all I wanted was a reasonable backup system when I started this 50 hours of screwing around.
Anyone – HELP !
Thank you!
NotImpressed
Fail, adb/fastboot doesn’t work so Magisk is pointless. I can make the patched file, but can’t flash it. Twrp is installed, this method is just trash af. I have followed the directions as described to the letter substituting the file names as required appropriately.
fastboot devices
That command sees nothing. Yes, the phone is in usb debug mode, bootloader is unlocked, verification is turned off.
Samsung Grand Prime SM-G530W with Fido Android 5.1.1 stock rom.
There has to be a better way than this trash approach.
alan
After installing the magisk_patched.img, do I have to continue using the magisk manager canary or can I install the stable version?
ethan allen allen
well i thought i had a winner but….
I got almost thru everything but the lg fastboot just can not write over the boot partition.
i even tried the boot_a partition.
On my PC I have to preface all fastroot commands with ./ when i use power shell., and i renamed the patched file mpatched.img.
So here is what i got on errors:
PS D:\androidsdk> ./fastboot flash boot mpatched.img
Sending ‘boot’ (32029 KB) OKAY [ 1.303s]
Writing ‘boot’ FAILED (remote: ‘unknown command’)
fastboot: error: Command failed
PS D:\androidsdk> ./fastboot flash boot_a mpatched.img
Sending ‘boot_a’ (32029 KB) OKAY [ 1.272s]
Writing ‘boot_a’ FAILED (remote: ‘unknown command’)
fastboot: error: Command failed
PS D:\androidsdk>
*** Any idea why LG hides the boot (or boot_a) partition, and where we nead to flash the image so it works??? **
ethan allen allen
So far so good. Had a bad moment when i found out that at least on my gl g5 h83030c. you can not eve SEE img files in download from the PC. Weird… Trying to do anyting with the magisk created boot image gives error of file type not suported. But it was easy enough to just copy it to the ‘internal data’ folder where the PC could see it and copy it.
Daniel
Hi,
I have a Sony Xperia XZ2 Compact mobile phone. I am using 22.1 version of Magisk. I have unlocked the bootloader, extracted the boot image and putted it into the phone. I have patched the boot file on my phone and tried to flash it back with the command:
fastboot flash boot_a magisk_patched.img
fastboot flash boot_b magisk_patched.img
But I cannot see the options for the modules and superuser. It says that Magisk is not installed on the phone.
Any idea why it does not work?
Thank you.
Sadique Hassan
After executing the two commands that you had listed, did you get any error messages in the CMD window? Furthermore, you could also try using the fastboot flash boot magisk_patched.img command.
Ioannis
I’d like to do the opposite but I can’t find a way. The device (tv box) has preinstalled patched magisk boot image or something and it won’t let me use newer versions of Magisk or completely unroot the device.
Peter
Hi, how do i extract boot.img on tecno ke5 spark go 2020
ZxRistos
Hey, when i type adb reboot bootloader my device just restarts and when i type fastboot flash boot magisk_patched.img it says waiting for any device
ZxRistos
When i type adb reboot bootloader it just restarts my device and also when i type fastboot flash boot magisk_patched.img it says wating for device
Remo
i have the same issue on Oppo A15.
would love some help.
Bagiarta
Hi friend,,,
every time i flash with command: fastboot flash boot magisk_patched.img i get this massage “error: cannot load ‘magisk_patched.img’: No such file or directory”
please help me (my phone is oneplus X)
Sadique Hassan
Hi Bagiarta, you need to place the magisk_patched boot.img file inside the platform tool folder and the CMD window should also be opened in the same platform-tools folder. Then execute the desired command and it should work.
Stefamo
Hi , i have a redmi note 8 pro and After flashing i had a bootloop. I flashed the original boot for fix but still no root. Did i have to do something with vbmeta.img?
Ahmad
hello .. i am working on infinix X655C device
flashed final software “Genuine Software”
ADB Enabled
OEM Unlocked
Magisk is installed
patched boot.img via magisk
patched boot.img copied to new folder on pc
flashed it with CMD via fastboot to the device
but now device went into neverending boot loop I believe the device is not yet supported I would like to know if my device is supported that’s all and if its not please reply … thank you
Peter Bergonzi
Thank you for your very clear and useful guides.
Yassin
Hi friend, thank you for the tutorial.
I’m currently trying a lot of things to root my 7T on 11OxyOs, most tutorials adress the global version and I can’t find any european magisk boot patched file. So I tried to patch it with my magisk manager, and once I boot it I just freeze on fastboot mode.
I even tried your tip of booting A and B, it still doesn’t work.
Hopefully I everytime I fail I can still boot the stock boot.img but I would love to root this phone.
Any idea ?
Thank you in advance
Sadique Hassan
Hi Yassin, so did you tried patching and flashing global boot.img onto your European one? If you did that, then unfortunately it wouldn’t give you any success. But if you picked the European boot.img, then please double-check and make sure that you are extracting the boot.img from the same firmware that is currently installed onto your device (refer to the device’s Build Number)
Steve Fox
Does it matter if it’s the factory or OTA boot image?
Sadique Hassan
Hi Steve, it is always recommended to extract the stock boot.img from the stock firmware and not incremental OTAs
Steve Fox
Weird, previous comment seems to have disappeared
On Pixel 3, I patched boot img with OTA modified boot img ( magisk_patched_OwbsU.img ), now phone won’t boot at all, responds with error boot prepare in fastboot screen. Won’t shut off, no options work. Phone appears to be bricked… Please advise.
Sadique Hassan
Hi Steve, this guide should help you out: Fix error boot prepare- device stuck in fastboot (Pixel devices)