In this guide, we will show you two different methods (ADB Sideload and Install from SD Card) to manually install the One UI 4.0 Beta update (based on Android 12) onto your Samsung device. The latest iteration of Android has just made its way and various OEMs have already started their beta testing as well. In this regard, the flagships from Samsung have got a first taste of the latest OS builds. Dubbed the OneUI 4.0, the Galaxy S20 and S21 series, the Note 10 series, and the latest Flip/Fold are the first in line to get hold of it.
In this regard, those of you who have joined the beta program or live in the region where this program is supported would have already received got a first-hand impression. However, there are a plethora of users who aren’t a part of this program- maybe because they missed the timeline to join the beta testers group or by the time they tried to enroll, it was already full. Likewise, for others, it wasn’t yet available in their country. Some have even changed the device’s CSC code to a supported region but didn’t get the OTA.
Well, there could be quite a few reasons why you might not have got the beta OTA. But the good news is that you could still welcome the latest OS build onto your device. You just need to download that OTA file (whose download link we have provided here) and then flash it onto your device via any of two methods- ADB Sideload or Install from SD Card. And in this guide, we will be explaining both these methods in detail. So without further ado, here are the steps to manually install One UI 4.0 Beta Android 12 onto your Samsung device.
Table of Contents
How to Manually Install One UI 4.0 Beta Android 12 on Samsung
There are a few important points that you need to keep in mind before proceeding with the instructions steps.
- First off, when you sideload the Beta updates, then you wouldn’t receive automatic OTAs. You will have to manually install the new Beta update as and when they get available.
- If there’s a change in plan and you wish to revert to the automatic OTA updates, then either downgrade to One UI 3.0 or flash the One UI 4.0 stable update (when available) via Odin.
- Furthermore, these steps are only for Beta updates, for stable, you should still use the Odin Tool.
- Likewise, you shouldn’t skip any beta update cycle. For example, if you are currently on OneUI 3.0 stable, then you have to follow the order of One UI 4.0 Beta 1, then Beta 2, then Beta 3 and so on.
- Droidwin and its members wouldn’t be held responsible in case of a thermonuclear war, your alarm doesn’t wake you up, or if anything happens to your device and data by performing the below steps.
If that’s all well and good, then let’s get started with the steps to manually install One UI 4.0 Beta Android 12 onto your Samsung device.
Method 1: Install One UI 4.0 Beta Android 12 via ADB Sideload
The below instructions are listed under separate sections for ease of understanding. Make sure to follow in the exact same sequence as mentioned.
STEP 1: Install Android SDK

First and foremost, you will have to install the Android SDK Platform Tools on your PC. This is the official ADB and Fastboot binary provided by Google and is the only recommended one. So download it and then extract it to any convenient location on your PC. Doing so will give you the platform-tools folder, which will be used throughout this guide.
STEP 2: Enable USB Debugging on Samsung
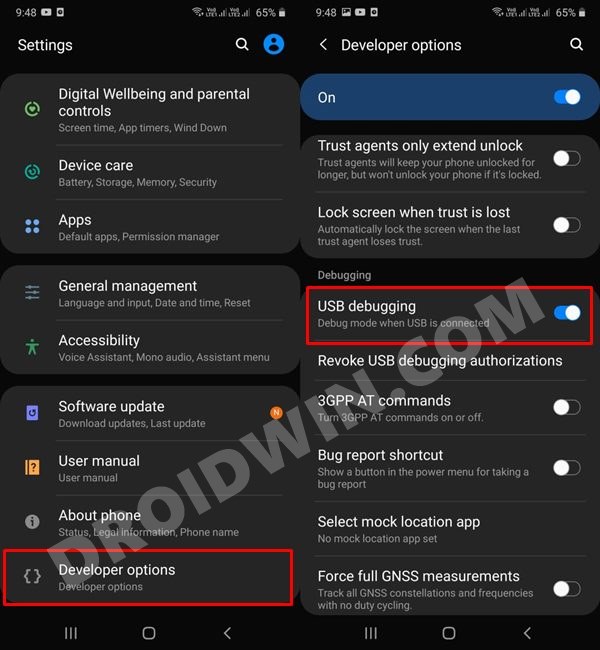
Next up, you will have to enable USB Debugging on your device so that your device is recognizable by the PC in ADB mode. This will then allow you to boot your device to Recovery Mode. So head over to Settings > About Phone > Tap on Build Number 7 times > Go back to Settings > System > Advanced > Developer Options > Enable USB Debugging.
STEP 3: Download OneUI 4.0 Beta OTA File
- First and foremost, you will have to download the OneUI4.0 Android 12 Beta file corresponding to your device/region/chipset (Snapdragon or Exynos). So please refer to our detailed guide on OTA Download Link for Samsung One UI 4.0 Android 12 Beta.
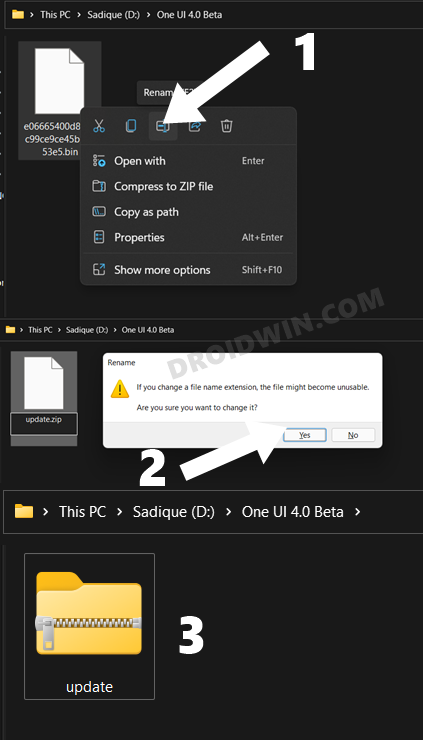
- Once you have downloaded the firmware, it will be something along the lines of xyz.BIN format. Name it ‘update’ and change its extension to ZIP, so that the complete name becomes update.zip.

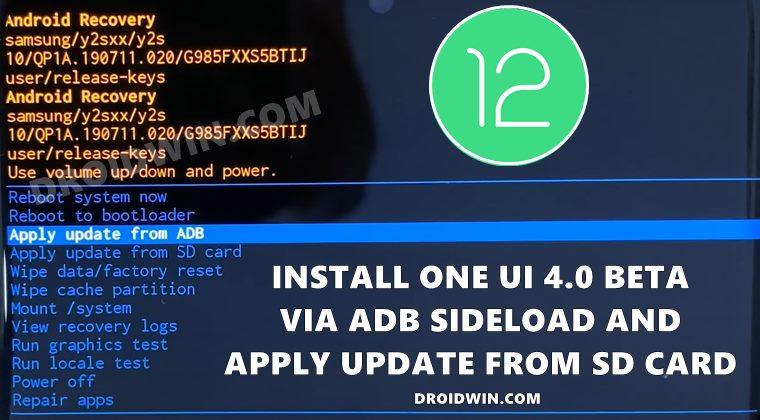
STEP 4: Boot Samsung to Stock Recovery
- Connect your device to the PC via USB cable. Make sure USB Debugging is enabled.
- Then head over to the platform-tools folder, type in CMD in the address bar, and hit Enter. This will launch the Command Prompt.
- Now type in the following command in the CMD window to boot your device to Recovery Mode
adb reboot recovery

STEP 5: Install One UI 4.0 Beta Android 12 via ADB Sideload
- First off, transfer the update.zip file to the platform-tools folder on your PC.
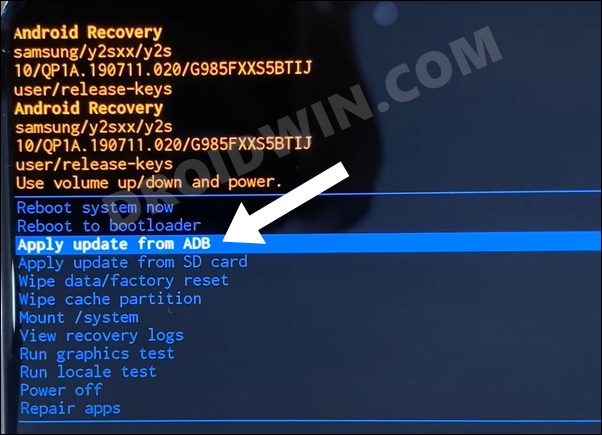
- Now with your device booted to Recovery Mode, use the Volume keys to highlight the “Update via ADB” option and press the Power key to confirm it.
- Finally, execute the below command in the Command Prompt that you have opened inside the platform-tools folder
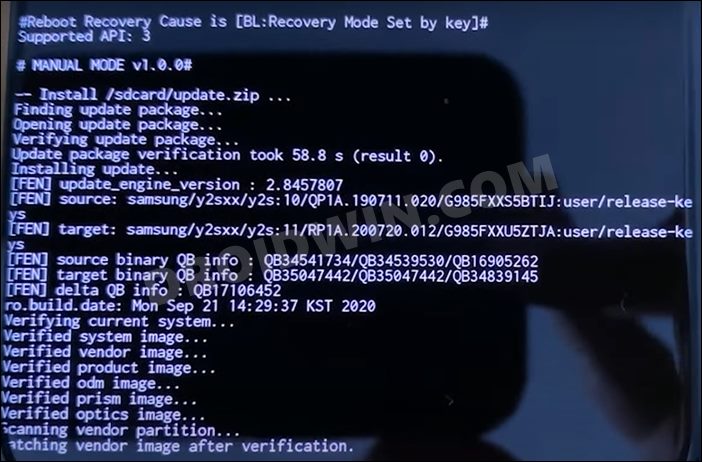
adb sideload update.zip
- The OneUI 4.0 Beta file will now begin flashing onto your device and could take a couple of minutes.
- Once done, you may use the below command to boot your device to the newly upgraded OS
adb reboot
That’s it. These were the steps to manually install the One UI 4.0 Beta update (based on Android 12) onto your Samsung device via the ADB Sideload method. Let’s now check how the same could be carried out via the Apply from SD Card method.
Method 2: Install One UI 4.0 Beta Android 12 via Apply from SD Card
The below instructions are listed under separate sections for ease of understanding. Make sure to follow in the exact same sequence as mentioned.
STEP 1: Install Android SDK
First and foremost, you will have to install the Android SDK Platform Tools on your PC. This is the official ADB and Fastboot binary provided by Google and is the only recommended one. So download it and then extract it to any convenient location on your PC. Doing so will give you the platform-tools folder, which will be used throughout this guide.
STEP 2: Enable USB Debugging on Samsung
Next up, you will have to enable USB Debugging on your device so that your device is recognizable by the PC in ADB mode. This will then allow you to boot your device to Recovery Mode. So head over to Settings > About Phone > Tap on Build Number 7 times > Go back to Settings > System > Advanced > Developer Options > Enable USB Debugging.

STEP 3: Download OneUI 4.0 Beta OTA File
- First and foremost, you will have to download the OneUI4.0 Android 12 Beta file corresponding to your device/region/chipset (Snapdragon or Exynos). So please refer to our detailed guide on OTA Download Link for Samsung One UI 4.0 Android 12 Beta.
- Once you have downloaded the firmware, it will be something along the lines of xyz.BIN format.
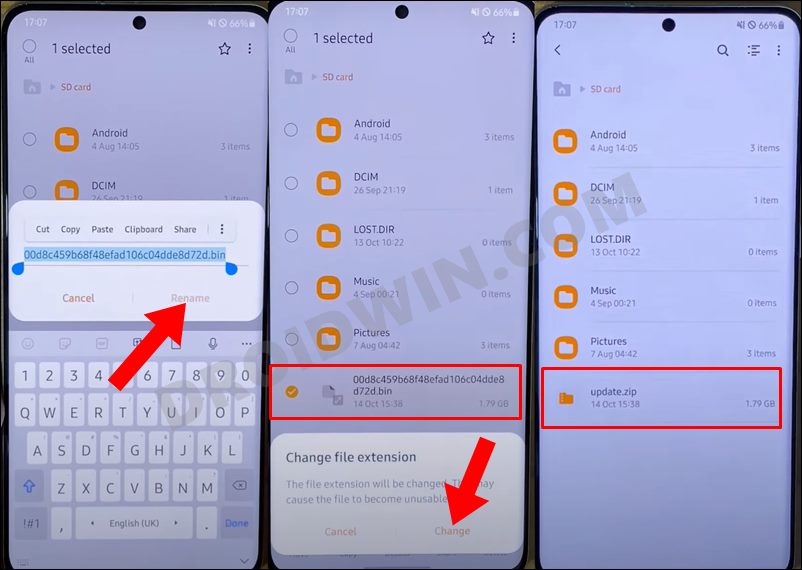
- So transfer this update.zip file to your device’s Internal Storage, but not inside any folder.
- Name it ‘update’ and change its extension to ZIP, so that the complete name becomes update.zip.
STEP 4: Boot Samsung to Stock Recovery
- Connect your device to the PC via USB cable. Make sure USB Debugging is enabled.
- Then head over to the platform-tools folder, type in CMD in the address bar, and hit Enter. This will launch the Command Prompt.
- Now type in the following command in the CMD window to boot your device to Recovery Mode
adb reboot recovery
STEP 5: Install One UI 4.0 Beta Android 12 via Apply from SD Card
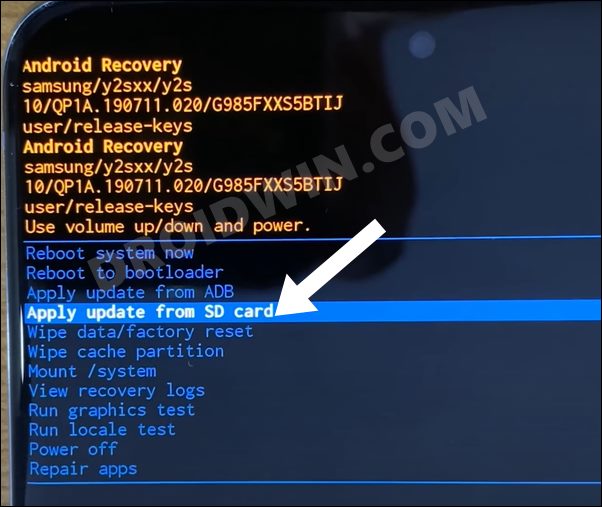
- With your device booted to Recovery Mode, use the Volume keys to highlight the “Apply from SD Card” option and press the Power key to confirm it.
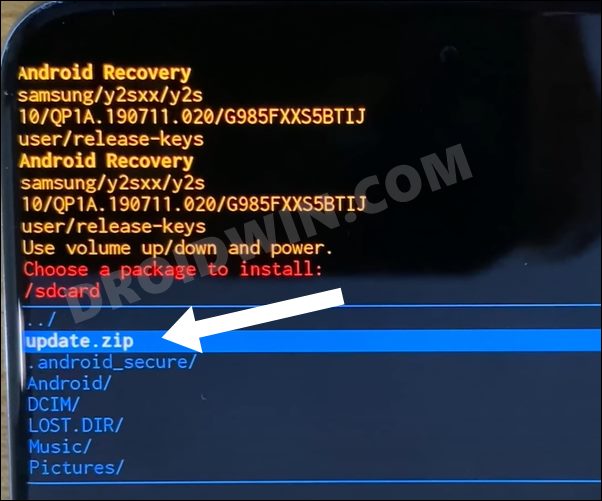
- Now use the Volume Keys to select the update.zip file and press the Power key to select it.
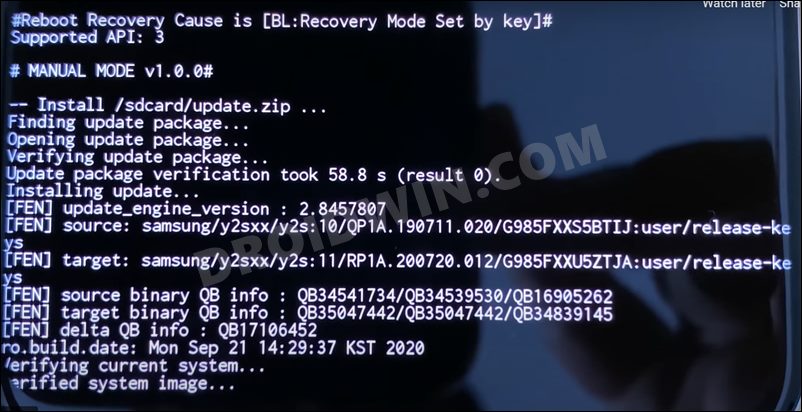
- The OneUI 4.0 Beta flashing will now start and could take a few minutes.
- Once done, your device will automatically boot to the newly upgraded OS.
So with this, we conclude the guide on how you could manually install the One UI 4.0 Beta update based on Android 12 onto your Samsung device. We have listed two different methods for the same, you could refer to the one that you find more comfortable to deal with. Rounding off, if you have any queries concerning the aforementioned steps, do let us know in the comments. We will get back to you with a solution at the earliest.