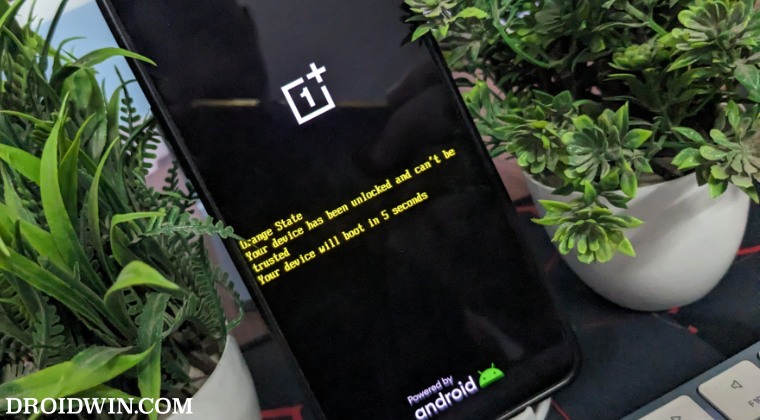
In this guide, we will show you various methods to remove the Orange State Warning on your OnePlus device. Beginning with OxygenOS 13, if your device’s bootloader is unlocked and it is rooted via Magisk, then you will get a warning message every time your device boots up. While it wouldn’t lead to any issues as such but it would surely lead to a delay in the normal boot-up process.
Moreover, no one likes a warning prompt on their device before it boots to the OS. While both the Orange and Red State Warnings are nothing new and have been present on MediaTek devices for ages, however, it is the first time that we are witnessing this on OnePlus phones. So we performed a few tests on the OnePlus 9 Pro and found that this warning wasn’t present in the last Android 12 firmware [F11] and only came into existence after the first Android 13 update [F16].
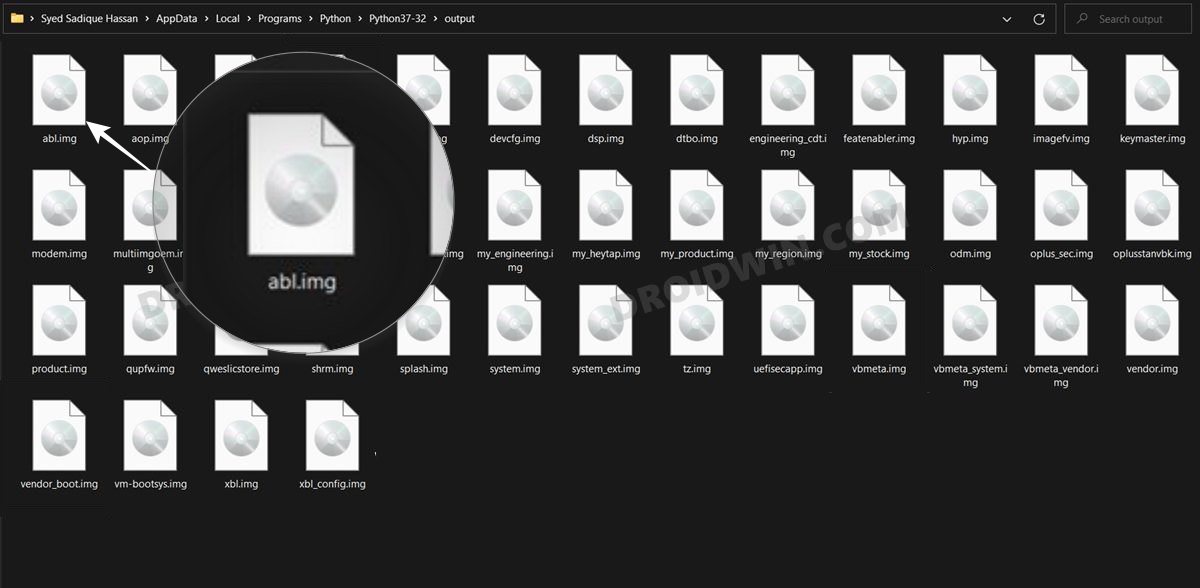
So to rectify it, we flashed the F11 firmware’s abl.img file [that houses the bootloader information] onto the latest F16 firmware [at the time of writing, for OnePlus 9 series] along with a few tweaks and the warning message disappeared. Making use of the same tweak, this guide will show you the steps to remove the Orange State Warning message on your OnePlus device. Follow along.
Table of Contents
How to Remove Orange State Warning on OnePlus
Droidwin and its members wouldn’t be held responsible in case of a thermonuclear war, your alarm doesn’t wake you up, or if anything happens to your device and data by performing the below steps.
METHOD 1: Flash Firmware
The easiest and the most recommended method is to simply flash the firmware. The firmware comes built-in with the modified abl.img file and upon flashing it, the Orange State will be removed from your device. The only caveat is the fact that it is only for OnePlus devices. If you own one, then refer to our detailed guide on How to Flash OxygenOS Firmware on any OnePlus [Video]
METHOD 2: Using Firmware ABL file
- To begin with, make sure that your device is rooted via Magisk.
- Then download the F11 firmware and extract its payload.bin.

- Now copy the abl.img from the extracted firmware and send it to your device [not inside any folder].
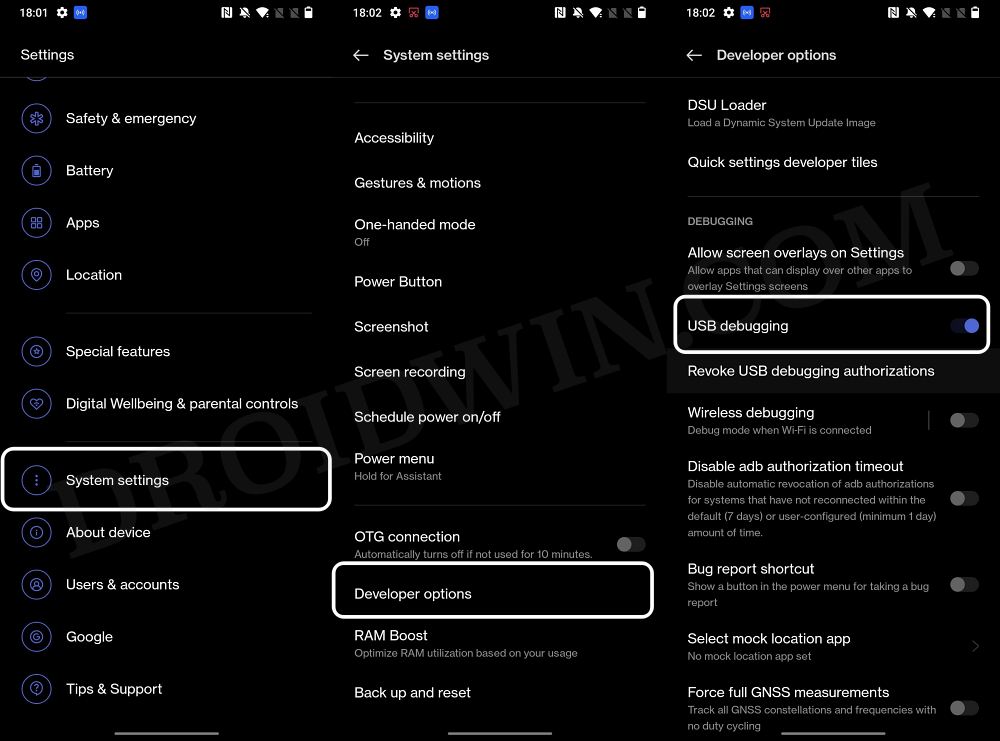
- Then enable USB Debugging and connect your device to your PC via a USB cable.
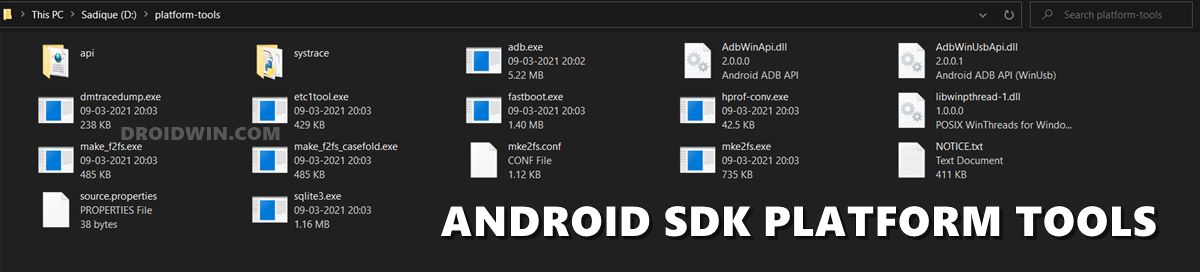
- Now download and extract Android SDK Platform Tools on your PC.
- Then type in CMD in the platform-tools folder address bar and hit Enter.
- This will launch Command Prompt. Type in the below command to open the shell environment
adb shell
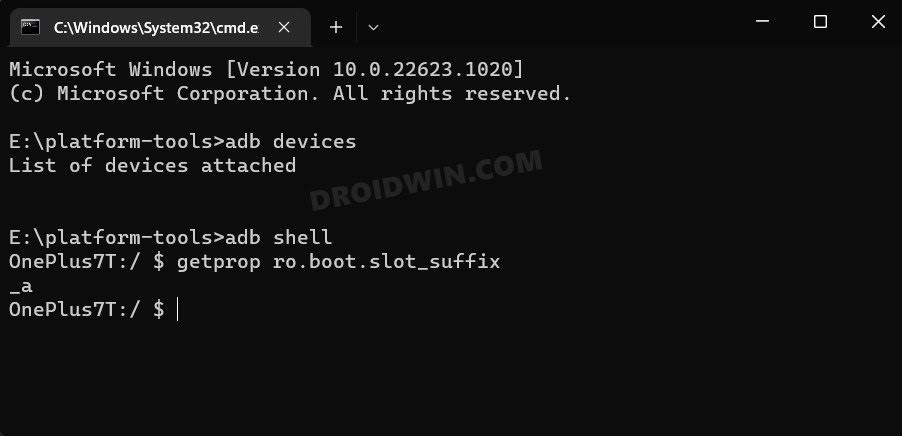
- After that, type in the below command to get hold of your current slot:
getprop ro.boot.slot_suffix
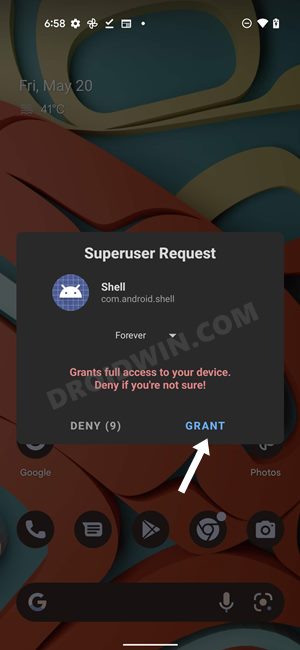
- If it is A, then execute the following commands [you will get a Magisk prompt after executing the su command, make sure to tap Grant]:
su
dd if=/dev/block/by-name/abl_a of=/sdcard/abl.img.bak
blockdev --setrw /dev/block/by-name/abl_a
dd if=/sdcard/abl.img of=/dev/block/by-name/abl_a
- On the other hand, if your active slot is B, then execute the below commands [you will get a Magisk prompt after executing the su command, make sure to tap Grant]:
su
dd if=/dev/block/by-name/abl_b of=/sdcard/abl.img.bak
blockdev --setrw /dev/block/by-name/abl_b
dd if=/sdcard/abl.img of=/dev/block/by-name/abl_b
- You may now reboot your device to the OS and it will boot without any warning!
METHOD 3: Via Commands
- Download the OnePlus 9 Pro Android 12 Firmware version F11.
- Then extract its payload.bin and get hold of the abl.img file.
- Now transfer this file to your device’s Internet Storage [not inside any folder].
- Then enable USB Debugging and connect your device to your PC via a USB cable.
- Now download and extract Android SDK Platform Tools on your PC.
- Then type in CMD in the platform-tools folder address bar and hit Enter.
- This will launch Command Prompt, Execute the below command to open the root shell
su
- You will now get a Magisk prompt on your device, tap on Allow/Grant.
- NOTE: In the below command [STEP 10], in our case, the abl partition was sde13, make sure to check yours using the below command and then make the changes to that command accordingly:
adb shell
cd /dev/block/platform
ls -la /dev/block/bootdevice/by-name
- After that, type in the below command to make the partition re-writeable:
blockdev --setrw /dev/block/sde13
- Finally, execute the below command to flash the F11 version abl.img
dd if=/sdcard/abl.img of=/dev/block/sde13
- You may now reboot your device to the OS and it will boot without any warning!
METHOD 4: Using Magisk
- Download the OnePlus 9 Pro Android 12 Firmware version F11.
- Then extract its payload.bin and get hold of the abl.img file.
- Now download the OnePlus 9 Pro Android 13 Firmware version F16.
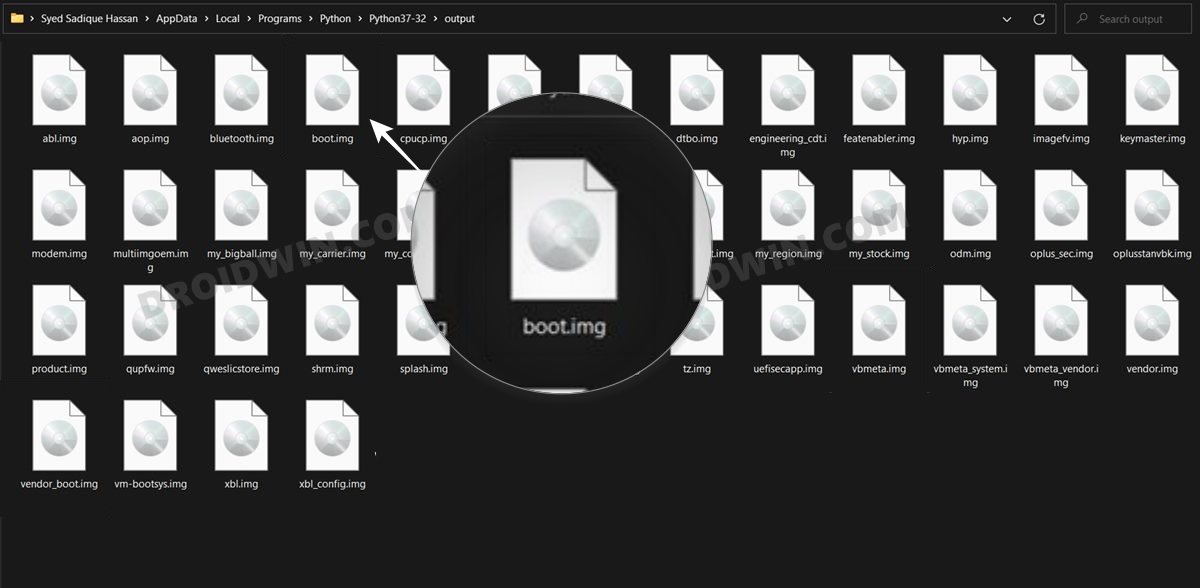
- Then extract its payload.bin and get the boot.img file.
- Transfer both abl.img and boot.img to your device’s Internet Storage [not inside any folder].
- Now launch Magisk and tap on Install > Select and Patch a file.
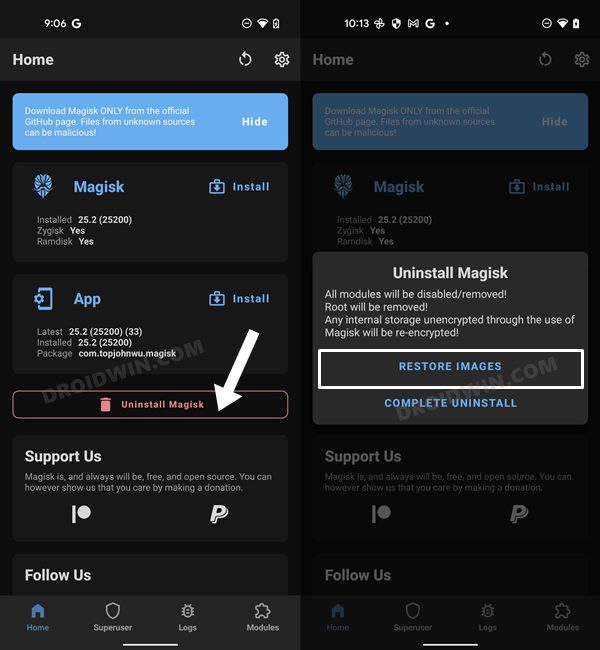
- Then choose the boot.img and it will be patched.
- Once done, tap on Uninstall Magisk > Restore Images.
- Then enable USB Debugging and connect your device to your PC via a USB cable.
- Now download and extract Android SDK Platform Tools on your PC.
- Then type in CMD in the platform-tools folder address bar and hit Enter.
- This will launch Command Prompt. Execute the below command to get your current active slot:
getprop ro.boot.slot_suffix
- Then execute the below command to open the root shell
su
- You will now get a Magisk prompt on your device, tap on Allow/Grant.
- After that, type in the below command to make the partition re-writeable:
blockdev --setrw /dev/block/sde13
- Then execute the below command to flash the F11 version abl.img
dd if=/sdcard/abl.img of=/dev/block/sde13
- After that, execute one of the below commands to flash the F16 boot.img to the inactive slot [if you got value ‘a’ in STEP 12, then flash the patched boot.img to Slot B and vice versa]:
fastboot flash boot_a magisk_patched_boot.img
fastboot flash boot_b magisk_patched_boot.img
- You may now reboot your device to the OS and it will boot without any warning!

METHOD 5: Using Hex Editor
- To begin with, download a Hex Editor software on your PC.
- Then download the firmware that is currently installed on your device.
- Now extract its payload.bin and get hold of the abl.img file.
- After that, drag and drop the abl.img to the Hex Editor to open it.
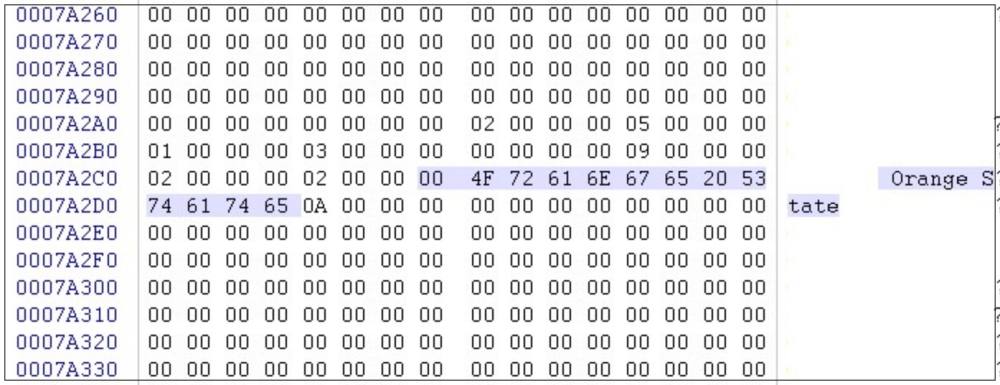
- Now search 0007A2C0 offset value and then delete the following value [see image]:
00 4F 72 61 6E 67 65 20 53 74 61 74 65
- The above value corresponds to the Orange State keyword. So delete it and then hit the Ctrl+S to save it.
- Then enable USB Debugging and connect your device to your PC via a USB cable.
- Now download and extract Android SDK Platform Tools on your PC.
- Then type in CMD in the paltform-tools folder address bar and hit Enter.
- This will launch Command Prompt, Execute the below command to open the root shell
su
- You will now get a Magisk prompt on your device, tap on Allow/Grant.
- Then transfer the abl.img file to the platform tools folder on your PC.
- After that, type in the below command to make the partition re-writeable:
blockdev --setrw /dev/block/sde13
- Finally, execute the below command to flash the modified abl.img
dd if=/sdcard/abl.img of=/dev/block/sde13
- You may now reboot your device to the OS and it will boot without any warning!
That’s it. These were the three different methods that should help you remove the Orange State Warning on your OnePlus device running Android 13. If you have any queries concerning the aforementioned steps, do let us know in the comments. We will get back to you with a solution at the earliest.


Ankit
after right this cmd fone goes to bootloopdd if=/sdcard/abl.img of=/dev/block/sde13
Unknown
I tried it on one plus 11 android 14.0.0.201. Got hard bricked.. Don’t try it. No good.
Jame
Hi everyone
I have realme gt2 master explorer android 12. I’ve tried to mod abl.img but didn’t find the word Orange state. Please help. thank you
Jose
Tengo un mensaje en el arranque Orange State ..Funciona para oneplus 10T ?? Ayudame
Shadab Kiani
Hi. I’m on OnePlus 9. I’m running OOS 13 (F.20 update) with Magisk root. I have the orange state warning. I tried you Hex editor method, but cannot find Orange State. 00 4F 72 61 6E 67 65 20 53 74 61 74 65 is not to be found. The line 0007A2C0 offset is already nulled, yet I get Orange State message at boot. Have they changed the mechanism?
Daniel
Method 2 “without Magisk”
Step 8 You will now get a Magisk prompt…
Oleg
On Oneplas 10 pro ColorOS/C.26
failed to do.
Silverfox
Hi,
first sorry for my bad english maybe. This Workaround doesn’t work on my Oneplus 8 EU Version – i tried all steps in this post. Unless the hex editor one doesn’t work bc in the OnePlus 8 abl.img this “orange state” section was not existing (not in the last android 12 version and not in the android 13 version). Any other solutions avaiable ?
thx alot in advance