In this guide, we will show you the steps to flash the stock boot.img as well as Magisk patched boot.img (magisk_patched.img) via TWRP Recovery. There are a plethora of benefits associated with rooting your device. For example, you could gain administrative privileges or access to the system partition. Likewise, you could also flash tons of mods, including the likes of Magisk Modules, Substratum Themes, and Xposed Framework. So how could one root their device? Well, there exist two different methods for the same.
In the first one, you just have to flash the Magisk Installer ZIP via TWRP Recovery. The second method is a slightly lengthier one and asks for patching the stock boot.img via Magisk and flashing it via Fastboot Commands. But since the inception of A/B partition devices, it has become quite a tough task for some in flashing recovery via Fastboot. This is because, in these dual partition devices, there exists no recovery partition, rather everything is taken care of by the boot partition.
That is the reason why you cannot directly flash TWRP Recovery onto these devices. Furthermore, sometimes, you would also have to flash the TWRP.img file to both the boot partitions A and B, whereas others require to only flash to the current active partition. All in all, these might lead to a few confusions to the end-user, especially if they are new to this domain, Fortunately there exists an easy way out. You could easily flash the stock boot.img as well as Magisk patched boot.img via TWRP Recovery. Let’s check out how this could be achieved.
Table of Contents
How to Flash Stock and Magisk Patched Boot.img via TWRP
We are listing out the below instructions into separate sections for ease of understanding. Make sure to follow in the exact same sequence as mentioned below. Droidwin and its members wouldn’t be held responsible in case of a thermonuclear war, your alarm doesn’t wake you up, or if anything happens to your device and data by performing the below steps.
STEP 1: Get the Stock Boot.img
First and foremost, you will have to download the stock firmware file for your device. After that, this firmware file will be extracted to get the stock boot.img file. In this regard, if you have a Google Pixel device, then you could directly extract the firmware file via WinZip or WinRAR.
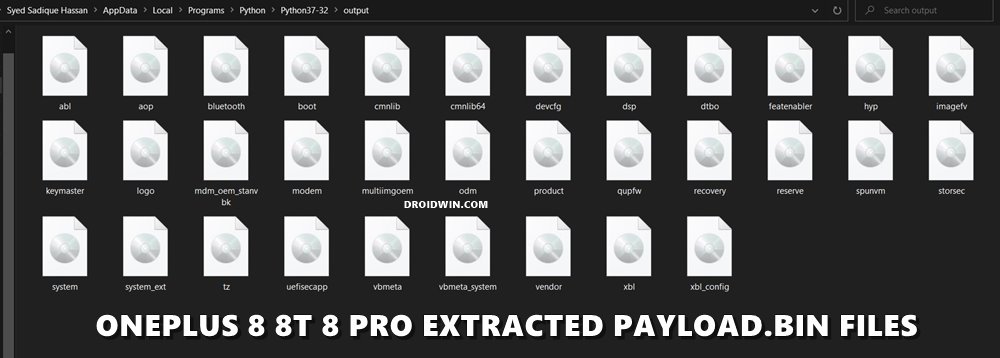
However, for other OEMs, it would be slightly different. If you own an OnePlus, then their firmware files are packed inside payload.bin. Likewise, Oppo and Realme have firmware partition files inside OZIP. So in these cases, please refer to our below guides to carry out the extraction process:
- How to Extract payload.bin and get the stock boot image file
- How to Extract OZIP Realme and Oppo Stock ROM (Firmware)
STEP 2: Patch Stock Boot.img via Magisk
If you are looking to directly flash the stock boot.img via TWRP, then skip this step and move over to the next one. This section is for those users who wish to patch the stock boot.img and get hold of the magisk_patched.img which will be flashed via TWRP to root your device. So on that note, let’s get started. Make sure to transfer the stock boot.img file to your device beforehand. [Having issues in carrying out the below steps on your Android 11 device? Check out this guide: Fix Magisk patched boot.img issue while Rooting Android 11].
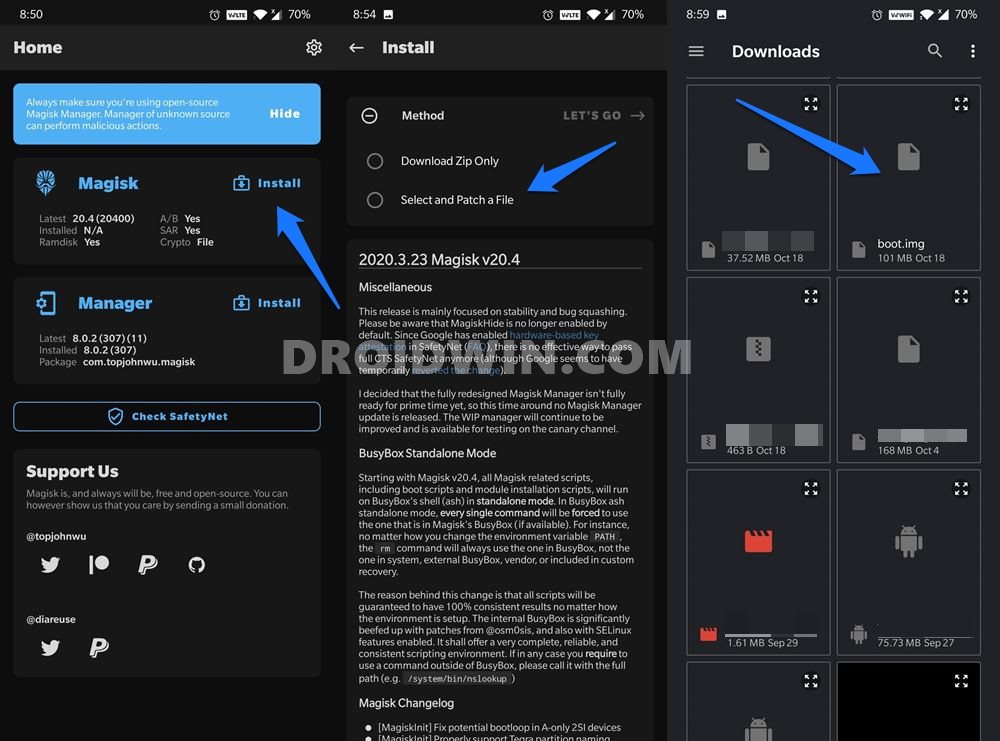
- To begin with, install the Magisk Manager app on your device.
- Then launch it and tap on the Install button situated next to Magisk.
- From the Method section, choose Select and Patch a file.

- Browse to the extracted stock boot.img file and select it.
- Then tap on the Let’s Go option situated at the top right.
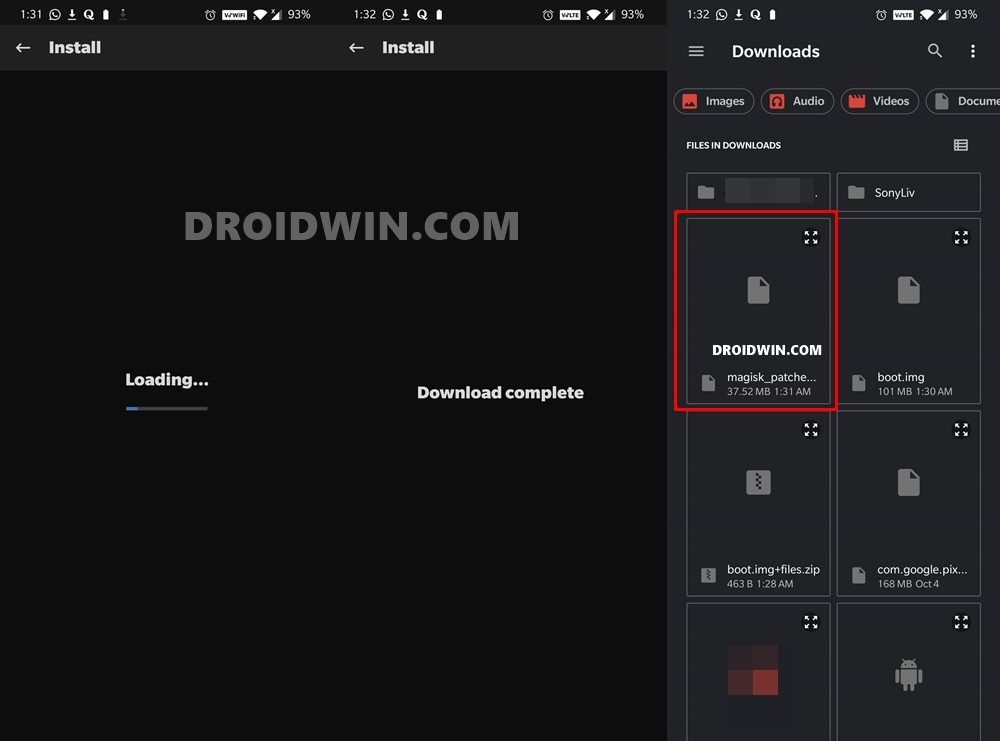
- Magisk will now load the boot.img file and will patch it accordingly. Once that is done, you would get the Download Complete message.
- The patched boot image file will be saved in Internal Storage > Downloads. The name of the file will be magisk_patched.img. Let’s now move to the final section of this guide to flash the stock boot.img as well as Magisk patched boot.img (magisk_patched.img) via TWRP Recovery.
STEP 3: Flash stock or Magisk Patched boot.img via TWRP
Make sure that the required stock boot.img file or magisk_patched.img is present on your device. Furthermore, if your device is currently rooted, then flashing the stock boot.img will unroot it. On the other hand, if your device is unrooted as of now, then flashing the magisk_patched.img will root your device. So if that’s well and good, then proceed with the below instructions to flash the file via TWRP Recovery.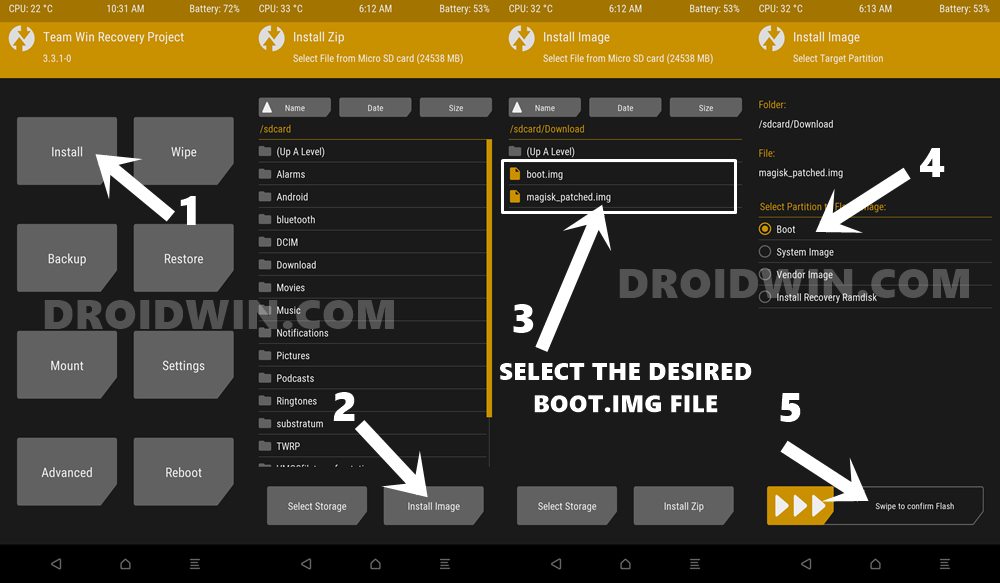
- Start off by booting your device to the TWRP Recovery.
- Then go to the Install section and tap on the Install Image button situated at the bottom right.
- Browse to the stock boot.img or magisk_patched.img file (whichever you need) and select it.
- Then choose the Boot partition from the partition selection screen.
- Finally perform a right swipe to flash this file to the boot partition.
- Once done, you may then boot your device to the OS. For that, go to Reboot and select System.
With this, we conclude the guide on how to flash the stock boot.img as well as Magisk patched boot.img (magisk_patched.img) via TWRP Recovery. If you still have any queries concerning the aforementioned steps, do let us know in the comments. We will get back to you with a solution at the earliest.
- How to Pass SafetyNet test after installing Xposed or EdXposed
- How to Pass Magisk SafetyNet on Rooted Android 11
- Fix ctsProfile Mismatch Error on Rooted Android
- How to use Core Only Mode in the new Magisk Manager?


Soumya Ranjan Nayak
We can extract boot file from LG G8X ThinQ phone(.kdz format) through QFIL or QPST. there the boot file is in .bin format. Can the boot.bin file be pached through magisk directly? Or we have to change the format .bin to .img ?
Is it possible?