In this tutorial, we will show you the steps to install LineageOS 17.1 onto OnePlus Nord, without using TWRP. The entire ROM will be flashed onto your device only through Fastboot commands. The device was recently blessed with AOSP Android 11 ROM as well, don’t forget to have a look at that ROM too. While there were still some doubts as to whether the OEM has deviated from its path of providing feature-rich devices at an ‘affordable price’, Nord put all that doubt to rest. The 6.44-inch screen has a 1080 x 2400 pixel resolution.
Under the hood, you get an octa-core Qualcomm SDM765 Snapdragon 765G chipset with Adreno 620 GPU. Furthermore, the device comes in three different variants: 64GB 6GB RAM, 128GB 8GB RAM, and 256GB 12GB RAM. Then there is a quad rear camera setup (48+8+5+2) that could record videos at 4K@30fps. On the front, you get a dual 32+8MP camera with 4k@30/60fps video recording capability. All these are supported by a 4115 mAh battery that comes with 30W fast charging.
While all these specs are definitely impressive, but it is just the start. You could get more out of your device once you step into custom development. Then there is no stopping you from trying out a plethora of tweaks, trying out TWRP, root, or installing a custom ROM. And in this guide, our focus will be on the latter. On that note, here are the steps to install LineageOS 17.1 on OnePlus Nord without using TWRP. Follow along for the detailed instructions.
- How to Install OxygenOS OTA on Rooted OnePlus devices
- How to Install OTA Updates in Rooted Android Device
- How to Permanently Install TWRP without TWRP ZIP File (only using TWRP.img file)
- How to Fix TWRP Error 7 (While Flashing Custom ROM via TWRP)
Table of Contents
What is LineageOS
When it comes to custom ROMs, LineageOS is among the most reputed and well-known names. Earlier, it was known as CyanogenMod and since then it’s lineage has been rightly carried forward. The ROM has never been known to provide tons of features. Rather, it maintains a rich balance with features and device stability. That is one major reason why many users flock to this ROM even today.

Furthermore, since it based on AOSP (Android Open Source Project), a fresh, clean, and minimalistic ROM is definitely on the cards. On that note, let’s get you acquainted with the working features and bugs present in this ROM. After that, you may proceed with the steps to install LineageOS 17.1 on OnePlus Nord. After installing the ROM, you could even Root OnePlus Nord using TWRP Recovery OR How to Root OnePlus Nord without TWRP (using Patched Boot file). Do have a look at these guides as well.
LineageOS 17.1 for OnePlus Nord: Working Features
-Boots
-RIL (Calls, SMS, Data)
-Fingerprint
-Wi-Fi
-Bluetooth
-Camera
-Camcorder
-Video Playback
-Audio
-Sensors
-Flash
-GPS
-Alert Slider
Bugs
-VoWiFi
Install LineageOS 17.1 on OnePlus Nord
before we list out the instructions steps, make sure to go through the below requirement section carry out the mentioned tasks/ download the required files. After that, you may proceed with the steps to install LineageOS 17.1 on OnePlus Nord without TWRP Recovery.
Prerequisites
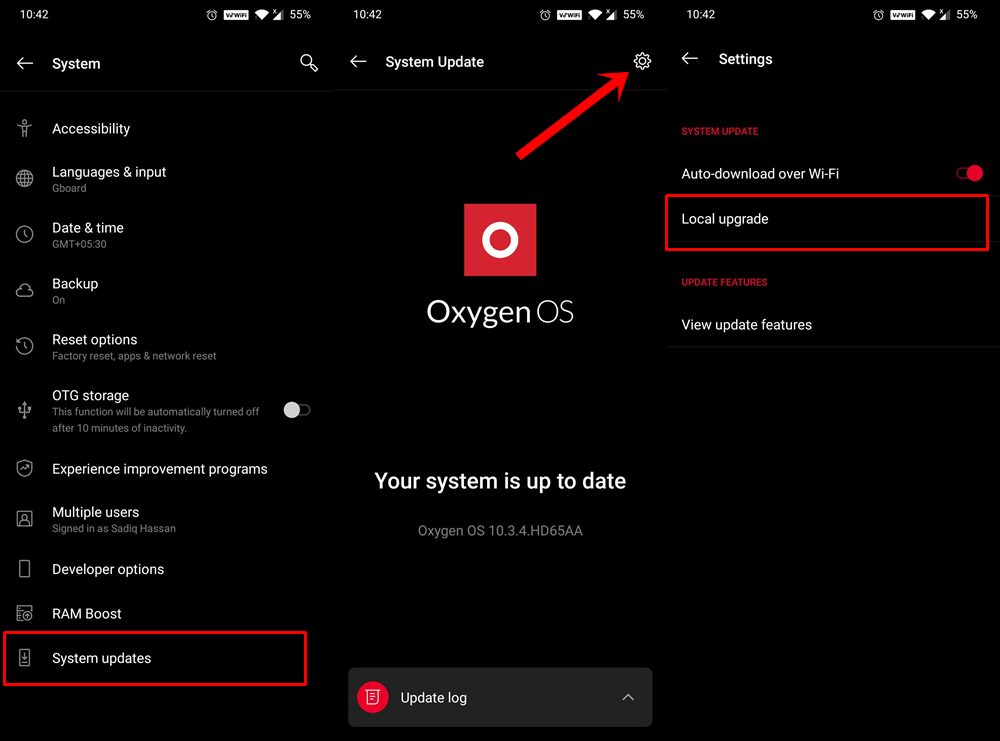
- To begin with, you need to be on the latest OxygenOS.

OnePlus Local Upgrade - We would also recommend that you take a complete device backup. This is because we would have to wipe off all the data from the device while flashing the ROM.
- Next up, enable USB Debugging. This is needed so that your device gets recognized by your PC in ADB Mode. Then we could easily boot the device to Fastboot/Bootloader Mode. So head over to Settings > About Phone > Tap on Build Number 7 times > Go back to Settings > System > Advanced > Developer Options > Enable USB Debugging. [Don’t Miss: Enable USB Debugging on a Broken Android Device’s Screen? Here’s a Workaround].
- Likewise, install Android SDK Platform Tools on your PC. This will provide you with the necessary ADB and Fastboot binaries.
Downloads:
- ROM OS Version: Android 10
- Kernel: Prebuilt stock kernel
- ROM Kernel: Linux 4.x
- Based On: LineageOS
- LineageOS 17.1 for OnePlus Nord: Download Link. (Credits: XDA Recognized Developer lakshay18)
- Download GApps: OpenGApps (Platform: ARM64, Android:10, and choose the Variant of your choice).
STEP 1: Unlock the Bootloader on OnePlus Nord
To begin with, you will have to unlock the device’s bootloader. if you haven’t done so, please refer to our detailed guide on How to Unlock the Bootloader on OnePlus Nord. Do keep in mind that it will wipe your device and might make the warranty null and void. Anyways, once that is done, proceed with the below steps to install LineageOS 17.1 on OnePlus Nord.
- [GUIDE] Flash ROMs/Magisk/TWRP/Kernels on A/B Partition Devices
- Everything About Magisk- Manager, Modules, and More
- Best Magisk Modules of 2020 [PART-1]
- [3 METHODS] Unroot any Android Device-Uninstall Magisk
STEP 2: Reboot OnePlus Nord to Fastboot Mode
- Connect your device to PC via USB cable. Make sure USB Debugging is enabled.
- Head over to the platform-tools folder, type in CMD in the address bar, and hit Enter. This will launch the Command Prompt.
- Type in the following command in the CMD window to boot your device to Fastboot Mode:
adb reboot fastboot
- You may now proceed with the below steps to install LineageOS 17.1 on OnePlus Nord.

STEP 3: Install LineageOS on OnePlus Nord
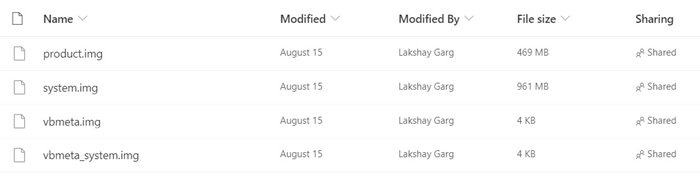
Head over to the platform-tools folder, where the ADB and Fastboot files are present. Now transfer the four downloaded ROM files (product.img, system.img, vbmeta.img, vbmeta_system.img) to this platform-tools folder.
- Starting off, you will have to flash the system file to the system partition:
fastboot flash system system.img
- Next up, you will have to flash the product.img file as follows:
fastboot flash product product.img
- Now comes the important part of disabling DM Verity in the vbmeta partition. Use the below command to do so:
fastboot --disable-verity flash vbmeta vbmeta.img
- Likewise, you now need to disable the DM Verity of VBMeta System partition as follows:
fastboot --disable-verity flash vbmeta_system vbmeta_system.img
- Finally, its time to format the device using the below command:
fastboot -w
- When that is done, you may now reboot your device to the newly installed OS by executing the following command:
fastboot reboot
STEP 4: Installing GApps on OnePlus Nord
Now comes the interesting part. We were able to install LineageOS 17.1 on OnePlus Nord. However, for GApps, you will need to flash TWRP. First and foremost, GApps isn’t necessary. LineageOS will continue to function as normal without these GApps as well. However, it’s really hard to imagine life without the Google ecosystem. So if you also echo these thoughts, then you might prefer to install GApps as well. Furthermore, if you face Erorr 20, then don’t forget to check out our guide on: How to Fix TWRP Error 20 GApps after flashing LineageOS.
Coming back, the first step of installing a custom recovery requires you to unlock the bootloader. Since you have already done so, you could now directly install TWRP. So head over to our detailed guide on How to Install TWRP Recovery on OnePlus Nord. Once the recovery is installed, boot your device to TWRP Recovery. You could refer to our linked guide, use the hardware key combinations or use the adb reboot recovery command.
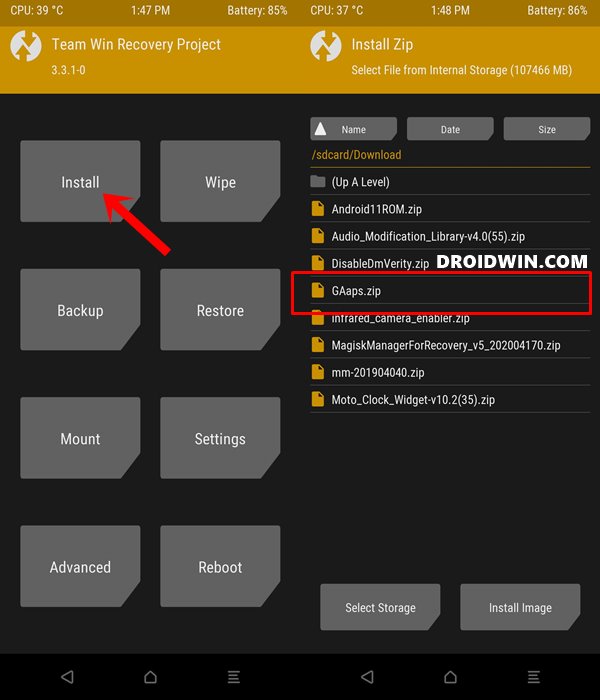
- From TWRP, head over to the Install section.
- Select the GApps ZIP file and perform a right swipe to install it.
- After this, you may now reboot your device. So go to Reboot and select System.
With this, we conclude the guide on how to install LineageOS 17.1 on OnePlus Nord. Do let us know your views about this ROM in the comments section. Likewise, if you have any queries, drop them in the comments. We would get back to you with a solution as soon as possible.