In this comprehensive tutorial, we will show you the steps to install the TWRP Recovery onto OnePlus 9 and 9 Pro devices. The latest flagships from OnePlus bring in plenty of reasons to cheer about. The top-of-the-end specs sheets coupled with its impressive OxyegnOS has attracted quite a lot of eyeballs. Along the same lines, the devices from this OEM have always been the most active players in custom development.
And the ninth iteration is no different either. Although both these devices are still in their early stage at the time of writing, yet there are a plethora of mods and tweaks already lined up. Likewise, the all-important custom recovery has also made its way for both these sets of devices. And in this guide, we will show you the steps to install this TWRP Recovery onto OnePlus 9 and 9 Pro devices. Follow along.
Table of Contents
Benefits and Risks of TWRP

There are a plentitude of perks associated with this custom recovery. To begin with, you could flash any ZIP or IMG file. These include the likes of Magisk, Kernel, ROM, or other modules. Then it also comes with the option to take a backup of all the partitions of your device in the form of Nandroid Backup. However, all these tweaks come with an associated risk factor as well.
If you don’t perform the steps correctly or end up flashing to the incorrect partition, then you are inviting trouble. Furthermore, flashing requires an unlocked bootloader, which could nullify the device’s warranty and wipe off all the data. So if all this is well and good, then let’s proceed with the steps to install the TWRP Recovery onto the OnePlus 9 and 9 Pro.
Install TWRP Recovery on OnePlus 9/9 Pro [Android 12/13]
The below instructions are listed under separate sections for ease of understanding. Make sure to follow the same sequence as mentioned. Droidwin and its members wouldn’t be held responsible in case of a thermonuclear war, your alarm doesn’t wake you up, or if anything happens to your device and data by performing the below steps.
STEP 1: Install Android SDK
 First and foremost, you will have to install the Android SDK Platform Tools on your PC. This is the official ADB and Fastboot binary provided by Google and is the only recommended one. So download it and then extract it to any convenient location on your PC. Doing so will give you the platform-tools folder, which will be used throughout this guide.
STEP 2: Enable USB Debugging and OEM Unlocking
Next up, you will have to enable USB Debugging and OEM Unlocking on your device. The former will make your device recognizable by the PC in ADB mode. This will then allow you to boot your device to Fastboot Mode. On the other hand, OEM Unlocking is required to carry out the bootloader unlocking process.
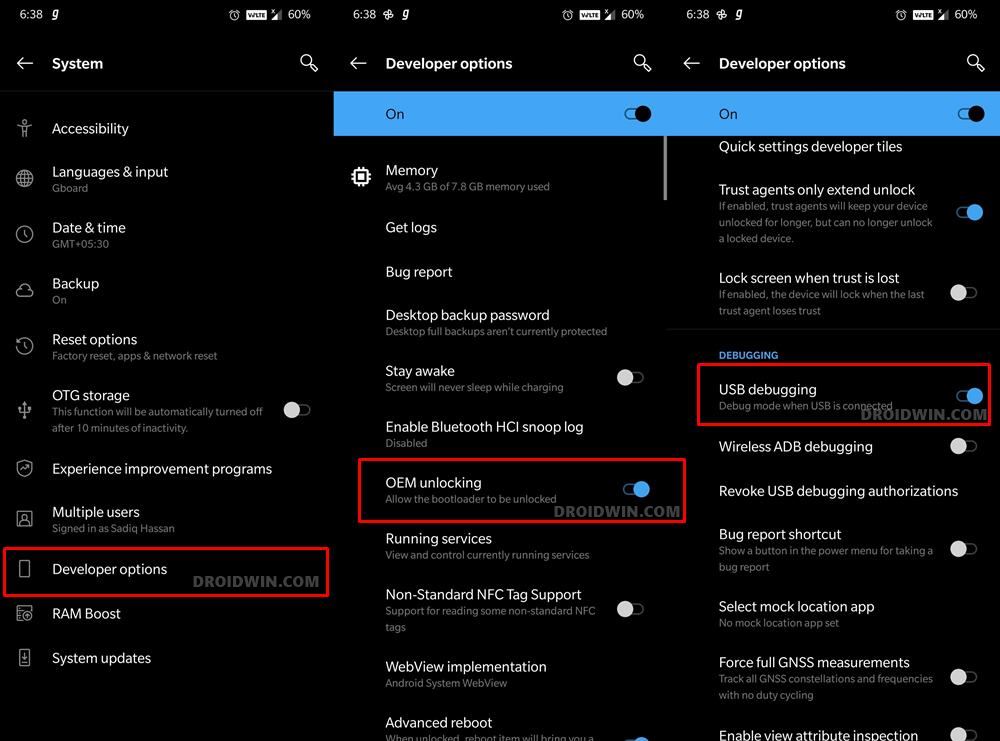
So head over to Settings > About Phone > Tap on Build Number 7 times > Go back to Settings > System > Advanced > Developer Options > Enable USB Debugging and OEM Unlocking.
STEP 3: Unlock Bootloader on OnePlus 9 Pro
After this, you will have to unlock the bootloader on your device. Do keep in mind that this process will wipe off all the data and might nullify the device’s warranty as well. So if that’s all well and good, then refer to our comprehensive guide on How to Unlock Bootloader on OnePlus 9, 9 Pro and 9R.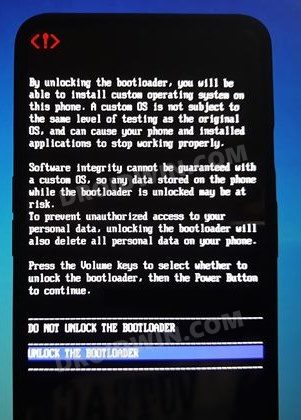
STEP 4: Download TWRP with Android 13 Encryption Support
You may now grab hold of the TWRP with the support for Android 12 and 13 data encryption from below [Credits: XDA Senior Member der_akinator]
Download: TWRP 3.7.0-12.1
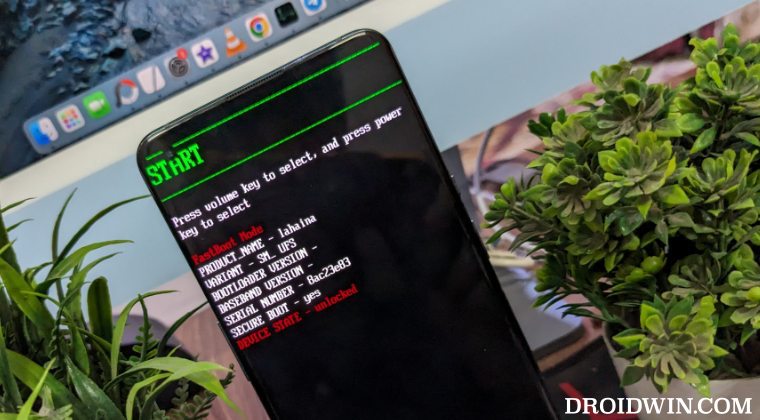
STEP 5: Boot OnePlus 9 Pro to Fastboot Mode
- Connect your device to the PC via a USB cable. Make sure USB Debugging is enabled.
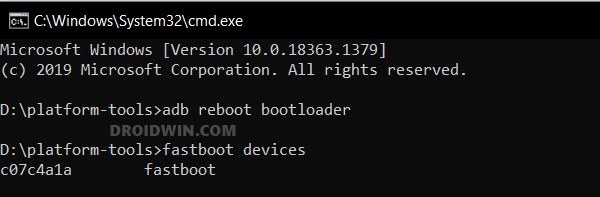
- Then head over to the platform-tools folder, type in CMD in the address bar, and hit Enter. This will launch the Command Prompt.

- Type in the following command in the CMD window to boot your device to Fastboot Mode
adb reboot bootloader
- Now type in the below command to verify the Fastboot Connection
fastboot devices
- If you get a device ID followed by the fastboot keyword, then the connection stands successful. If not, then install Fastboot Drivers on your PC.

STEP 6: Install TWRP on your OnePlus 9 Pro [Android 13]
We have listed three different methods through which you could install TWRP Recovery onto your OnePlus 9 Pro. Go through both these methods and then try out the one that is in sync with your requirements.
Method 1: Universal Method
- To begin with, transfer the boot.img file to the platform tools folder.
- Then type in the below command to temporarily boot your device to TWRP:
fastboot boot boot.img
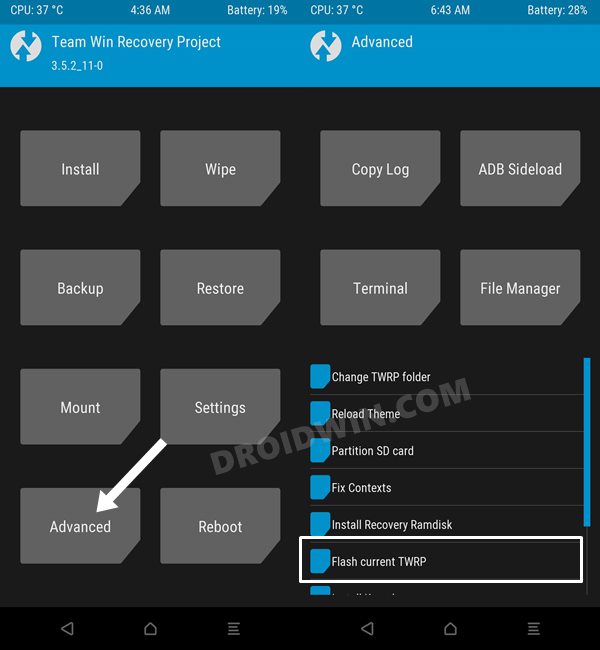
- From TWRP, go to Advanced > Flash Current TWRP > Right swipe to flash.
- You may now flash Magisk APK via TWRP if you want to root your device.
Method 2: For Rooted Device
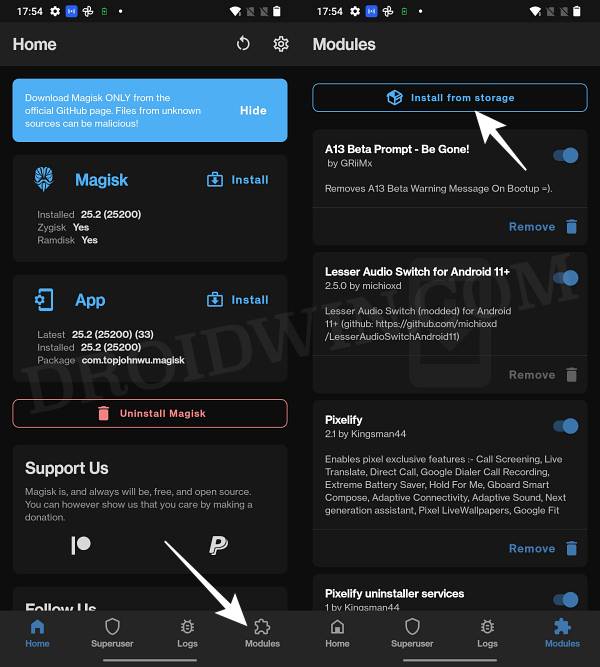
- Launch the Magisk App and go to the Modules section.
- Then tap on Install from Storage and select the twrp.zip file.
- It will now be flashed. Once done, do not reboot your device.
- Instead, download the Magisk APK file and rename it to ZIP.
- Then flash this Magisk ZIP via the Modules section of Magisk.
- Once flashed, you should now reboot your device. That’s it.
Method 3: Using a Custom Recovery
If your device already has any other custom recovery installed, then you could flash the latest version using the adb sideload feature. Here’s how:
- Boot your device to the already installed custom recovery via the below command:
adb reboot recovery
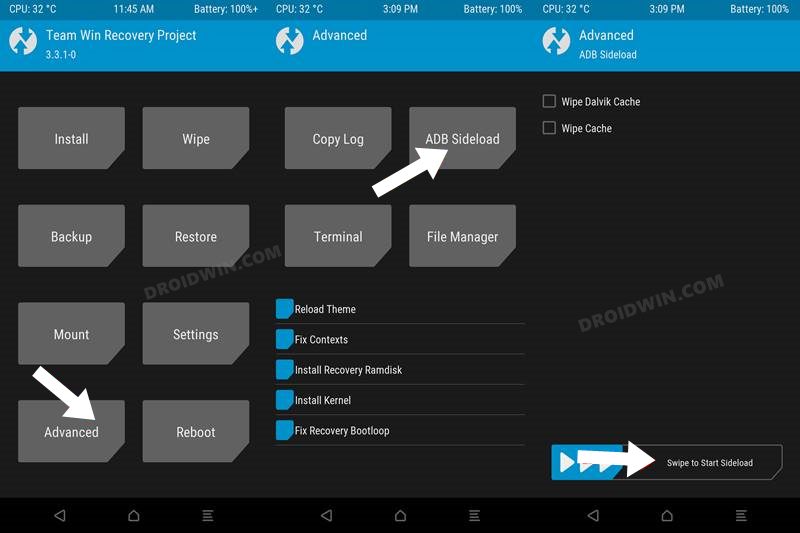
- Then go to Advanced > Sideload and perform a right flash to start the sideload.
- After that, transfer the latest TWRP to the platform-tools folder and rename it to twrp.zip.
- Then open CMD inside the platform-tools folder and execute the below command to flash it:
adb sideload twrp.zip
- Once done, execute the below command to reboot your device to the newly installed recovery:
adb reboot recovery
- Flash Magisk.zip for root [optional] and then boot to OS via Reboot > System.
Install TWRP Recovery on OnePlus 9/9 Pro [Android 11]

The below instructions are listed under separate sections for ease of understanding. Make sure to follow the same sequence as mentioned. Droidwin and its members wouldn’t be held responsible in case of a thermonuclear war, your alarm doesn’t wake you up, or if anything happens to your device and data by performing the below steps.
STEP 1: Install Android SDK
First and foremost, you will have to install the Android SDK Platform Tools on your PC. This is the official ADB and Fastboot binary provided by Google and is the only recommended one. So download it and then extract it to any convenient location on your PC. Doing so will give you the platform-tools folder, which will be used throughout this guide.
STEP 2: Enable USB Debugging and OEM Unlocking
You will also have to enable USB Debugging and OEM Unlocking on your device. The former will make your device recognizable by the PC in ADB mode. This will then allow you to boot your device to Fastboot Mode. On the other hand, OEM Unlocking is required to carry out the bootloader unlocking process.
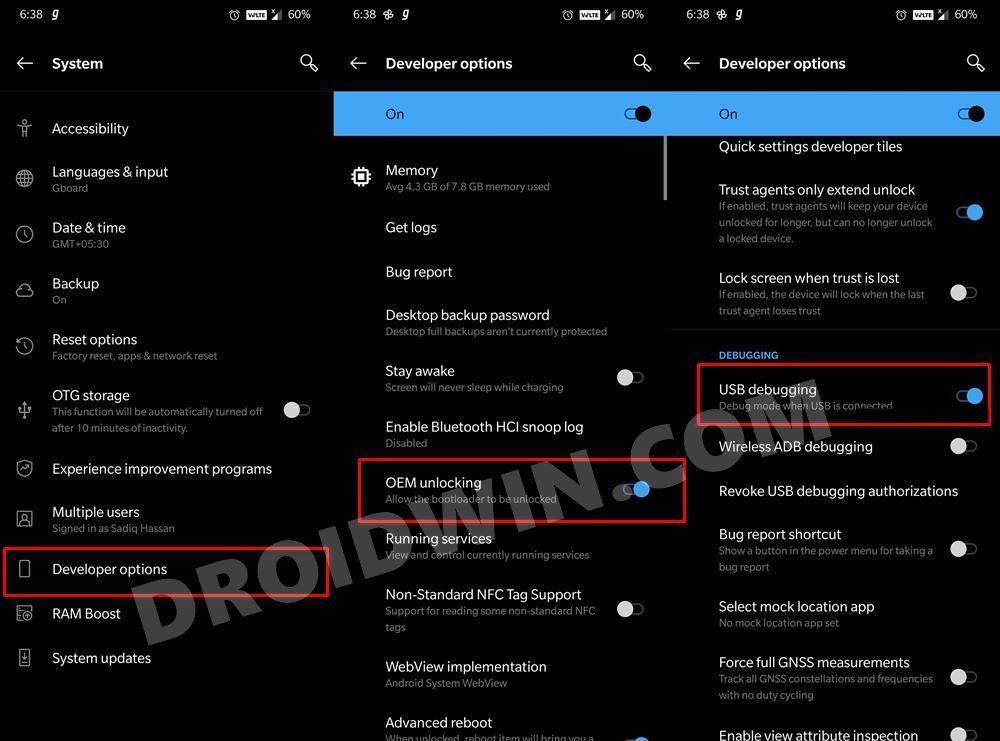
So head over to Settings > About Phone > Tap on Build Number 7 times > Go back to Settings > System > Advanced > Developer Options > Enable USB Debugging and OEM Unlocking.
- How to Update OnePlus to Android 11 OxygenOS 11 via TWRP without losing root
- TWRP Recovery gone after a Reboot: How to Fix
- How to Fix Soft brick/Bootloop after installing TWRP Recovery
STEP 3: Unlock Bootloader on OnePlus 9/9 Pro
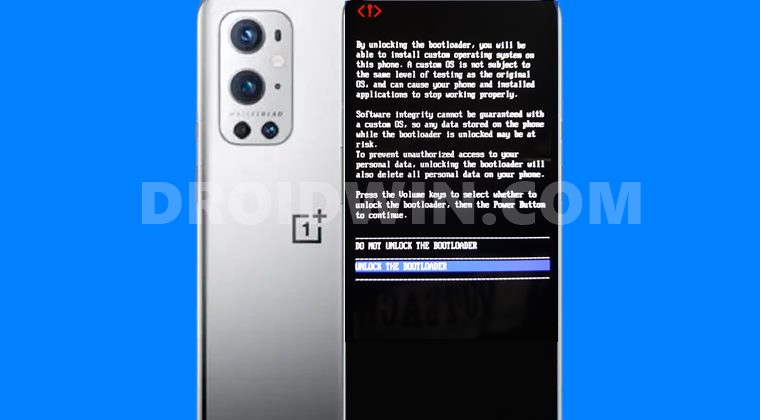
To install the TWRP Recovery onto OnePlus 9 and 9 Pro devices, you will have to unlock the bootloader. Do keep in mind that doing so will wipe off all the data and could make the device’s warranty null and void. If that’s fine, then please refer to our guide on How to Unlock Bootloader on OnePlus 9, 9 Pro, and 9R.
STEP 4: Download TWRP Recovery for OnePlus 9/9 Pro
You may now grab hold of the TWRP Recovery for OnePlus 9/9 Pro from the below link [Credits: XDA Senior Member Nebrassy]
Download: TWRP-3.5.1-lemonadep-Nebrassy-2.img
As you might have noticed, there’s only the TWRP IMG file but no ZIP file. So we would be flashing this recovery to your device’s Ramdisk. Furthermore, it is recommended that you rename this recovery file to twrp, hence the complete name becomes twrp.img. Once done, transfer this twrp.img file to the platform-tools folder on your PC.
Likewise, transfer twrp.img to your device’s Internal Storage as well. Moreover, if you are planning to flash any modules such as Magisk for root, or a custom kernel, then transfer them to your device at this stage as well. While there’s always an option of transferring files right from TWRP itself, it’s better if we do it at this stage itself.
STEP 5: Boot OnePlus 9/9 Pro to Fastboot Mode
- Now connect your device to the PC via USB cable. Make sure USB Debugging is enabled.
- Then head over to the platform-tools folder, type in CMD in the address bar, and hit Enter. This will launch the Command Prompt.
- Type in the following command in the CMD window to boot your device to Fastboot Mode
adb reboot bootloader
- To verify the Fastboot connection, type in the below command and you should get back the device ID, as shown in the image.
fastboot devices
STEP 6: Temporary Boot OnePlus 9/9 Pro to TWRP
First off, you will have to temporarily boot your OnePlus device to TWRP. But before that, make sure that you have transferred the twrp.img to the platform-tools folder on your PC and to your device as well. Likewise, your device should be booted to Fastboot and connected to the PC. If all that’s done, then you may proceed with the below steps to install the TWRP Recovery onto the OnePlus 9 and 9 Pro:
- Head over to the platform-tools folder, type in CMD in the address bar, and hit Enter. This will launch the Command Prompt.
- Now type in the following command in the CMD window to temporary boot your device to TWRP:
fastboot boot twrp.img
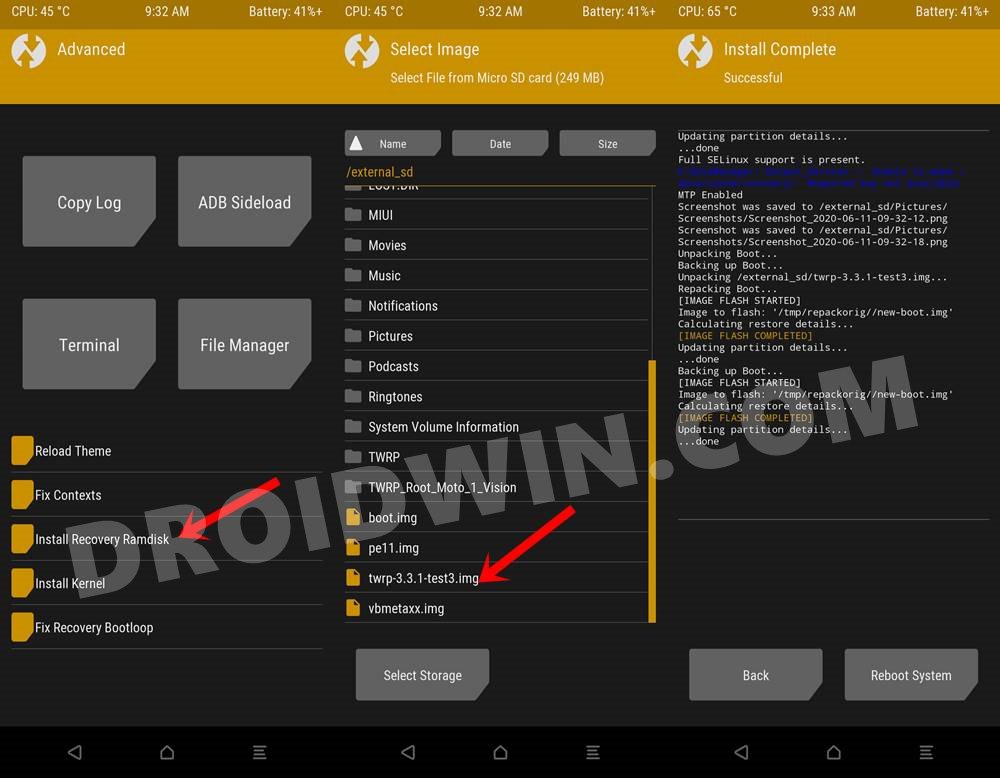
STEP 7: Permanent Install TWRP Recovery on OnePlus 9/9 Pro
- Now that your device is booted to TWRP, go to Advanced and select Flash Current TWRP.
- Navigate to the twrp.img file, select it, and perform a right swipe to flash it.
- If that doesn’t work out for you, then go to Advanced and select Install Recovery Ramdisk.
- Then go to the twrp.img file, select it, and perform a right swipe to flash it. That’s it.
The TWRP Recovery has been successfully installed onto your OnePlus 9/9 Pro device. If you are planning to flash any mods as well (optional), then refer to the below instructions.
STEP 8: Flash Magisk and Root OnePlus 9/9 Pro via TWRP [Optional]
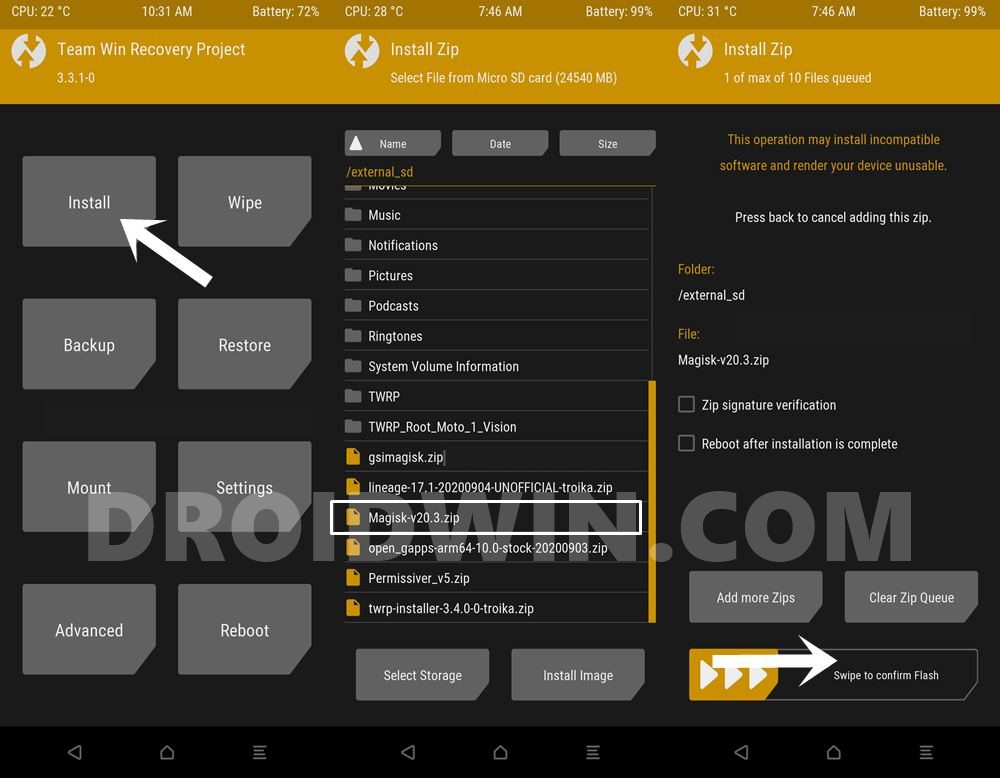
- If you wish to flash Magisk for root, then download the Magisk APK to your PC, rename the APK to ZIP and transfer it to your device via ADB Sideload.
- Then go to the TWRP’s Install section, select the Magisk ZIP file and perform a right swipe to flash it.
- Likewise, flash all the other mods (such as any custom kernel, etc) in the same manner.
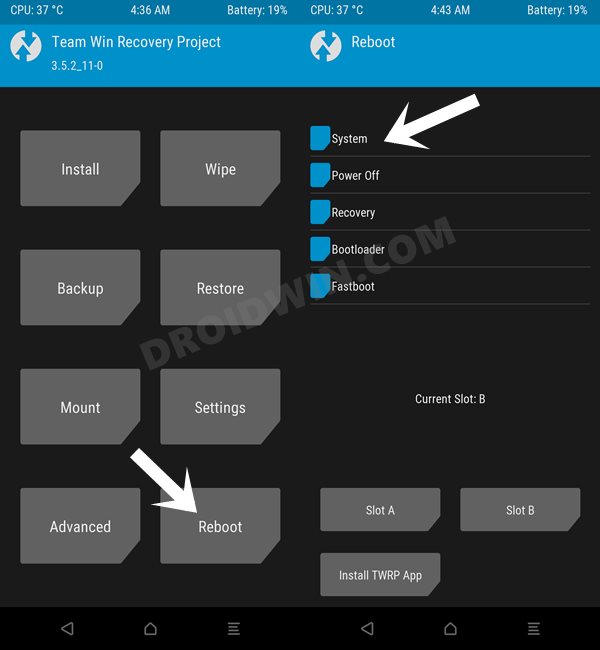
- Once done, you may reboot the device to the OS. For that, go to Reboot and select System.
- That’s it, you have successfully installed TWRP Recovery on OnePlus 9 and 9 Pro devices.
FAQ 1: How to Update TWRP Recovery on OnePlus 9/9 Pro
As and when there’s a new TWRP build, here’s how you could update it over your existing version.
- To begin with, download the new TWRP.img build on your device.
- Then boot your device to TWRP Recovery.
- After that, go to Install > Advanced > Install Recovery Ramdisk (see the screenshot of STEP 7).
- Select the newly download twrp.img and perform a right swipe to flash it.
- After this, you should flash the other mods that you had earlier installed, such as Magisk, etc.
- Once everything is done, you may reboot to the OS via Reboot > System. That’s it, the update is now complete.
FAQ 2: Flash Current TWRP Option Not Working on OnePlus 9 Pro
Some users have said that the Flash Current TWRP option isn’t working for them. If you are also getting bugged with this issue, then boot your device to TWRP and go to the Backup menu. Within that, tap on the Refresh Sizes option and wait for the process to complete. Once done, retry using the Flash Current TWRP option, and this time you shouldn’t face any issues.
So with this, we conclude the guide on how you could install the TWRP Recovery onto the OnePlus 9 and 9 Pro. If you have any queries concerning the aforementioned steps, do let us know in the comments section. We will get back to you with a solution at the earliest.


Velo
problem:
after the flash, I have the comment: OKAY [ 8.143s]
writing ‘recovery’…
FAILED (remote: (recovery_a) No such partition)
finished. total time: 8.155s
How I make or find the partition? tks
Giuseppe
how do i restore stock recovery?
Andrew Louis
Thank you so much. your website helped me a lot to install TWRP & root my phone