This guide will be providing detailed instructions on how to Install Custom ROMs on any Android Device- including A/B Partition. These include the devices having two partitions as well. So let’s begin.
Admit it. If you prepare a list of top two reasons why you would ever unlock your device’s bootloader, one would definitely be flashing a custom ROMs. The second one quite obviously would be rooting your device (but we won’t be talking about that here. You may instead refer to this guide: How to Root any Android Device). But why more and more users are going after these custom ROMs? The reason is simple- features.
The stock OS that comes shipped with your device has features limited in numbers. Moreover, some of the features are even blocked by the carrier. So you are left with no choice but to accept what’s given to you. Well, not anymore. With a custom ROM, the name says it all.
You could customize each and every part of the OS that you want. Don’t you prefer the white theme? Switch to a dark one. Don’t like the native Recents Menu? Change it a Quick Pie or Android Q style (if your ROM supports)? Hate some of the pre-installed apps? Simply uninstall them. Well, these are only some of the features that are mentioned. it could consume two-three more posts if I go on writing the various benefits of a Custom ROM.
So, let’s start with the guide. For your convenience, it will be broken down into two main parts- for ‘A’ and ‘A/B Partition’ devices. Within that, it would also have many important sub-parts.
Table of Contents
IMPORTANT NOTE 1- About Flashing and Partitions
‘A Partition’ and ‘A/B partition devices follow completely different methods of flashing a Custom ROM. Since flashing a custom ROM on A/B Partition device is quite difficult, most of the users directly apply the rule used to install custom ROMs on single A Partition devices. Never do that- it will definitely brick your device!
So how to know whether your device is ‘A/B Partition’ or just having a single ‘A Partition’. Head over to the detailed guide over here. The procedure of knowing whether your device is an A/B Partition device is mentioned there. A complete list of all the A/B Partition devices is also attached to that guide. Go check it out.
Prerequisites:
No matter if your device has an A/B Partition or just a single A Partition, you need to follow all the below-mentioned points. Then only proceed with the guide on how to Install Custom ROMs on any Android Device- including A/B Partition.
- Create a backup of all the data present on your device. Installing a Custom ROM will wipe it all.
- Make sure your device’s bootloader is unlocked. You may refer to our guide here on how to unlock the bootloader of Android Devices. For Pixel Devices- see this guide.
- Keep your device charged upto a minimum basic level of 50%.
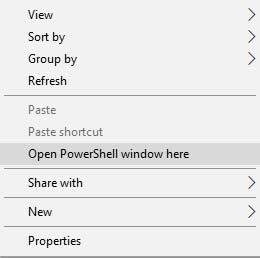
- Install the ADB and Platform Tools. Inside the folder where you have installed it (adb/platform-tools)– keep the ‘Shift’ key pressed and right-click in an empty area. Then select ‘Open PowerShell window here’.

- Enable USB Debugging on your device: Go to ‘Settings’ > ‘About Phone’ > Tap on the ‘Build Number’ 7 times > Go back to ‘Settings’ > ‘Developer Options’ > Toggle on the ‘USB Debugging’ and ‘OEM Unlocking’ switch.
Downloads
For the guide on how to Install Custom ROMs on any Android Device- including A/B Partition, the following files are to be downloaded:
- Download the custom ROM of your choice from here: Top 5 Custom ROMs based on Android 9.0 Pie (2019).
- Download the official TWRP Recovery for your device. If no official recovery exists as of now, get your hands on one of the unofficial ones from the XDA.
- Download the Google Apps package. It is used for installing core Google Services and Framework on your Custom ROM.
IMPORTANT NOTE 2- Setting up the TWRP Recovery
After downloading both the TWRP Recovery, i.e. the ZIP File (.zip) as well as the image file (.img), follow the below steps:
- Rename both the recovery to twrp.
- The complete name of ZIP file would now be: twrp.zip
- For the Image file, it will be twrp.img
- Transfer the twrp.img inside the ADB and Fastboot > platform-tools folder.
- Whereas, for the twrp.zip, transfer it to the device’s internal storage.
IMPORTANT NOTE 3- Installing the TWRP Recovery
Installing a Custom Recovery like TWRP has nothing to do with slots or partition whatsoever. hence the process of installing TWRP is exactly the same for both kinds of devices. Follow the below steps. It contains two sections. In the first one, you need to temporary boot the TWRP Recovery and in the next step, it will have to be permanently installed. Execute both the steps very carefully.
STEP 1: Temporary Boot your device to TWRP Recovery
- Connect your device to PC via USB Cable.
- In the PowerShell window, enter the below code to boot your device to fastboot mode:
adb reboot bootloader
- Now type the below command to boot your device to TWRP Recovery:
fastboot boot twrp.img
- So now that you have temporarily booted your device to the TWRP, it’s time to permanently install it. Head over to the next section.
STEP 2: Permanently Install the TWRP Recovery:
- Your device should now be booted into TWRP Recovery.
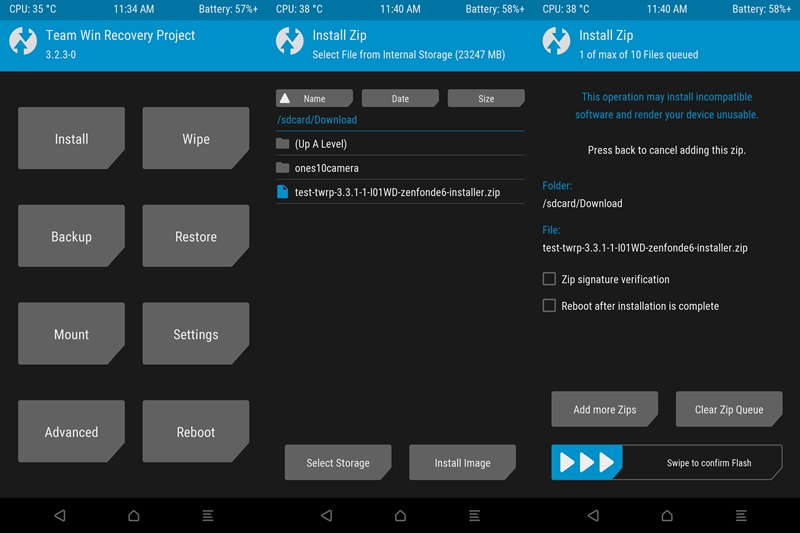
- Tap on ‘Install’.
- Navigate to the location where you have placed the twrp.zip and select it.
- Perform a right swipe to install it on your device.
That’s it. You have installed the TWRP Recovery on your device.
Installing Custom ROMs on A/B Partition Devices
So let’s begin with the first half of the guide on how to Install Custom ROMs on any Android Device- including A/B Partition. In this section, we would be dealing with A/B Partition devices only. If you have just a single partition, then jump to the next section, although it is recommended to get a complete knowledge of the A/B Partition. Do note that everything about A/B Partition devices- right from its meaning to flashing ROMs, Magisk, TWRP is covered in depth here: [GUIDE] Flash ROMs/Magisk/TWRP/Kernels on A/B Partition Devices. Therefore in this guide, it would be a brief description of everything.
What is an A/B Partition?
First of all, let us understand what exactly is an A/B Partition? In simplest of terms, most of the devices now come with two partition- A and B. One is the active slot- on which you are currently booted, while the next one is the inactive slot. Now, whenever an Over-The-Air (OTA) update arrives, it will be automatically downloaded and installed to the inactive slot.
This will allow you to carry on with your work undisturbed. And whenever you get free, just reboot your device. Doing so will boot your device to the inactive slot- on which the OTA update was installed. And as you might have guessed by now, this inactive slot becomes the active one, whereas the other becomes inactive. This process carries on every time an OTA is received.
With that said, let us now begin with the installation process. lease follow each and every step very carefully.
IMPORTANT NOTE 4- Handling Slots and Partitions
The Custom ROM you are about to install will be installed to an inactive slot. this is the slot that would be needed later on to boot your device into and make it the active one. So to remove all ambiguity and create a uniform process, let’s fix Slot B as the Active Slot. Follow the below steps:
- Connect your device to PC via USB Cable.
- In the PowerShell window, enter the below code to boot your device to fastboot mode:
adb reboot bootloader
- Next, enter this code to fix slot B as the active one:
fastboot set_active b
- So now we have fixed Slot B as the active slot. Hence the ROM would be flashed to the inactive one, i.e. Slot A.
How to Install a Custom ROM on A/B Partition Devices
For the first half of the topic on Install Custom ROMs on any Android Device- including A/B Partition. The section will be divided into 2 steps. In the first step, you would be flashing a Custom Recovery on your device via TWRP Recovery. Then you would be changing slots to switch to the active one- where your ROM has been installed. The below guide is written assuming you have carried out all the things mentioned in “Prerequisites”, “Important Note 2”, “Important Note 3” and “Important Note 4” section.
STEP 1: Installing a Custom ROM
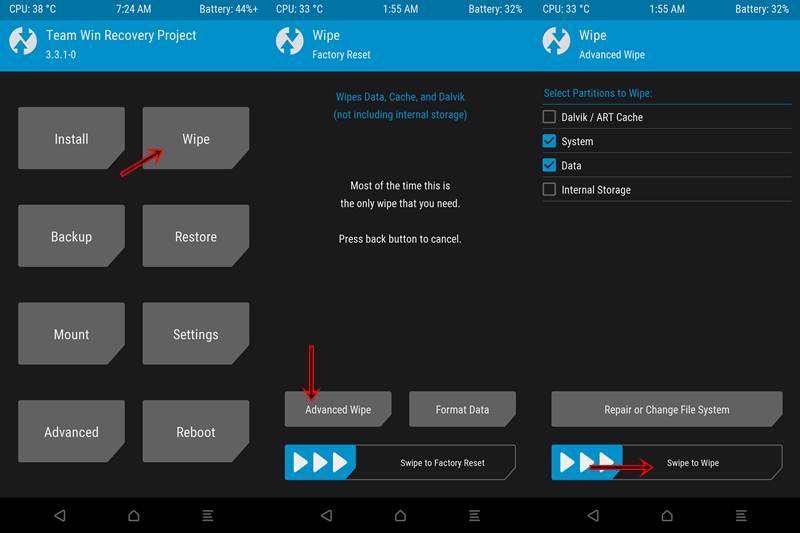
- In the TWRP Recovery, head over to “Wipe”.
- Next, tap on “Advanced Wipe”.
- Select everything except Internal Storage (Dalvik Cache is optional).
- Perform a right swipe on the “Swipe to wipe” button.
- Go back and tap on “Install”.
- Transfer the desired Custom ROM to your device. Refer to this guide if you want any help: [3 METHODS] How To Transfer or Install Files via TWRP Recovery (refer to the 3rd feature- “Mount”).
- Perform a right swipe to install the selected Custom ROM.
STEP 2: Changing Slots- From Active to Inactive
- The recently installed Custom ROM has been flashed to the inactive slot (i.e. Slot A). And you are currently on the active Slot B.
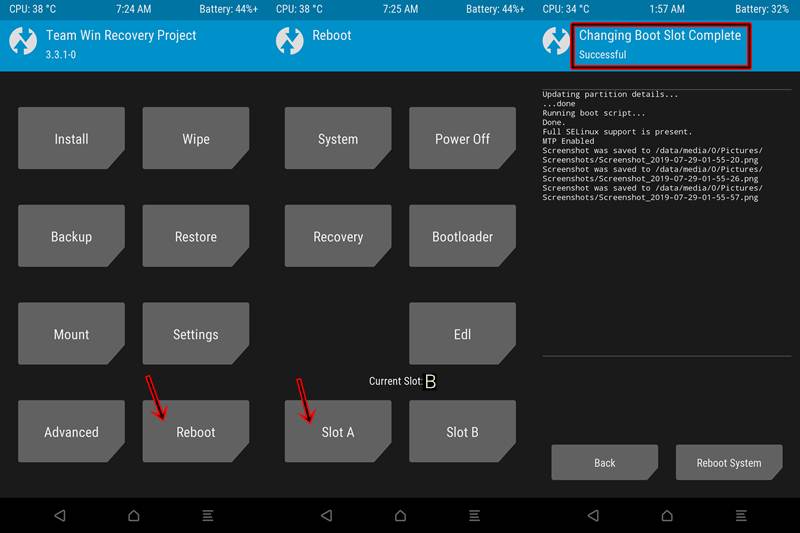
- So to switch to your newly installed ROM, and hence the slot, go to “Reboot”.
- From there, tap on “Slot A”.
- Next, go back and from “Reboot”, tap on “Recovery” (don’t reboot to the system at this stage. It will trigger DM-Verity and your device might end up in bootloop).
- Now when your device reboot to TWRP Recovery, you are on the Active slot, i.e. Slot A, whereas Slot B has become the inactive one.
- That’s it. You may now reboot your device to Android OS by going to “Reboot” and selecting “System”.
Hence with that, we cover the first half of the guide on how to install Install Custom ROMs on any Android Device including A/B Partition. We have successfully installed a Custom ROM on an Android Device having an A/B Partition.
Although, it might look a little bit longer to you, this just because I have explained each step in as much depth as possible. Hope you would have understood the entire process. So, tap your back, you have just now learned among the most difficult tips of all the topics related to rooting. Congratulations!
Installing Custom ROMs on Single ‘A’ Partition Devices
With A/B Partition now done and dusted, it is now time to set our focus on the second half of the guide titles- Install Custom ROMs on any Android Device- including A/B Partition. Now we would begin the process of installing Custom ROMs on “Single-A Partition” devices. Mark my words, installing a Custom ROM on any ‘A-only Partition’ device is way more easy than carrying the same procedure on A/B devices. So let’s begin with the process.
- Carry out all the steps mentioned in “Prerequisites”, “Downloads”, “IMPORTANT NOTES 2” and “IMPORTANT NOTES 3”.
- With your device booted to TWRP, go to “Wipe”.
- Tap on “Advanced Wipe” and select everything except the Internal Storage.
- Swipe to wipe the selected partitions.
- Next, go back tap on “Install”.
- Transfer the desired Custom ROM to your device. Look at this guide if you are having trouble sending the ROM: [3 METHODS] How To Transfer or Install Files via TWRP Recovery (look at the third feature- “Mount”).
- Select the recently transferred ROM and perform a swipe to flash it.
- That’s it. You have successfully flashed a Custom ROM on your Android Device.
- Now you may reboot your device. Head over to “Reboot” and select “System”.
Final Thoughts
With this, we come to the end of a long, detailed and step by step guide on how to Install Custom ROMs on any Android Device- including A/B Partition. If you need any help or assistance do let me know. Moreover, if you are having any issue with respect to any part of this guide, mention them in the comment section below.
Also, if you want any file for your device including a Custom ROM, TWRP Recovery or anything related to Rooting, just use the Request Page or the comments box below. Always there to help. Happy Flashing!


Mangalram
my device moto one power , already triggered verity mode, how many time in installed custom rom, its stucked in boot loop,
what need to do?
Dario
Hi, thank you very much for your text! How can I check if my TWRP is properly installed on both slots? I booted in my TWRP and selected: Reboot. I see now that the Current Slot is A.
My phone is Redmi Note 10 (sunny/mojito) and custom ROM: Havoc OS 4.13.
Envious
how do i head to twrp recovery after changing my active slot to B ?
Sadique Hassan
Hi Envious, apologies for the delay. As a general rule, you will have to flash the TWRP to both slots. I would request you let me know your device name as well, so that I can list out the instructions specific to your device only.