This guide contains detailed steps on How to Get Unlimited Storage on Google Drive and Google Photos- free of cost!
Table of Contents
Table of Contents:
- Advantages of Google Drive and Photos
- Disadvantage Scenario for free users of Google Drive and Photos
- How to Increase the Storage Space to Unlimted Storage of Google Drive and Photos
- Steps to Get Unlimited Storage on Google Drive
- Steps to Get Unlimited Storage on Google Photos
- Final Thoughts
Google Drive and Photos- Advantages
Let’s face it. Google Photos and Google Drive are two of the most indispensable app for every device. Be it Android or iPhone, one cannot stay away from either of the two apps. A large part of it could be attributed to the fact that is used nearly everyday use. No matter the type or size of photos you click, they all get synced over to the Google Cloud Server, thereby allowing you to remove those files from your device. This considerably increases your storage capacity.
Google Drive also follows a similar path, but one step ahead. Not only photos and media but any file type- be it PDF, WORD, PPT, APK, ZIP, etc all could be uploaded to your Google Drive. Once uploaded, remove these files from your device for the same said reason as mentioned before.
Thanks to these apps, sharing photos and videos have also become extremely easy. You could just create a shareable link and send that link to whosoever you want (let me know if you want a tutorial on this). Anyone with that link can view all the photos and if given permission, can add his photos as well. This creates an organized shared album which could be sent to anyone anywhere in the world.
Google Drive and Photos- Free User’s Limitations
But every app does come with its fair share of limitations for free users. And so does these two. Let us first talk about Google Drive. In this, you get a maximum quota of 15 GB. Although it may sound more than enough to you, but mark my words, it gets exhausted pretty quickly. There is an option to extend your storage, but you will have to shell out some money from your pockets.
Similar is the case with Google Photos, although at a lower scale. There are two ways of uploading photos to Google Photo- either at Original Quality or at High Quality. The good thing is that at High Quality it provides unlimited storage. But at Original Quality, storage space is limited to 5 GB.
With the improvements in a smartphone camera, normal image size is close to 4-5MB. Upload these photos on its original size and you wouldn’t even realize when the quota gets finished. So if you chose to keep on uploading images at Original Quality, then I’m afraid after a certain period, you’ll have to empty your pockets.
So is there any tips, trick or hack by which the storage capacity could further be increased. Yes, there is! But how much could this storage be increased? Unlimited! Does this mean I’ll have to spend tens of thousands of dollars? No, not a single penny, it’s totally free of cost! Read on further and carry out the detailed steps to get this unlimited storage on Google Drive and Google Photos.
How to Increase the Storage Space in Google Drive and Google Photos
Instructions are provided below to get unlimited storage on your Google Drive and Google Photos. Screenshots have also been attached for your reference. For your convenience, this guide has been divided into two sections- the first section deals with Google Drive whereas the second one talks about Google Photos.
The first step is common for both- you need to create a new Gmail ID. Head over to the Google sign-up page, enter all the details and follow the on-screen instructions. Just make sure to use a different first and last name– which you haven’t used for your previous Gmail ID. Once you have successfully created a Gmail ID, head over to the next section.
Steps to Get Unlimited Storage on Google Drive
In the first half of the guide on How to Get Unlimited Storage on Google Drive and Google Photos, our entire focus will be on Google Drive. Follow the below-mentioned points to get an additional 15 GB storage. You may carry out this step as many times as you wish, thereby getting an increase in storage space by a multiple of 15GB. Just create a new Gmail ID every time you execute this process.
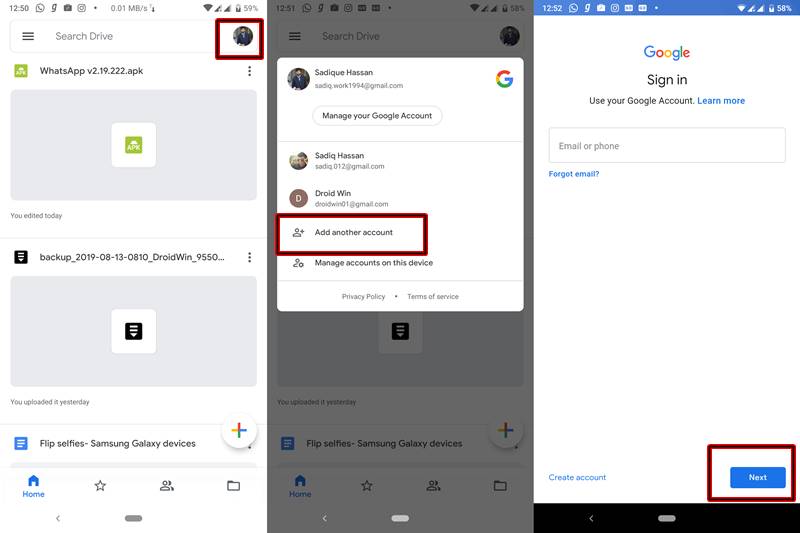
- Open the Google Drive App on your device
- You would be logged in to your earlier Gmail ID right now.
- Tap on your profile icon situated at the top right.
- Next, select Add another account.
- A sign-in window will appear. Enter your newly created Gmail ID.
- Press Next and enter your password.
- That’s it! You will now be logged in to your newly created Gmail ID with 15 GB of extra free space.
What’s even more interesting is the fact that you may keep on adding as many accounts as you like. In the above screenshot, you may see that I have added 3 Google Accounts, thereby getting a total of 45GB worth of storage space!
[Visit Here For More Ausum Google Tips And Tricks]
Steps to Get Unlimited Storage Space on Google Photos
Now we come to the second half of the guide on How to Get Unlimited Storage on Google Drive and Google Photos. In this section, we will be talking about the steps needed to get an additional 5 GB of storage for uploading photos in Original Quality.
Again, you may carry out the said procedure as many times as you wish to. Every time there will be an increase in storage by a multiple of 5GB. The only prerequisite is to create a new Gmail ID every time- which hardly takes a minute or so.
NOTE: If you have already created a new Gmail ID for Google Drive, then the same ID could also be used for Google Photos as well. The reverse is also true.
Follow the below steps in order to begin with the process:
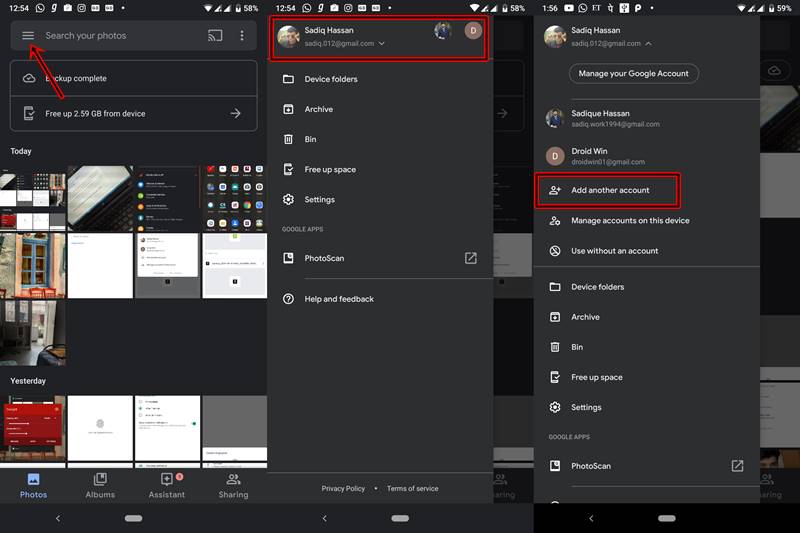
- Open the Google Photos app on your device.
- Tap the Hamburger Icon (three horizontal lines) situated at the top left corner of your screen.
- Have a look at the top bar of the menu. It will be showing your current Gmail ID along with the profile picture.
- Tap on that section. An expanded list will appear.

- Now select Add another account.
- Enter the email address of the newly created Gmail ID.
- Tap Next and enter your password.
- That’s it. your newly created Gmail ID will be synced to this device, giving you additional 5GB of ‘Original Quality’ photos that could be added.
Final Thoughts
This was a simple yet extremely useful guide on How to Get Unlimited Storage on Google Drive and Google Photos. As mentioned before, you can get as much additional storage as you wish (a multiple of 15GB in case of Google Drive, whereas a multiple of 5GB for Google Photos). What’s even more interesting is that you don’t need to create separate new Gmail IDs for both of these apps. A single newly-created ID will do the job for both of them. The only thing to keep in mind is that every time you carry out this process, you need to create a new Gmail ID.
With that said, if you have any queries with regard to any of the steps mentioned in this guide, do let me know. Always there to clear all your doubts. Keep Reading, Keep Supporting 🙂


Xisak
I was expecting not creating an account. :/
Good job though.
Sadique Hassan
Thanks mate and unfortunately, that’s the only way out 🙂