[See UPDATE at the end of this guide] This guide will show you two different methods to pass the SafetyNet Test on your rooted Android 12/13/14 device. The latest iteration of the OS has brought in a plethora of new and intriguing features. Some of the noteworthy ones include the likes of new photo pickers, lock screen customizations, Notification Flash, Auto-Confirm Lock Screen [finally!], and Predictive Back Gesture. However, all these are just what the OEM has to offer.
If you wish to step into unchartered territory, then the first prerequisite is to gain administrative privileges. This could be done either by flashing the Magisk patched boot.img or by flashing the Magisk App via TWRP. Once you do so, you will get access to the system partition. This in turn will allow you to flash Magisk Modules, Xposed Framework, Substratum Themes, and a plethora of other tweaks as well. However, all these tweaks come at a cost……
Table of Contents
What is Safety in Android?
As soon as you successfully root your device, it will end up triggering a safety flag. Also known as SafetyNet, this is an API that is embedded into your device by Google in order to check if your device has been modified or not. Only when your device is able to pass this test will you be able to use certain types of apps.
Moreover, Google has switched over from BASIC (which was easier to bypass) and has now implemented the Hardware-based Attestation, which can’t be easily fooled. But fret not, there’s still a handy way out. You could spoof the BASIC Attestation over the current Hardware-based which in turn will allow you to easily able to pass the SafetyNet Test on your rooted Android 12 device.
What if SafetyNet Fails?
Well, if the test fails, then you wouldn’t be able to use any banking apps or streaming services like Netflix that make use of WideVine Certification. Along the same lines, games like Pokemon Go wouldn’t function along the expected lines.

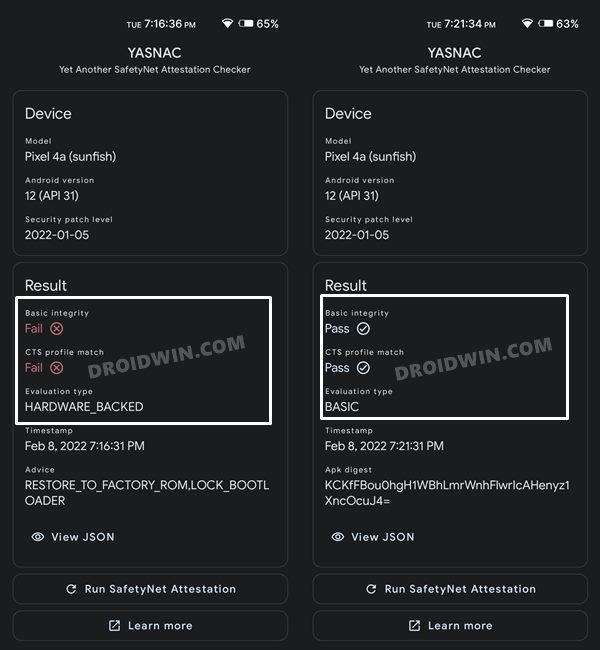
The basicIntegrity and ctsProfile Tests
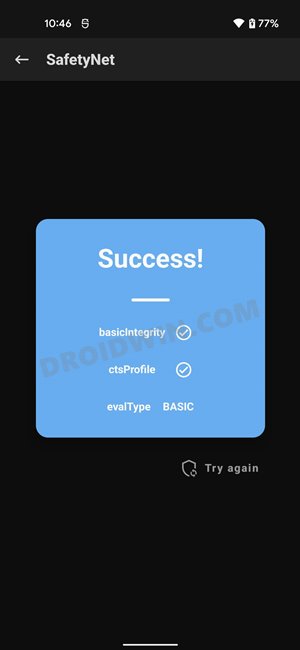
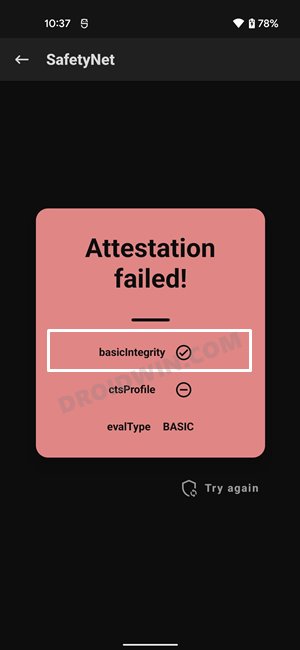
All these apps just check for the SafetyNet flag’s value, and if it comes out to be ‘Failure’, then it wouldn’t allow you to carry out its functionality onto your device. In this regard, these apps carry out two SafetyNet tests- the basicIntegrity and ctsProfile. In order to successfully use these apps, you will have to pass both these tests (passing just one wouldn’t do any good, see the below image).
However, with each new release of Android, things are becoming a tad difficult. And the recent development surrounding Magisk does do any good to the tech enthusiast either. But the fact that it’s an open-source platform is more than sufficient for us. And making full use of the same, this guide will show you the steps to pass the SafetyNet Test on your rooted Android 12/13/14 device. Follow along.
How to Pass SafetyNet on Rooted Android 12/13/14
Given below are two different methods to get this job done. The second method is the old and lengthier approach but initially, it was our only escape route. However, now there is a new and shorter approach available as well, which we have listed in Method 1 [recommended]. With that said, both these methods should work on your device, but you should give higher preference to Method 1 itself.
Likewise, the process has been tested on both Android 12 and 13 [should also work on older Android versions]. So on that note, let’s get started. Droidwin and its members wouldn’t be held responsible in case of a thermonuclear war, your alarm doesn’t wake you up, or if anything happens to your device and data by performing the below steps.
METHOD 1: Pass SafetyNet via SafetyNet Fix Module [NEW]
The shorter of the two methods, this doesn’t require you to spoof the device’s fingerprint or flash the Magisk Hide Props Config, all thanks to tweaks made by the developer of the Universal SafetyNet Fix Module.
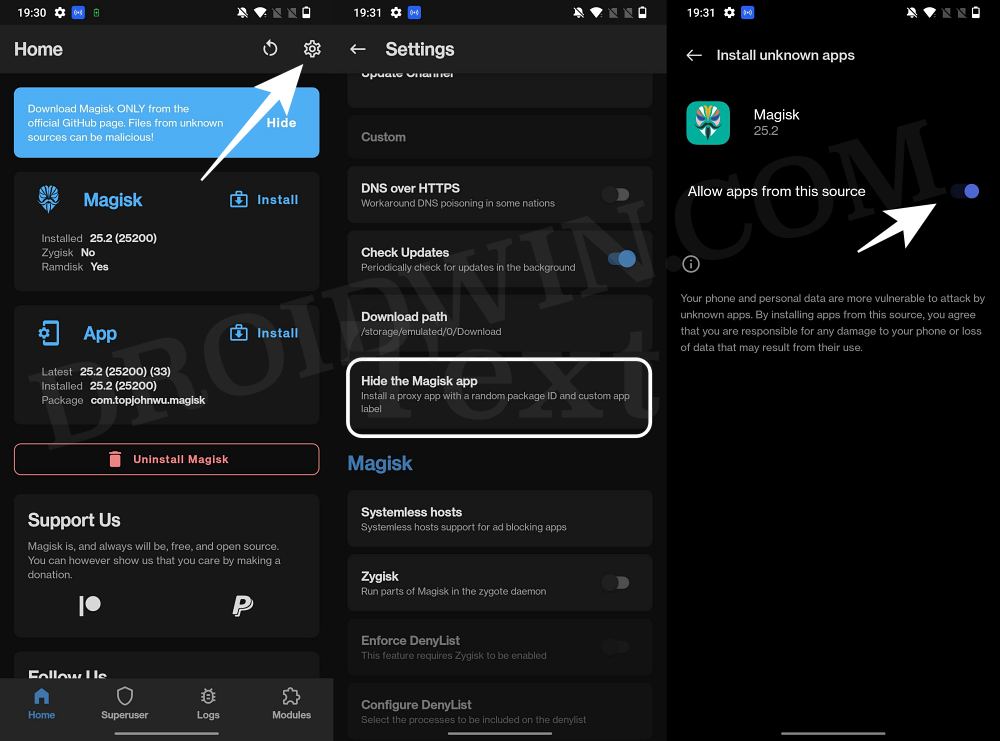
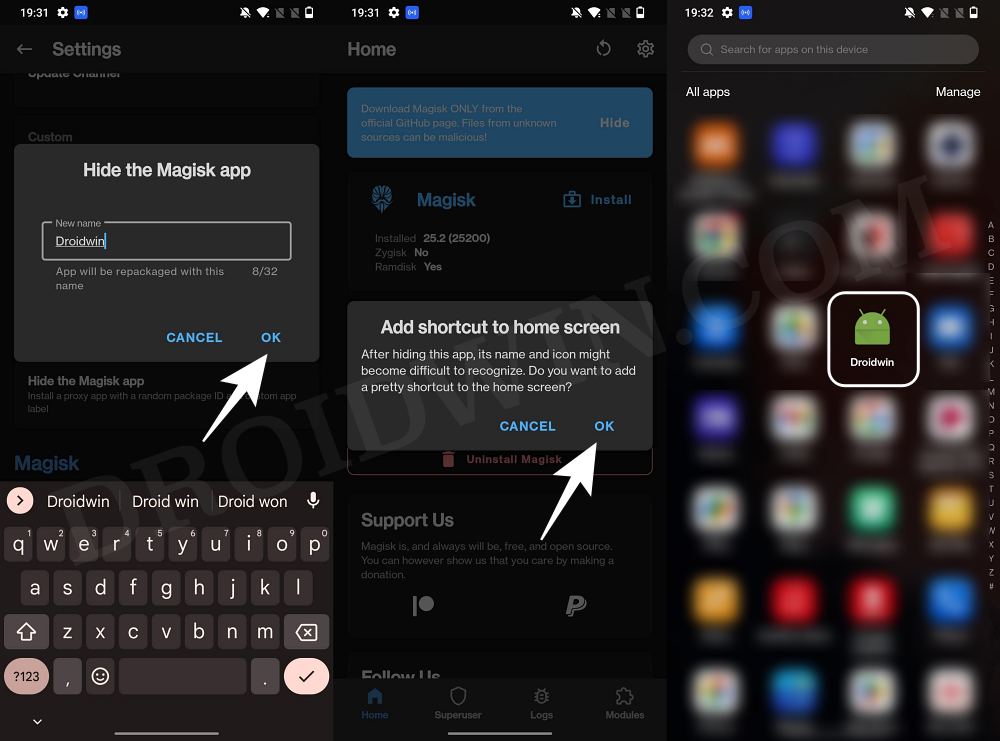
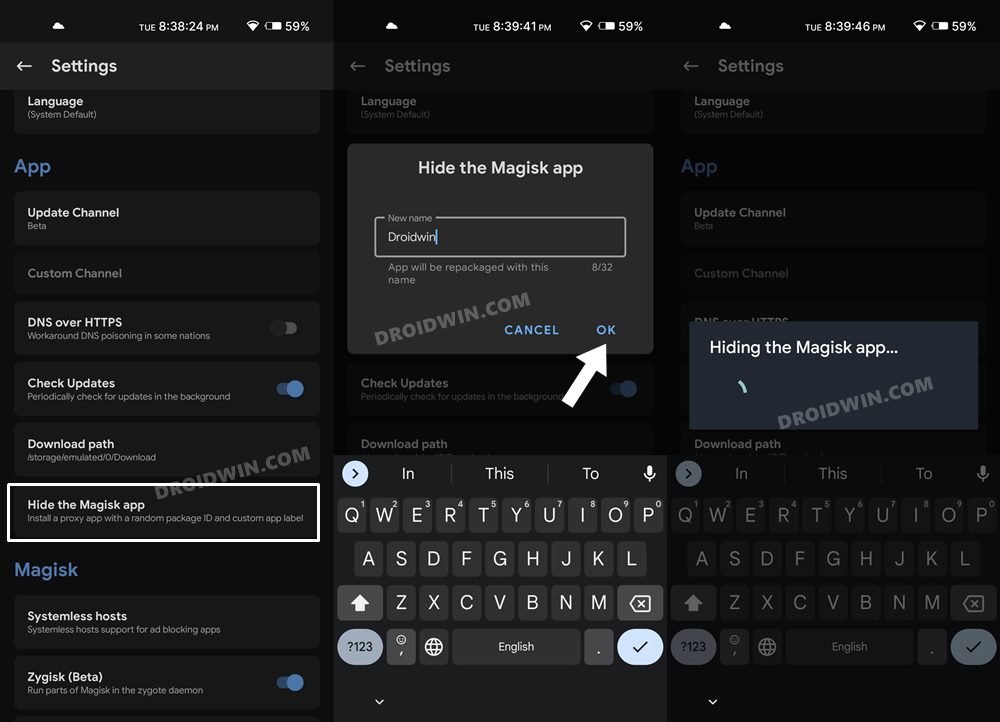
STEP 1: Hide Magisk App
- Launch the Magisk App and tap on the settings icon situated at the top right.
- Then tap on Hide the Magisk App > Enable the toggle next to Allow apps from this source.

- Assign a new random name to this Magisk app and hit OK.
- It will now ask for a home-screen shortcut, tap OK [recommended].
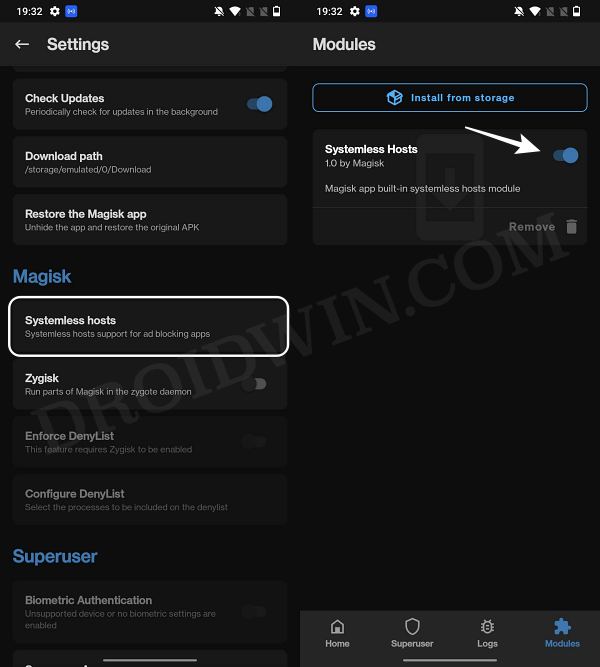
STEP 2: Enable Systemless Hosts
- Launch the Magisk App and tap on the settings icon situated at the top right.
- Then tap on Systemless hosts.
- Now go to the Modules section and verify that it has been added.
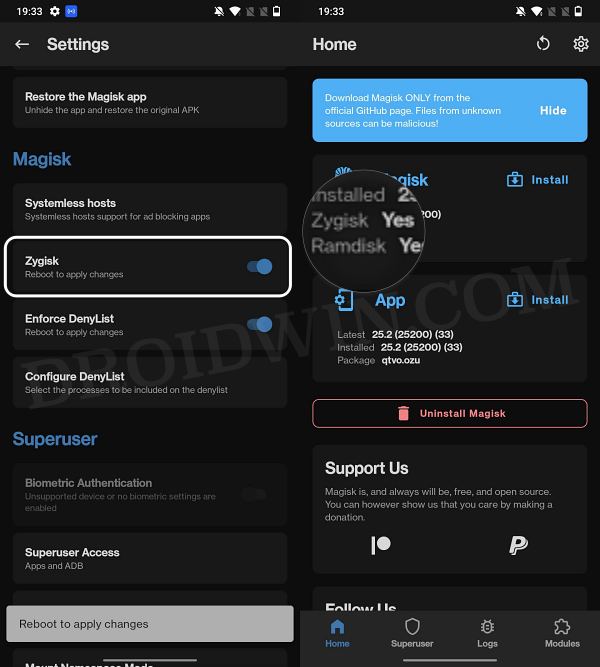
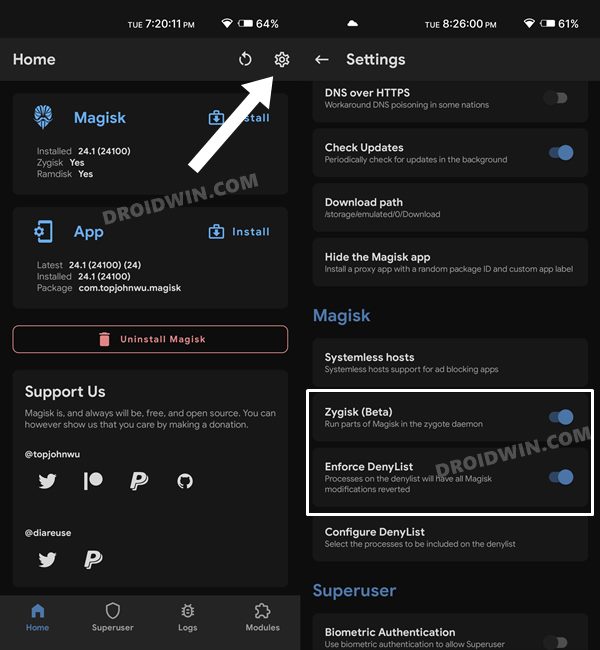
STEP 3: Enable Zygisk
- Launch the Magisk App and tap on the settings icon situated at the top right.
- Then enable the toggle next to Zygisk and restart your phone.
- Now launch Magisk and make sure that it says YES next to Zygisk.
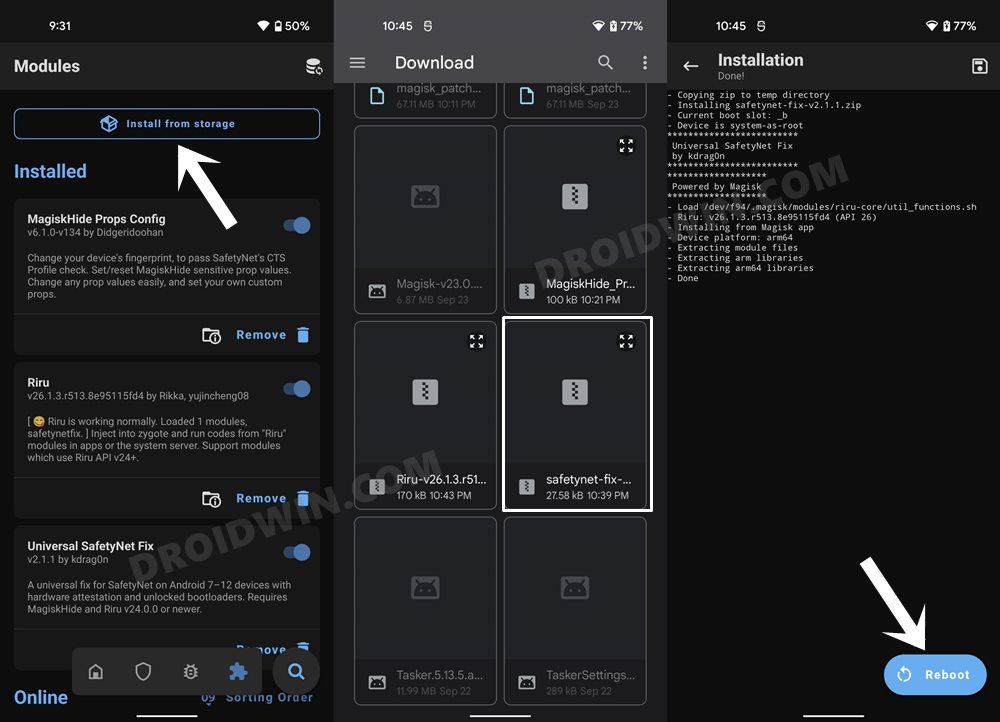
STEP 4: Flash Universal SafetyNet Fix Module
- Download the new Universal SafetyNet Fix module from below:
SafetyNet Fix module v2.3.1-MOD_3.0
Safetynet-fix-v2.4.0-MOD_2.0.zip
- Then launch Magisk, go to the Modules section and tap on Install from Storage.
- Navigate to the downloaded safetynet module and select it.
- It will now be flashed. Once done, hit Reboot.

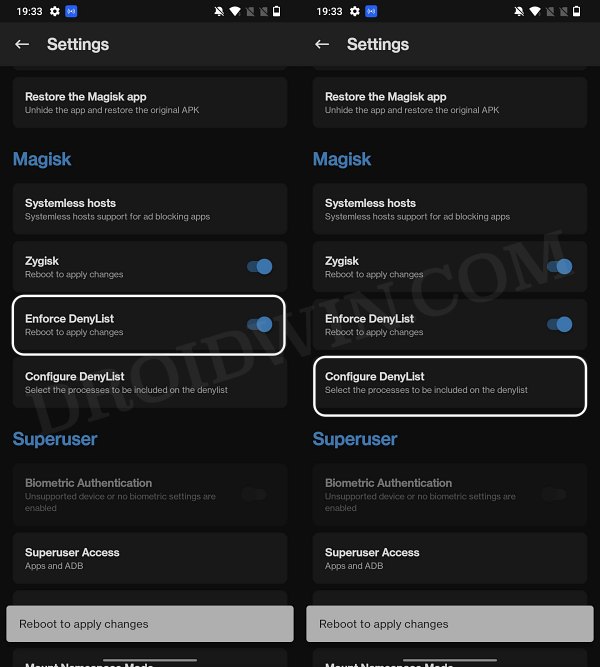
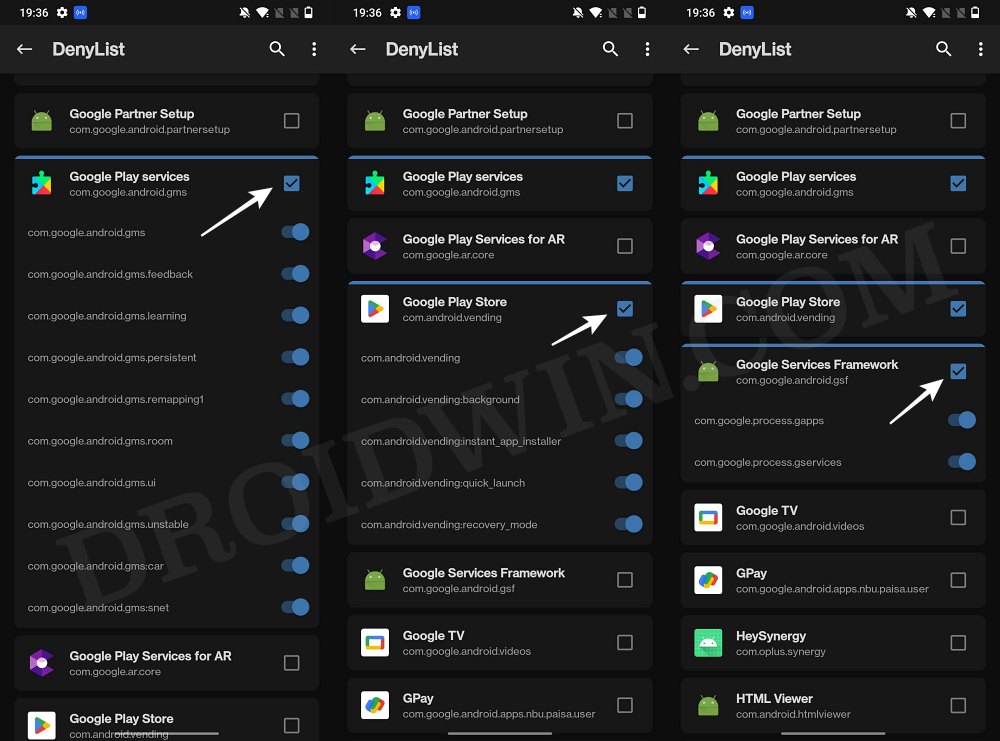
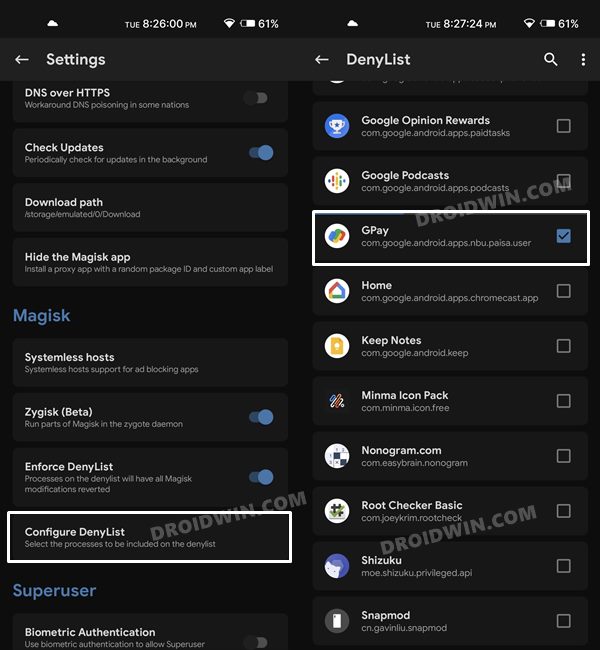
STEP 5: Configure Denylist
Denylist is the new name for the traditional Magisk hide. You could use this functionality to hide root from the desired apps, apart from the three compulsory apps listed below.
- Launch the Magisk App and tap on the settings icon situated at the top right.
- Then enable the toggle next to Enforce Denylist. Now tap on Configure Denylist.
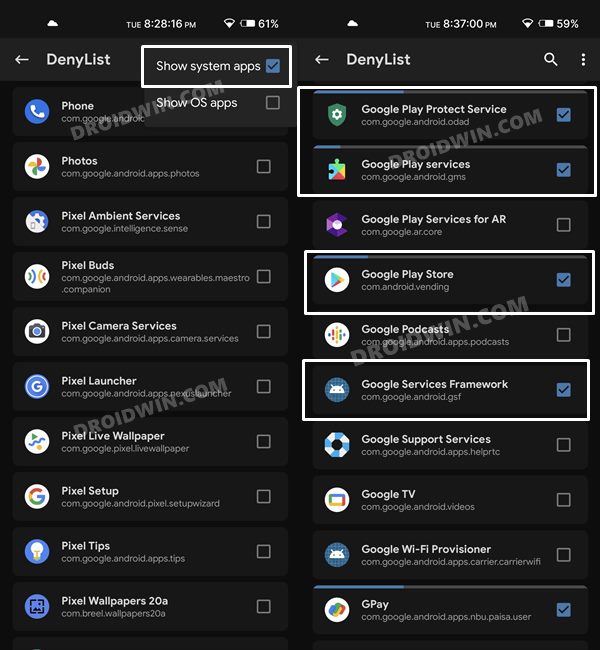
- Then expand the following apps and checkmark all its services
Google Play Service
Google Play Store
Google Service Framework
Google Play Protect Service [if present]
- After that, do the same for the banking/payment app of your choice.
- NOTE: Upon restart, the Google Service Framework might get unchecked and Google Play Services might be missing from the DenyList. This is just a UI bug and nothing to worry about [as they are still active in the backend].
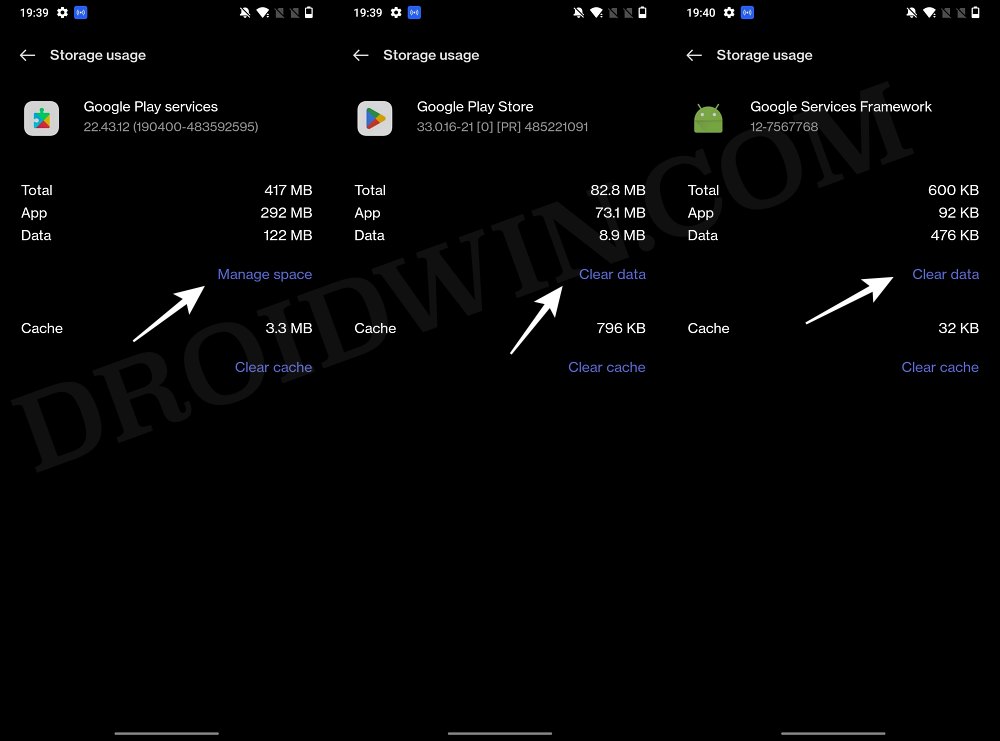
STEP 6: Delete Data
You will now have to delete the app data of all the apps from which you have hidden root. These include the compulsory Google apps and the desired apps of your choice.
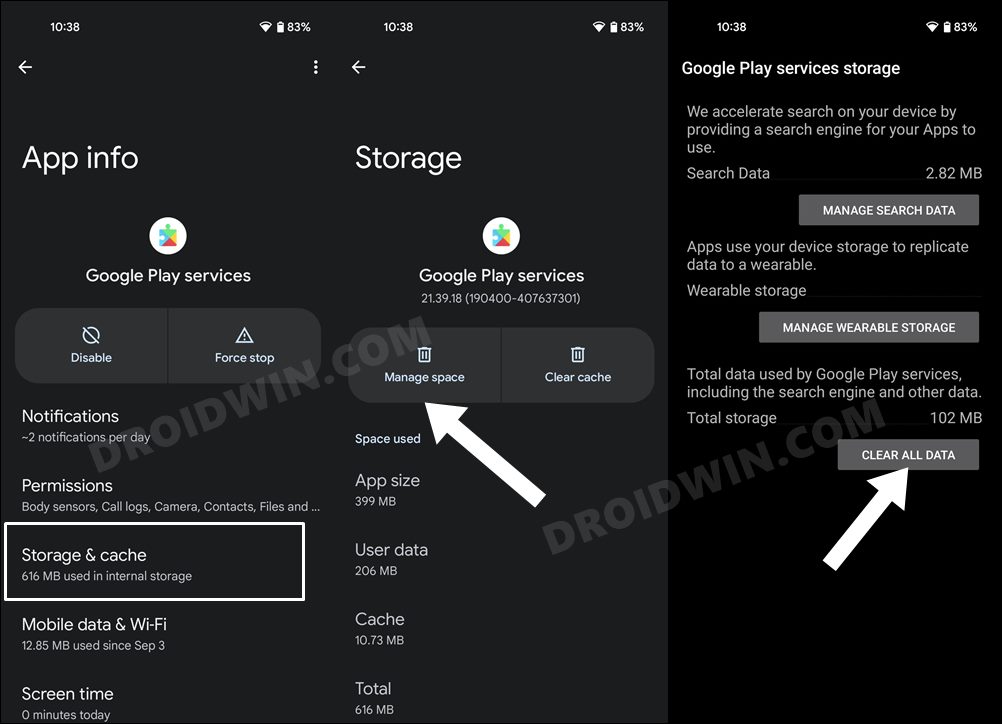
- Head over to Settings > Apps and select Google Play Service.
- Then go to its Storage section and tap on Manage Space > Clear all data.
- After that, delete the data of Google Play Store and Google Play Protect Service [if present].
- Then tap on the overflow icon situated at the top right and select Show System.
- This will bring up the system apps. Select Google Service Framework and delete its data.
- Finally, delete the data of the banking/payment apps from which you have hidden root. Once done, restart your device [compulsory].
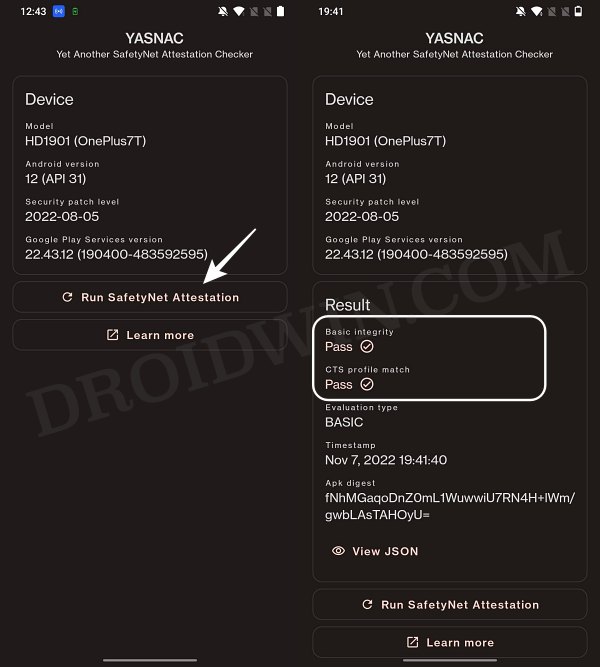
STEP 7: Check SafetyNet Test Results
- Download and install the YASNAC app from Play Store.
- Then launch it and tap on Run SafetyNet Attestation.
- You should now get Pass under both Basic Integrity and CTS Profile Match.
That’s it. these were the steps to pass SafetyNet on your rooted Android 12/13/14 device. If you have any queries concerning the aforementioned steps, do let us know in the comments. We will get back to you with a solution at the earliest.
METHOD 2: Pass SafetyNet using Magisk Hide Props Config [OLD]
This is the lengthier of the two methods and involves spoofing the device’s fingerprint to one of the older devices that followed Basic Attestation and were easier to bypass.
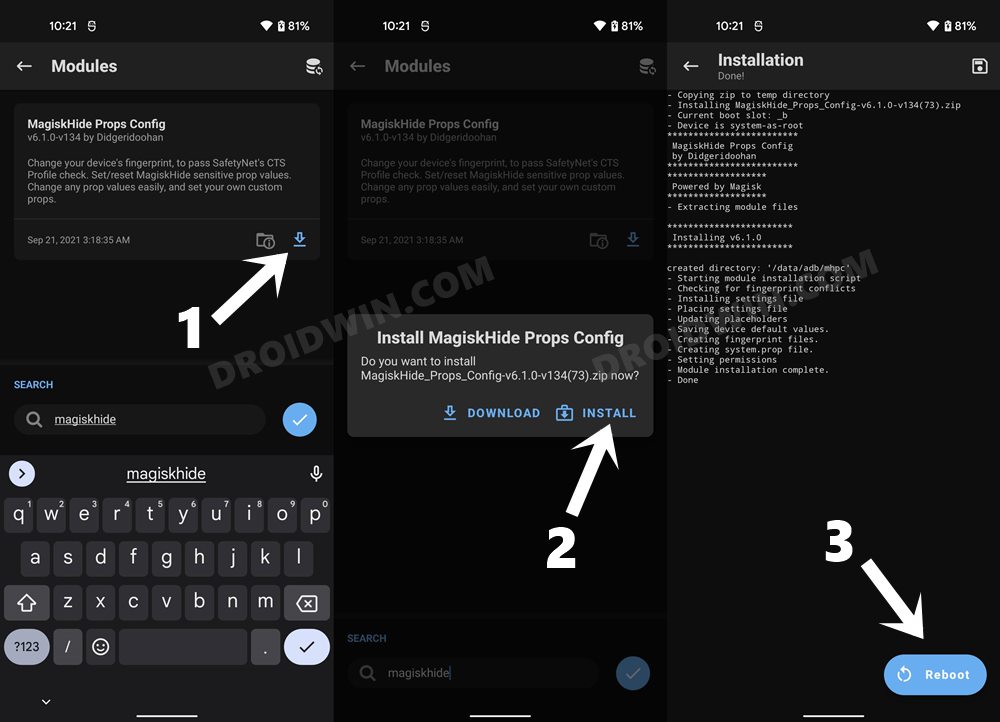
STEP 1: Install MagiskHide Props Config
- Download the MagiskHide Props Config module from GitHub/XDA and send it to your device.
- Then launch the Magisk App onto your device.
- Now tap on Install from Storage, select the Module, and hit Install.
- Once the installation is complete, hit the Reboot button situated at the bottom right.
STEP 2: Force Basic Attestation
We will now be starting with the implementation of the BASIC attestation on top of the hardware-based so that it becomes easier to bypass. Here’s how it could be done:
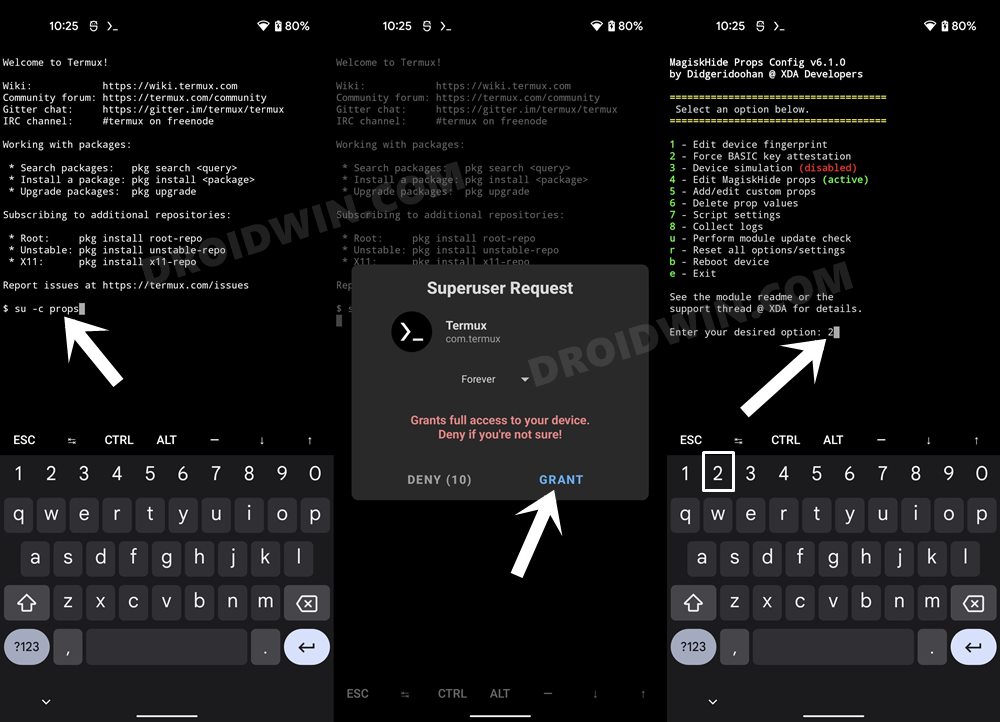
- First off, install any terminal emulator app on your device (such as the Termux app).
- Now launch it and type in the below command:
su -c props
- You will now get a Superuser Request, tap Grant.
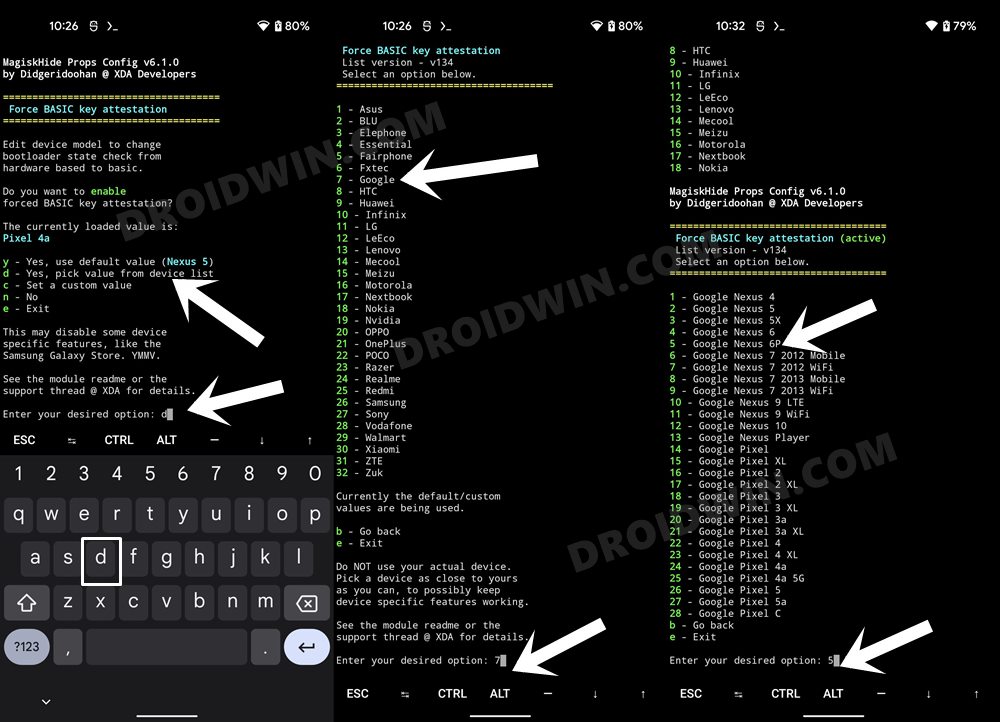
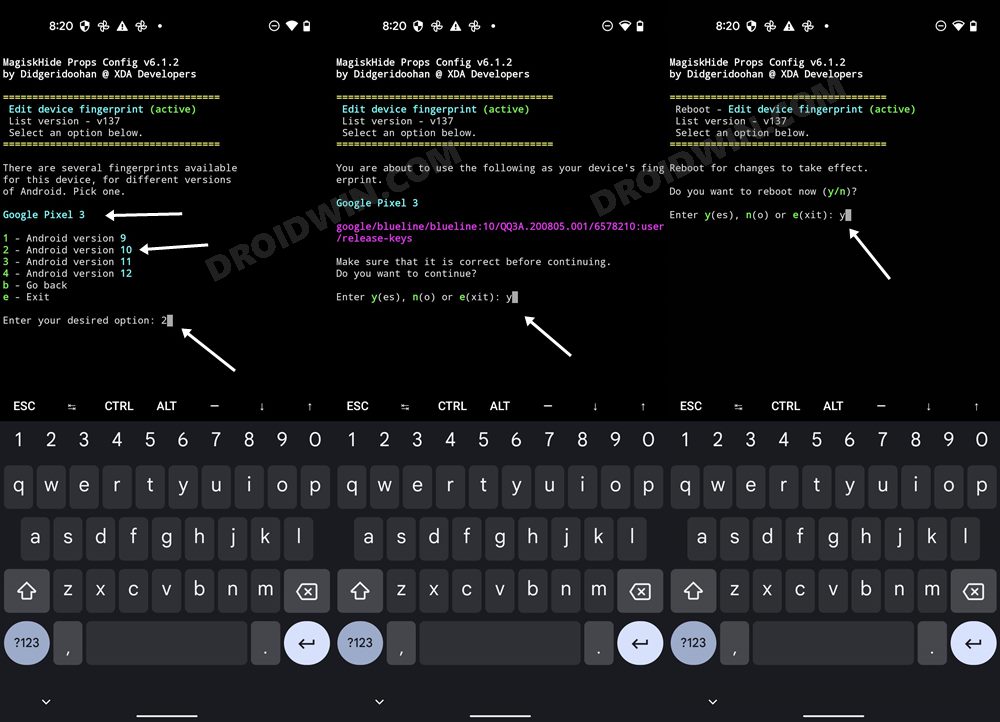
- It shall now launch the MagiskHide Props Config within the terminal itself. Type in 2 [Force BASIC Key Attestation] and hit Enter.
- This shall take you to the Force BASIC Key Attestation page. By default, the value will be set to Nexus 5.
- While there is no particular value as such that would surely spell out success, but the one from Nexus 6P or Pixel 3A seems to be giving the best results.
- In this regard, I have used the Nexus 6P value on my rooted Pixel 4A running Android 12 and was able to pass the Safetynet, so let’s choose that one [Read FAQ at the end]. To do so, type in d [Yes, pick value from device list] and hit Enter.
- Then type in 7 [Google] and press Enter. After that, type 5 [Google Nexus 6P] and hit Enter.
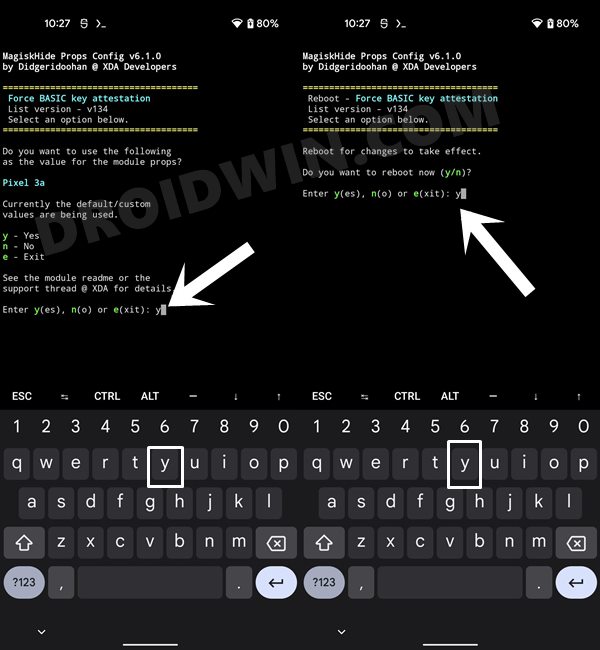
- It will now ask you to confirm the selected value, type y [YES], and hit Enter.
- Finally, you will have to reboot the device. So type y [YES] and press Enter.
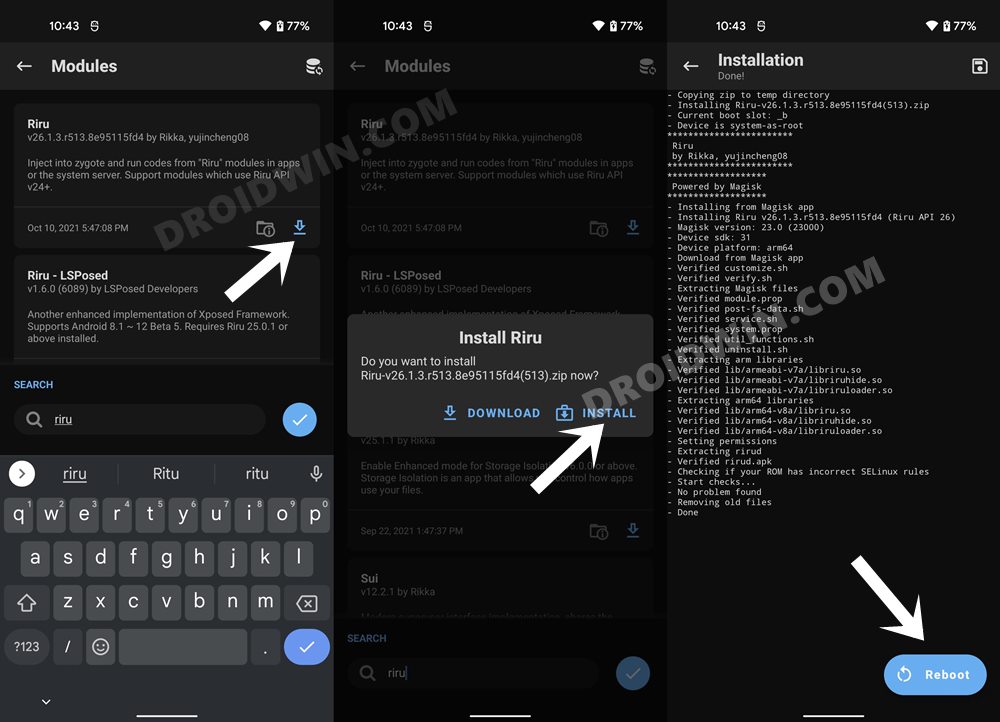
STEP 3: Instal Riru Module
Next up, you will have to install the Riru Module, which is a prerequisite for the SafetyNet Fix Module (STEP 5).
- Download the Riru Module from GitHub and transfer it to your device.
- Then launch the Magisk App and go to the Modules section.
- Now tap on Install and wait for the process to finish.
- Once done, tap on the Reboot button that appears at the bottom right.
STEP 4: Flash SafetyNet Fix
This module will help us to implement the BASIC attestation on top of the hardware one. And yes, it is the final piece of this jigsaw, completing which you would have achieved success.
- Download the SafetyNet Fix module corresponding to your Android version from below:
Android 12: Universal SafetyNet Fix Magisk Module [Credits: XDA Senior Member kdrag0n]
Android 13: Modified SafetyNet Fix Module [Credits: XDA Senior Member displax]
- Now transfer this module to your device and launch the Magisk App.
- Then go to the Modules section and tap on Install from Storage.
- Browse to the Universal SafetyNet Fix Magisk Module and select it. The module will now be flashed.
- Once done, tap on the Reboot button that appears at the bottom right.
STEP 5: Enforce Deny List and Enable Zygisk
Deny List is the new name for Magisk Hide. For the unaware, it is the feature through which you could hide root from various installed apps onto your device. So let’s first enable this Deny List and then configure it according to the requirement.
- Launch the Magisk App onto your device
- Then tap on the Settings icon situated at the top right.
- Now enable the toggle next to Zygisk and Enforce Deny List.
- Now restart your device for the changes to take place. Then launch Magisk and make sure it says YES next to Zygisk.
STEP 6: Configure DenyList
- Under the Magisk Settings menu, tap on Configure DenyList.
- Now, select the desired user apps in order to hide root from it [optional].
- After that, tap on the overflow icon situated at the top right and select Show System App.
- Now checkmark Google Play Protect Services [if present], Google Play Services, Google Play Store. and Google Service Framework.
- NOTE: Upon restart, the Google Service Framework might get unchecked and Google Play Services might be missing from the DenyList. This is just a UI bug and nothing to worry about [ they are still active in the backend].
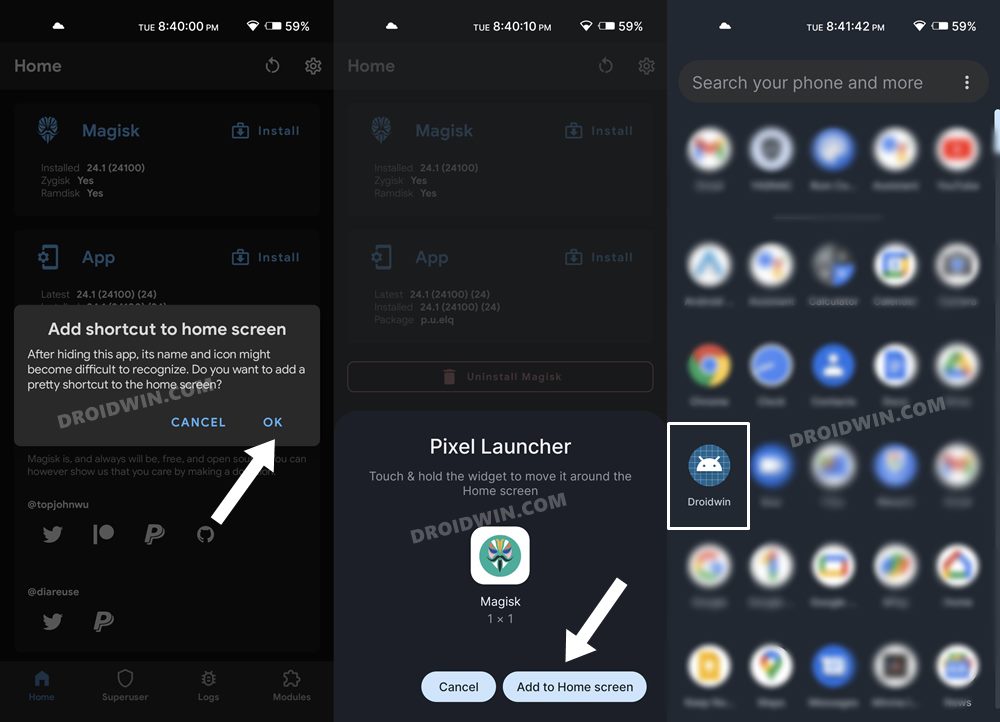
STEP 7: Hide Magisk App
- Go to the Magisk settings menu and tap on Hide the Magisk App.
- Then give it the desired name of your choice and tap OK.
- The hiding process will now begin. Once done, it will ask whether you wish to have the app shortcut on the home screen.
- For ease of convenience, you may select Yes and then tap on the Add to Home Screen button.
STEP 8: Delete Play Service and Play Store Data
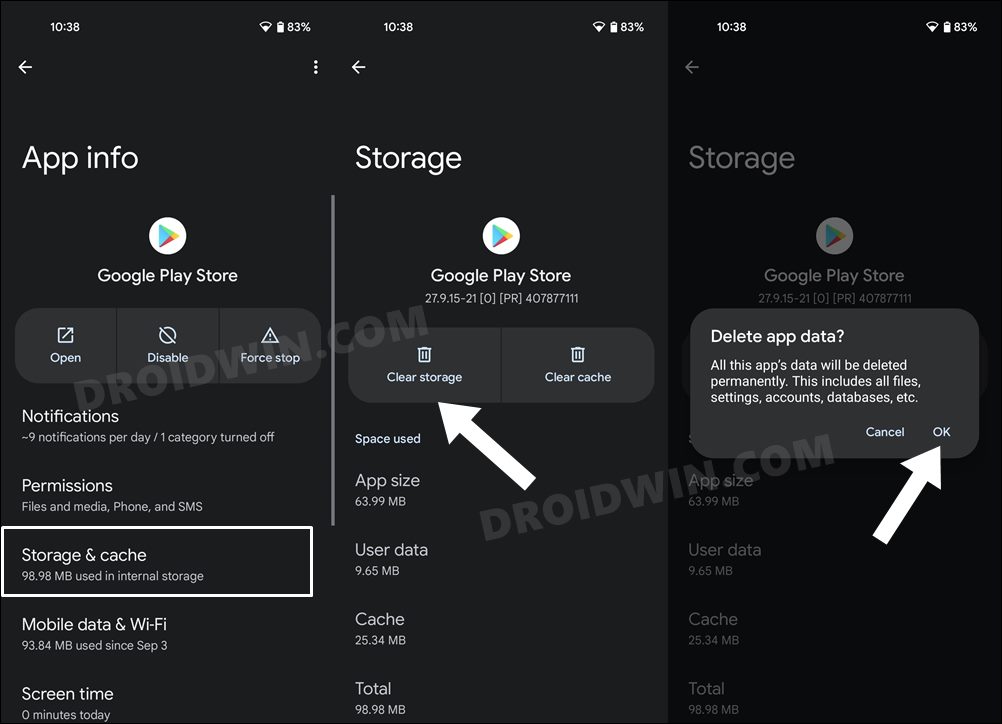
- Head over to Settings > Apps > See All Apps.
- Then select Google Play Service and go to its Storage and Cache section.
- After that, tap on Manage Space > Clear All Data.
- Once that is done, go back and select Google Play Store.
- Then go to the Storage and Cache section and tap on Clear Storage > OK.
STEP 9: Check SafetyNet Results
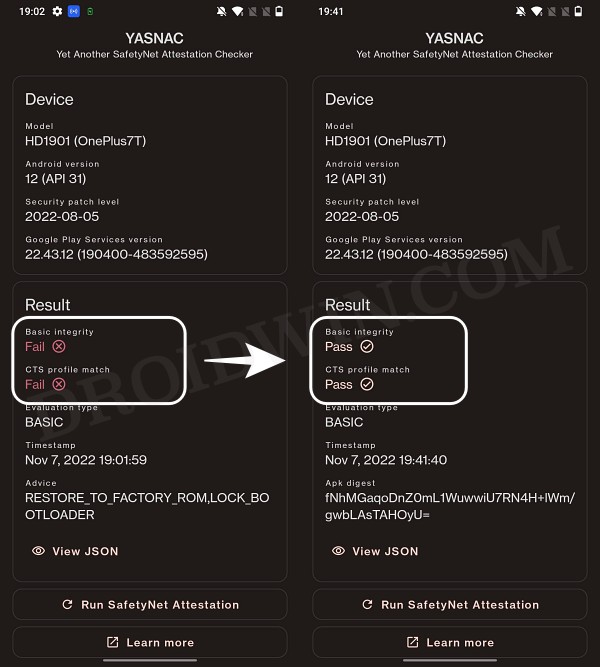
UPDATE 1: The latest update to the Magisk app has removed the option to check SafetyNet. So you will now have to take the help of a third-party app. As for this guide, we will be using the YASNAC – Yet Another SafetyNet Attestation Checker.
- So download YASNAC from the Play Store and install it onto your device.
- Then launch the app and tap on Run SafetyNet Attestation.
Before and After - You should now get the Pass result under both the basicIntegrity and ctsProfile sections.
The older method of checking Safetynet via Magisk is preserved below:
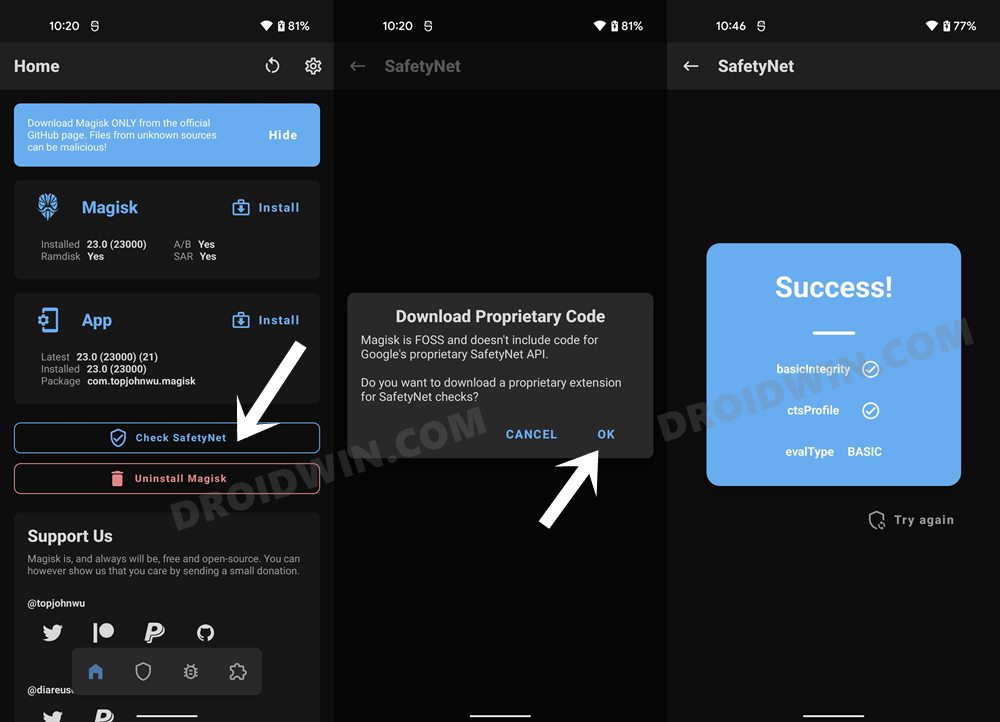
- To begin with, launch the Magisk App and tap on Check SafetyNet.
- If this is the first time, you are performing this check, then Magisk will notify you to download the proprietary code, tap OK.
- As soon as it gets downloaded, the results will be right in front of you.
- It should spell out the Success message with both the basicIntegrity and ctsProfile tests having a checkmark next to them.
These were the steps to pass the SafetyNet Test on your rooted Android 12/13/14 device. If you have any queries concerning the aforementioned steps, do let us know in the comments. We will get back to you with a solution at the earliest.
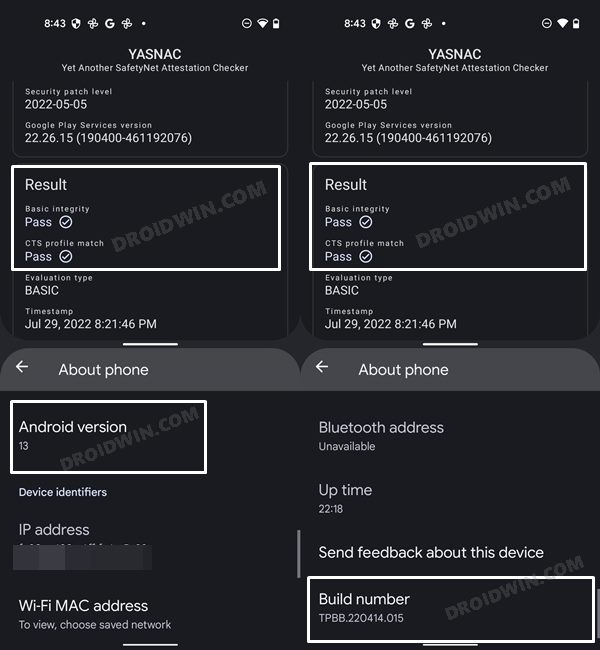
Update for Android 13/14
For my device running Android 14, I chose Pixel 3 and selected Android 1o as the OS in STEP 2 above. So if you have any doubts, then it’s better to select that one as it has been tried and tested.
Attaching hereby are the results of passing SafetyNet on rooted Android 13/14:
UPDATE: Use Play Integrity Instead of SafetyNet
Most apps have already ditched SafetyNet and moved over to Play Integrity. So instead of trying to pass the former, you should instead pass the latter, the instructions for which are given in the below-linked guide:
How to pass ‘Meets Device and Basic Integrity’ via Play Integrity Fix


Alex DP
Great guide. Method 1 worked perfectly on my old Galaxy Note 8 (with hadesrom, Android 10).
You need to closely follow each step, don’t skip anything, and it will work perfectly.
Thank you.
Asher Burns
My pixel 7 was failing CTS Profile Match. The reason for the failure is that I installed Safetynet-fix-v2.4.0-MOD_2.0.zip modified by Displax. That does not work for the Pixel 7. Instead install the first option shown(as of today, this page changes) which is released on GitHub called kdrag0n. I uninstalled the displax made mod and restarted. Then I installed the release from kdragon and restarted. Now I pass safety check! I hope this helps someone
Steven
CTS profile match failed
Hardware backed
Followed every step.
Device OnePlus 9 Pro
Steven
Well I can play Monster Hunter Now now. So at least it doesn’t check for the failed check. Not sure if all apps work. I’ll have to check overtime.
Jean-Noël HAMON
Good morning
I cannot configure Magisk 26.3 correctly for an SS23 Ultra smartphone: I have the default “CTS profile match” fail….
I can’t find the different services that you mention to hide Magisk from them in your tutorial:
Google Play Service
Google Service Framework
Google Play Protect Service
I don’t know if that’s the only reason!!
I made the same settings in Magisk on another S7 EDGE smartphone (which runs LineagesOS 20 or Android 13) and Yasnac or SafetyNet are OK with all the settings green…
Google Wallet works perfectly on this device and I was able to set up a bank card without difficulty.
The Google Wallezt app worked perfectly on the S23 Ultra when it was not rooted…
Thank you for giving me your help and your information which will be very useful to me…
Best regards,
Nikto
Hi, I followed your Method 2 to fix the SafetyNet CTS profile match Fail on my Moto G6 Plus with Android 9. The only thing I did different from you was using the latest 2.4.0 Safetynet Fix version instead of the 2.3.1 you mentioned. I thought it was implied to prefer the latest one. However, But when my phone failed again the CTS profile match on YASNAC the question came to me. Do I have to do it all over again using version 2.3.1 anyway? Or maybe I should use Method 1 instead?
(Basic intergrity has passed)
Thanks
VK4TB
Method 2 worked perfectly on my MotoG7plus running Android 10 using SafetyNet Fix module v2.3.1-MOD_3.0
Many thanks.
missionman
I have a Pixel 7 Pro rooted with latest Magisk 26.1 (26100) on Android 13. I followed the 2nd Method of the 2.
I got a Certified Device Pass but failed CTS Profile Match.
I tried to update my module to version 2.4.0 by Kdragon and this didnt fix it but I did pass Device Certification.
HOW DO I GET CTS PROFILE MATCH TO PASS? Please help! 🙂
Alexander
GREAT! xiaomi readmi 12 pro ch
ste
I follow your steps on my Pixel 4a with LineageOS 20/Android 13. Unfortunately on my side the CTS profile check still fails! What could I do?
Spiros Sakkas
Hi I have Redmi note 6 pro with custom pixel experience rom running android 13, for me I tried both of the methods but cts profile match always fails what can I do????
Robert
working on a project to make this run in a AVD ..
https://github.com/freeload101/Java-Android-Magisk-Burp-Objection-Root-Emulator-Easy
message me at freeload101____AT__yahoo.com I can do a screenshare sometime!!!
Tomasz
For Pixel 7 PRO the second method is not enough, one needs to install the modified safetynet-fix module published here: https://forum.xda-developers.com/t/magisk-module-universal-safetynet-fix-2-3-1.4217823/page-91#post-87198517
ma61187
I have tried both the ways with and without the Magisk Hide Props Config and I get Basic Integrity but fail CTS profile match. Running latest firmware for Google Pixel 7 and latest version of Magisk.
micadot
perfect tutorial, clean and many purposes for same result.
Google pixel 4, android 13=> choice nexus , no problem, ok after reboot.
Big thanks, Hassan.
Jonathan
Should i still clear Data of GServices and Playstore even safetynet passess..
This what i’ve done
I follow all the instruction, check the playstore say it’s still passess, then download YASNAC check safety net all cleared PASSES.. so do i need to clear Data of it
xboxbr
mine passed, but I can’t find netflix or ifood in google play… play protect is certified
Ruud
Google service framework check mark, in the deny-list, disappeared after I rebooted my device.
And so with Google play service.
In addition, I can’t find Google play protect anywhere in the deny-list.
I hope you have a solution for me.
Sadique Hassan
Google Play Protect might not be present on every device. If it is missing from yours, then just leave it, it wouldn’t result in any issues. Moreover, the Google Service Framework and Google Play Service do tend to get unchecked or disappear upon restarting the device, this is just a UI bug and nothing to worry about [they are actually active in the backend].
Parku
i am on oneplus 10pro android 13, interestingly none of the below is even present in the configure deny list option. should i proceed without any worry?
Google Play Service
Google Play Store
Google Service Framework
Google Play Protect Service [if present]
Dovie Weinstock
Hi, great tutorials! I managed to root my Pixel 6 using your method, and when trying this fix, I can’t find the MagiskHide setting, and neither do I get modules in module section. I installed MagiskHide from local storage.
Someone recommended I turn on Zygisk, but it hasn’t helped as far as I can tell.
I’ve also been getting a “No command” screen when trying recovery mode.
Ziziros
Excellent tutorial. Very thorough and updated to the newest methods and tools. Great work. All worked for me. Xiaomi android 12 Mi 11i.