In this guide, we will show you four different methods to install OTA Updates on Rooted Pixel 6A/6/Pro devices. Now that the sixth iteration of the Pixel series is live, users could get acquainted with a plethora of new and intriguing features. The major hardware redesign, Android 12 out of the box, in-display fingerprint sensor (which seriously needs to perform better!), and the in-house Tensor chip are some of its noteworthy features.
Along the same lines, the latest additions to the Pixel lineup have carried forward the legacy of the OEM’s active participation in custom development. As a result of which, gaining administrative privileges is now a possibility. However, rooting both these devices, as of now, wouldn’t take the general approach of simply flashing the patched boot.img file.
This time around, you will also have to disable the verity check otherwise, you will end up with the “failure to load/verify boot images” error. Well, we have already discussed all this in the linked guides, so our next course of action should be to install OTA updates on rooted Pixel 6A/6/Pro devices. Since the process to root is different, installing OTA on rooted will also be a tad different than what the general procedure is. So with that in mind, let’s get started.
Table of Contents
Installing OTA Updates on Rooted Pixel 6A/6/Pro: What’s the Fuss All About?
![]()
Just to get a quick recap, in order to root your Pixel 6/Pro device, you will have to disable the Verified Boot. This could be done by flashing the stock vbmeta file along with the –disable-verity and –disable-verification flags. However, after rooting the device, if you download the OTA update and then reboot the device to install it, it would re-enable the Verified Boot. In such a situation, the only way out is to completely wipe your device which will then disable the Verified Boot as well.
So how could you then install OTA Updates on Rooted Pixel 6/Pro devices without facing any troubles as such? Well, what you need to do is install the latest OTA update [but don’t boot to OS]> Boot to Fastboot and disable Verified Boot > Boot to OS > Patch and Flash boot.img = Success!. The below step-by-step instructions shall make it all clear. So without any further ado, let’s get started.
How to Install OTA Updates on Rooted Google Pixel 6A/6/Pro [Video]
Given here are four different methods to carry out the said tasks. All these methods only differ in the process of installing OTA and disabling the vbmeta check, whereas the process of patching the stock boot.img and then flashing it via Magisk remains the same across all these methods. With that in mind, let’s get started. Droidwin and its members wouldn’t be held responsible in case of a thermonuclear war, your alarm doesn’t wake you up, or if anything happens to your device and data by performing the below steps.
Method 1: Via Direct OTA
This is the easiest and shortest method out of the four when it comes to installing OTA Updates on Rooted Pixel 6A/6/Pro. Here’s what you need to do:
- To begin with, launch the Magisk App, go to the Modules section, and disable all the modules.

- Then come back to the Magisk home page and tap on Uninstall Magisk > Restore Images.

- Then go to Settings > System > System Update and download the available update.
- Once downloaded, do not reboot your device. Rather, launch the Magisk App.
- Then tap on Install next to Magisk. After that, select Install to Inactive Slot.

- You will now get a prompt, tap OK. Magisk will now be installed to the inactive slot.
- Once done, your Pixel 6A/6/Pro will automatically restart to the updated and rooted OS! You may now re-enable all the modules as well.
Method 2: Via ADB Sideload [OTA]
- To begin with, download the Android SDK Platform Tools. Then extract it to any location on your PC. Doing so shall give you the platform-tools folder, which we will be using throughout this guide.

- Next up, download the OTA image for your device from below:
OTA Images for: PIXEL 6A | Pixel 6 | Pixel 6 Pro
- Now extract the boot.img from the Images ZIP file and transfer it to your device. If the OTA is in a paylod.bin format, then you could use the Fastboot Enhance Tool to unpack it and extract boot.img

- Next up, transfer the OTA file to the platform-tools folder as well. Also, make sure to rename the downloaded the file to ota, so that the complete name becomes ota.zip.
- After that, enable USB Debugging on your device [Settings > System > Tap on Build Number 7 Times > Settings > System > Developer Options > USB Debugging].

- Connect your device to the PC via USB cable. Then head over to the platform-tools folder, type in CMD in the address bar, and hit Enter.


- This will launch the Command Prompt. Type in the following command in the CMD window to boot your device to Recovery Mode
adb reboot recovery
- Now use the Volume Keys to select Apply Update via ADB and hit the Power key to confirm it.

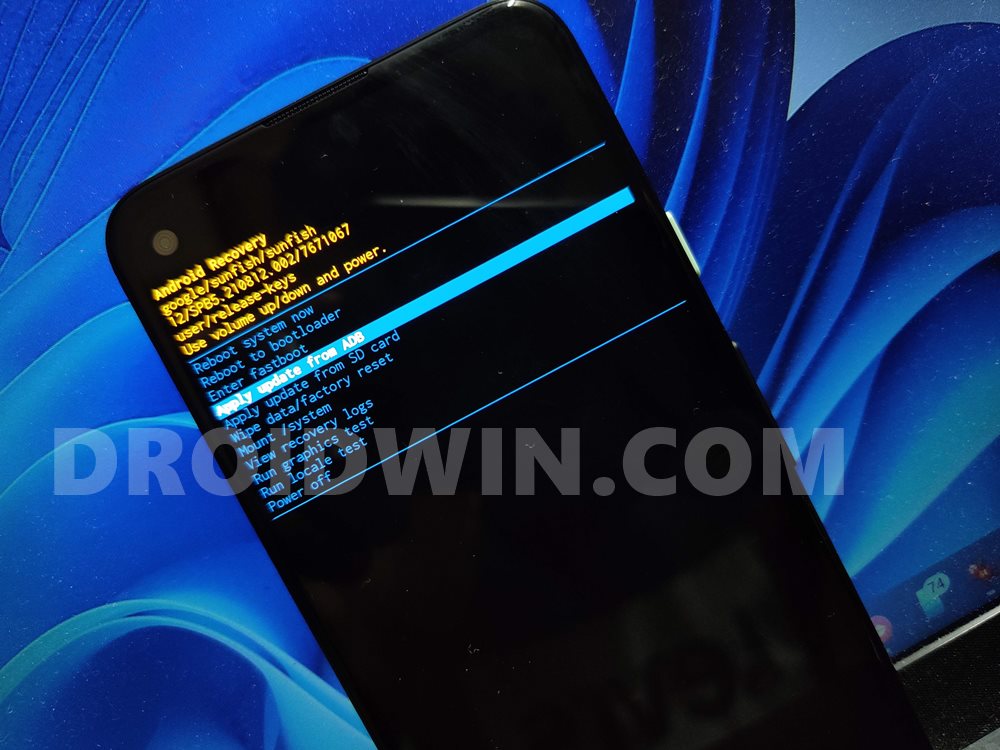
- Then head over to the Command Prompt that is opened inside platform-tools and execute the below command to flash the OTA file:
adb sideload ota.zip
- Once the flashing is complete, use the Volume key to select Reboot System now and hit the Power key to confirm it.

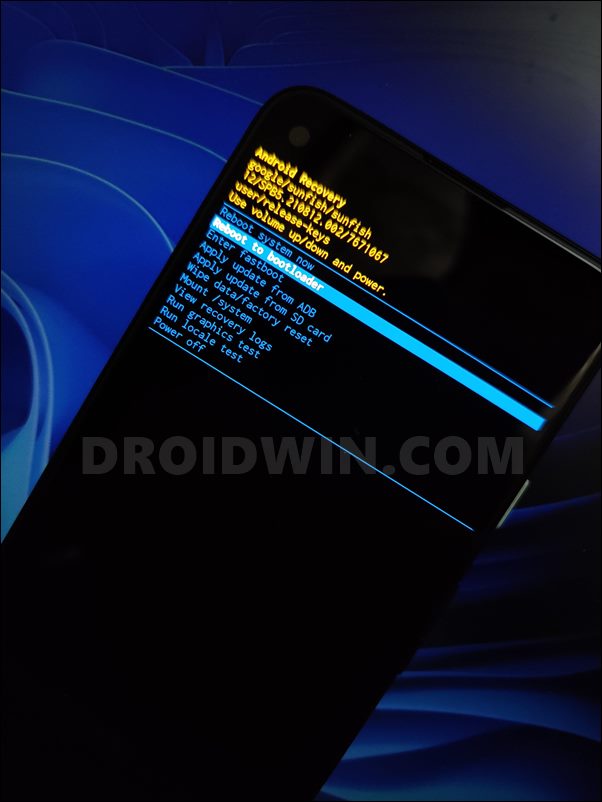
- Now install the Magisk App onto your device. Then launch it and tap on the Install button next to Magisk.
- Then choose Select and Patch a File. Navigate to the boot.img file and select it.


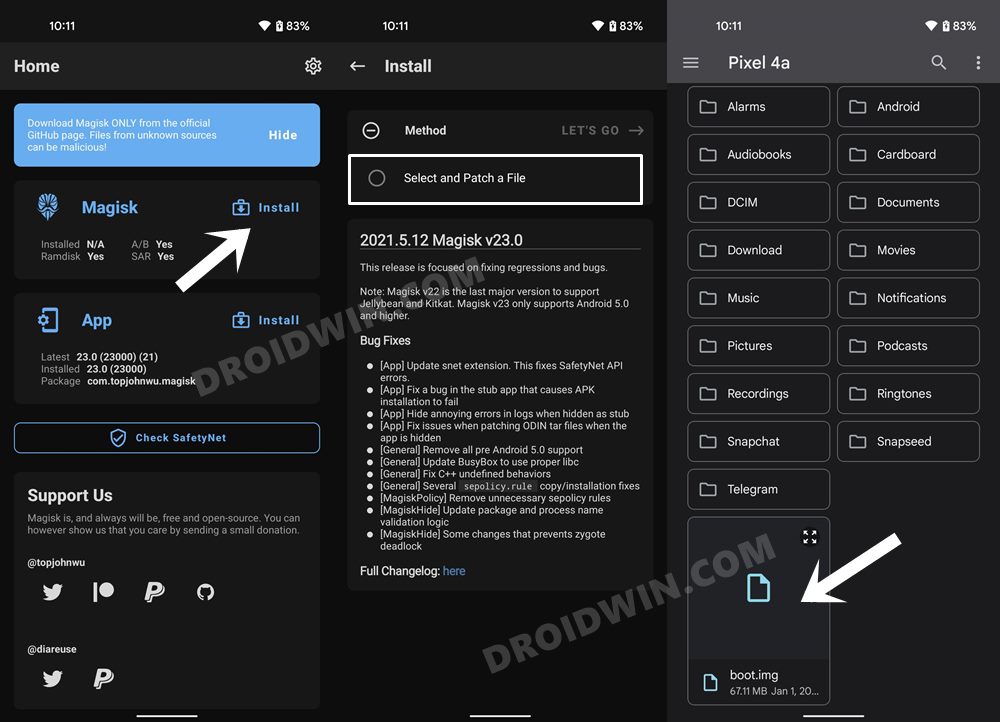
- Then tap on the Let’s Go button situated at the top right to patch the file.


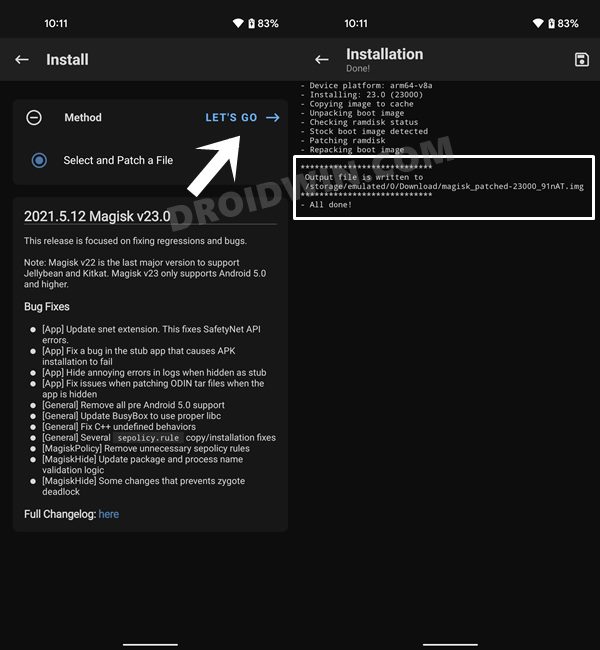
- Once done, connect your device to the PC via USB. Then transfer this patched boot.img to the platform-tools folder. Likewise, rename it to magisk_patched_boot.img.
- Now use the below command to boot your device to Fastboot Mode:
adb reboot bootloader

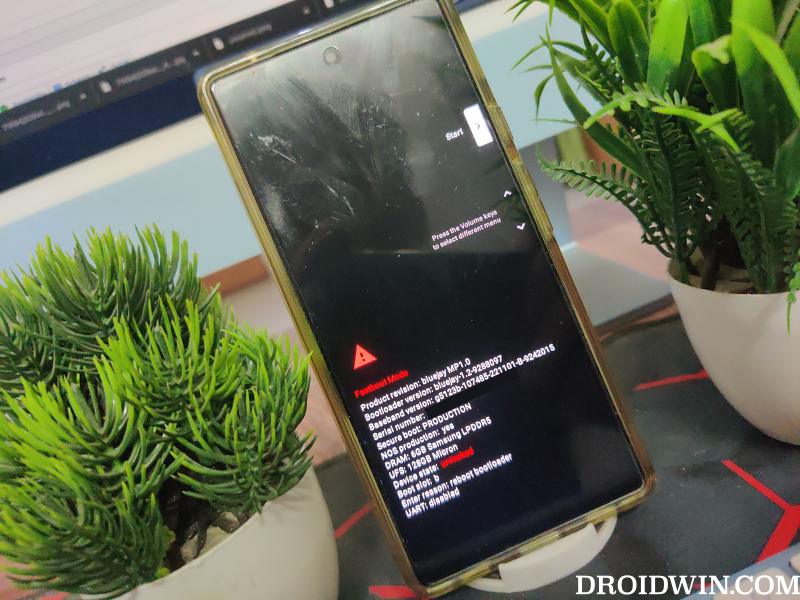
- Now execute the below command to boot your device via the patched boot.img using the below command:
fastboot boot magisk_patched_boot.img
- If everything is working well and good, then you could proceed for permanent root. This could be done by launching the Magisk App, then tap on Install > Direct Install > Let’s Go.

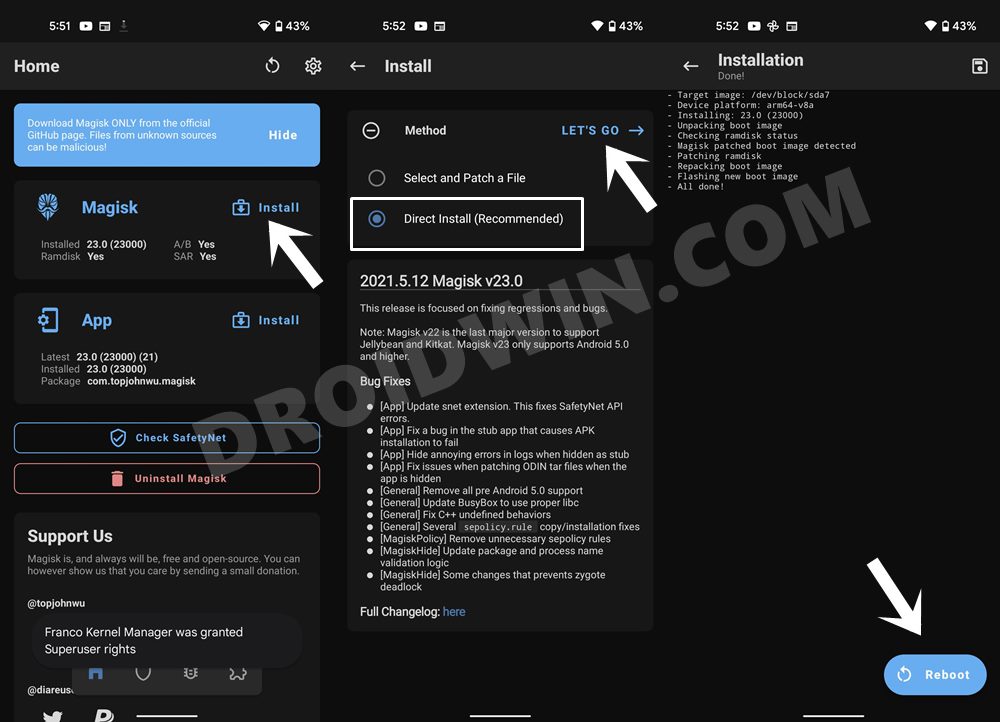
- Now, wait for the process to finish. Once done, tap on the Reboot button situated at the bottom right. That’s it
So this was the second method to install OTA Updates on Rooted Pixel 6A/6/Pro. Let’s now make you aware of the other two methods.
Method 3: Via Factory Image [Recommended]
This is the lengthiest of the four methods but is also the most safest one, so it’s usually the recommended approach.
- To begin with, download a text editor like Notepad++ on your PC.
- Then download and extract the Android SDK Platform Tools on your PC.

- Now download the factory image for your device from below and extract it inside the platform tools folder.
Factory Images for: Pixel 6A | Pixel 6 | Pixel 6 Pro

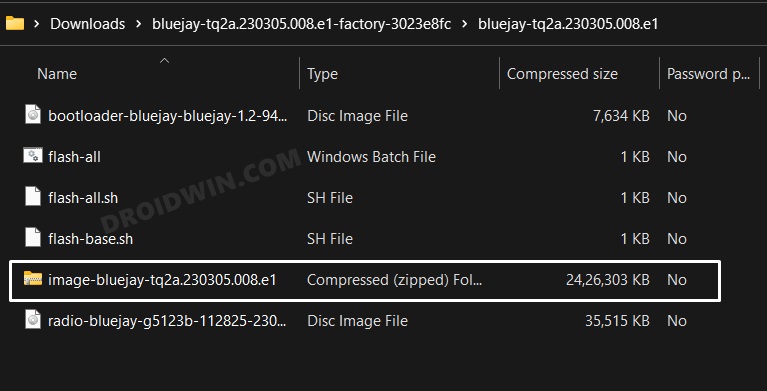
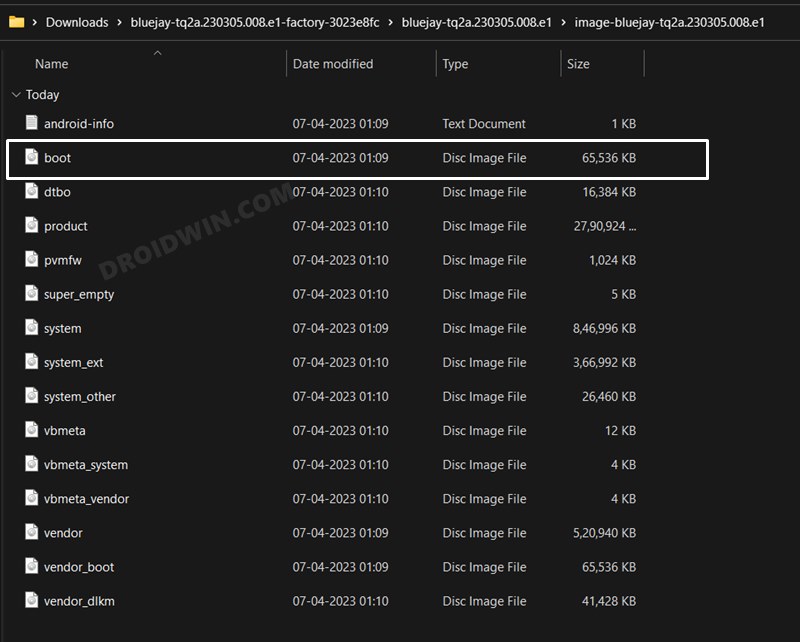
- Then go to the Images folder and extract the boot.img file. Now transfer this file to your device.

- Now launch the Magisk App, tap on Install next to Magisk, and tap on Select and Patch a File.


- Now select boot.img file and hit the Let’s Go button situated at the top right.
- The file will now be patched and placed in the Downloads folder on your phone.


- Transfer it to the platform-tools folder on your PC and rename it to magisk_patched_boot.img.
- Now enable USB Debugging on your device and connect it to your PC via a USB cable.


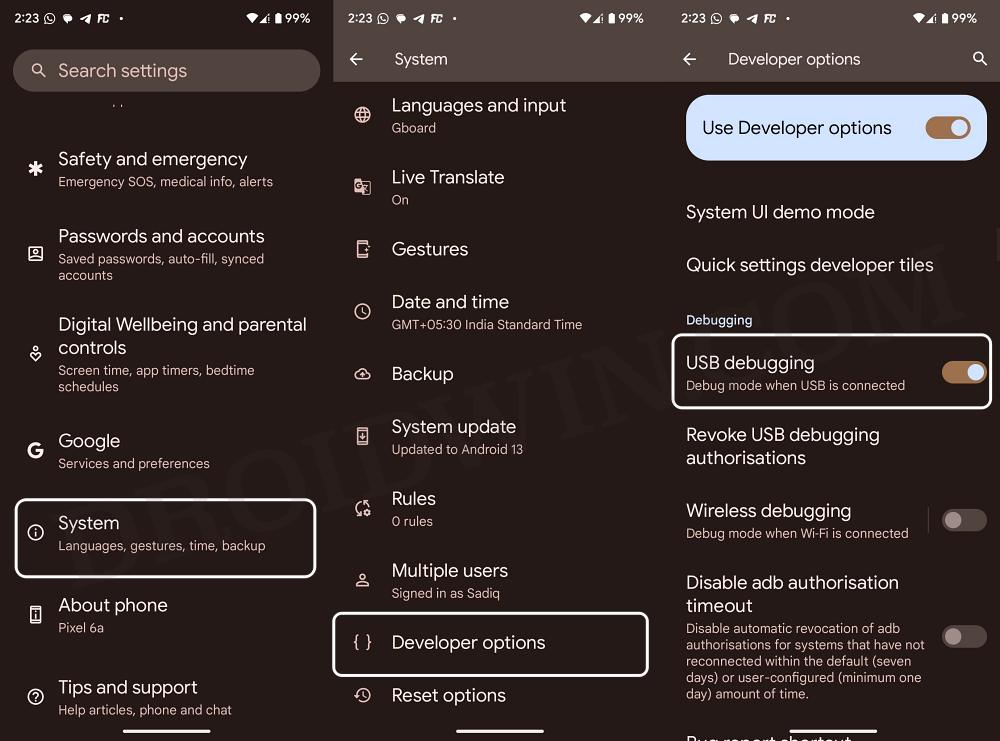
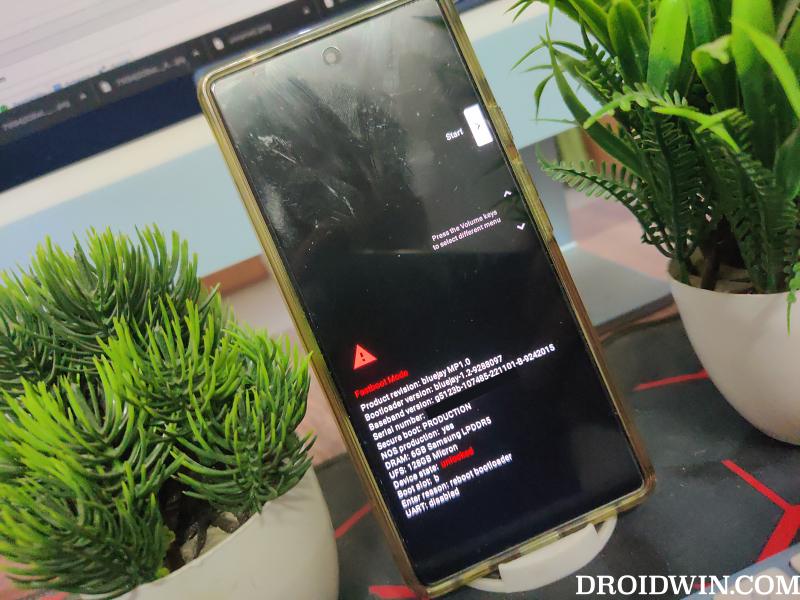
- Then launch CMD inside the platform-tools folder and type in the below command to boot your device to Fastboot Mode:
adb reboot bootloader


- Now go to the extracted firmware folder, right-click on the flash-all.bat file, and select More Options > Edit with Notepad++.

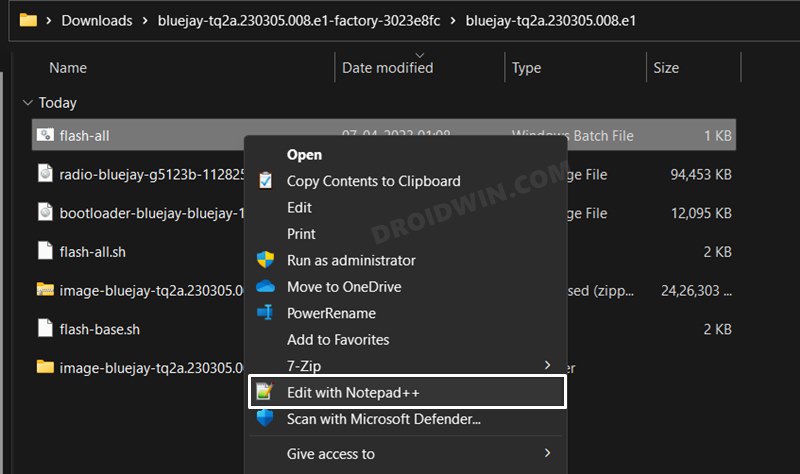
- Move your cursor over to the fastboot -w update image-filename.zip and delete the -w keyword. Now hit the Ctrl+S to save the changes. The line should now look something like this:
fastboot update image-filename.zip


- Now run this flash-all.bat file. The flashing will now start and during the process, your device will automatically reboot to Fastboot and FastbootD Modes, that’s completely normal.

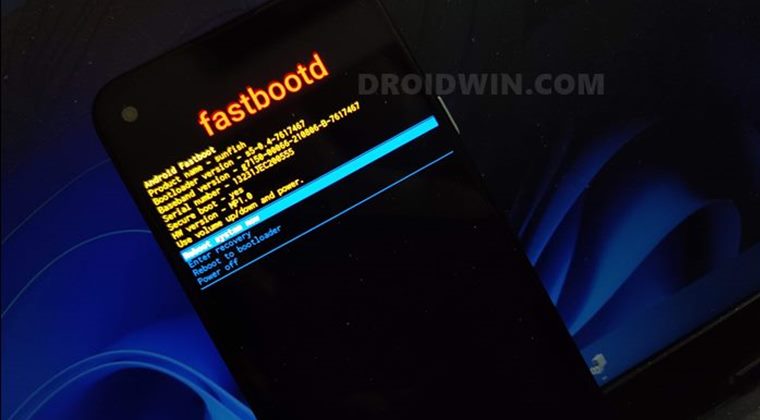
- Once done, your device will boot to the OS. Now enable USB Debugging and execute the below command to boot your device to Fastboot Mode:
adb reboot bootloader


- Now execute the below command to boot your device via Magisk patched boot.img:
fastboot boot magisk_patched_boot.img
- If everything is working well and good, then you could proceed for permanent root. This could be done by launching the Magisk App, then tap on Install > Direct Install > Let’s Go.

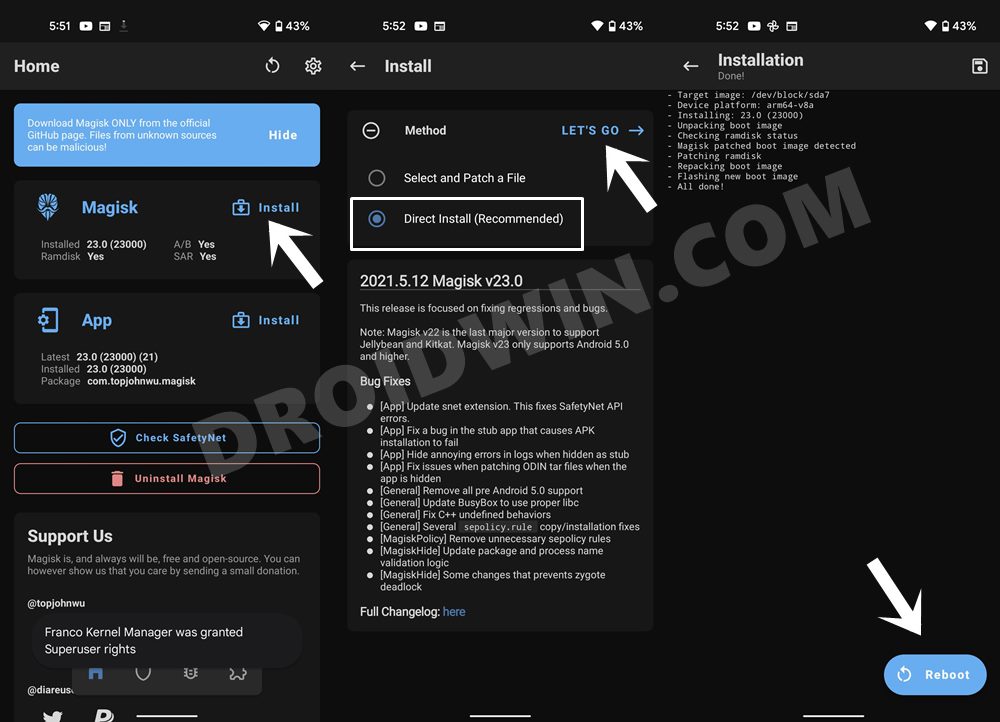
- Now, wait for the process to finish. Once done, tap on the Reboot button situated at the bottom right. That’s it.
- Once your device boots to the OS, you could now verify root via Magisk and then re-enable all the disabled modules [do so one module at a time].
This was the third method to install OTA Updates on Rooted Pixel 6A/6/Pro. Let’s now make you aware of the final method to carry out this task. But before that, let’s discuss something interesting.
NOTE: We first flashed the factory image file [STEP 8], booted our phone to OS, patched the stock boot.img [STEP 11 ], then booted to Fastboot [STEP 14], and finally booted our phone via the patched boot [STEP 15]. But, apart from that, there exists another method of getting this job done. namely,
- You could first patch the stock boot.img via Magisk and place it in the platform-tools folder,
- Then boot to Fastboot Mode and flash the update.ZIP file but instruct it not to boot to the OS
- This could be done by modifying the flash command to
fastboot update --skip-reboot image.zip
- So once the OTA gets flashed, you will still be in the Fastboot Mode and you could then directly boot using the Magisk patched boot file via
fastboot boot magisk_patched_boot.img
- Once done, you could then perform the Direct Install to obtain permanent root.
Method 4: Via Android Flash Tool
- To begin with, download the Android SDK Platform Tools. Then extract it to any location on your PC. Doing so shall give you the platform-tools folder, which we will be using throughout this guide.
- Next up, download the factory images for your device:
Factory Images for: Pixel 6A | Pixel 6 | Pixel 6 Pro
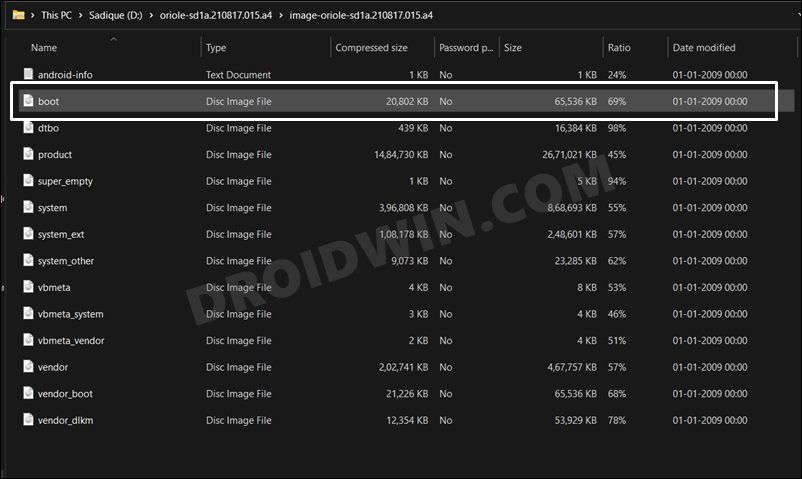
- Now extract the boot.img file from the Images ZIP file and transfer it to your device.

- Next up, connect your device to the PC via a USB cable. Then head over to the platform-tools folder, type in CMD in the address bar, and hit Enter.


- This will launch the Command Prompt. Type in the following command in the CMD window to boot your device to Fastboot Mode
adb reboot bootloader
- Now head over to the Android Flash Tool site and proceed with the on-screen instructions to flash the firmware. You could also refer to our standalone guide that has detailed instructions and screenshots: How to Flash Firmware on Pixel via Android Flash Tool.

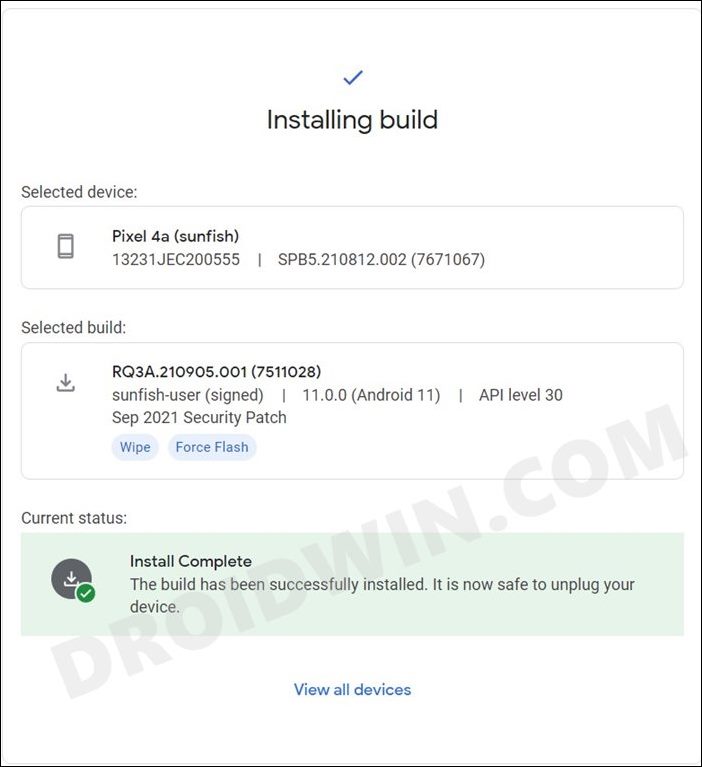
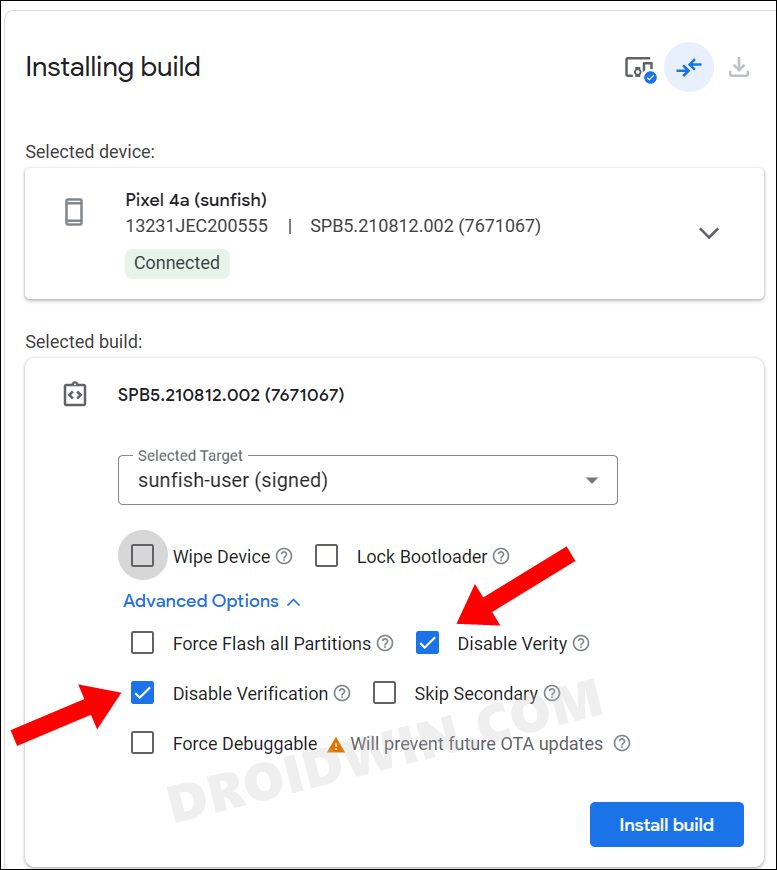
Reference Image - There’s just one important thing to keep in mind- at the Selected Build screen, expand the Advanced options section and checkmark “only” the Disable Verity and Disable Verification.

- As soon as the flashing is complete, your device will boot to the OS. Now install the Magisk App onto your device.
- Then launch it and tap on the Install button next to Magisk.
- Then choose Select and Patch a File. Navigate to the boot.img file and select it.


- Then tap on the Let’s Go button situated at the top right to patch the file.


- Once done, connect your device to the PC via USB. Then transfer this patched boot.img to the platform-tools folder. Likewise, rename it to magisk_patched_boot.img.
- Now use the below command to boot your device to Fastboot Mode:
adb reboot bootloader

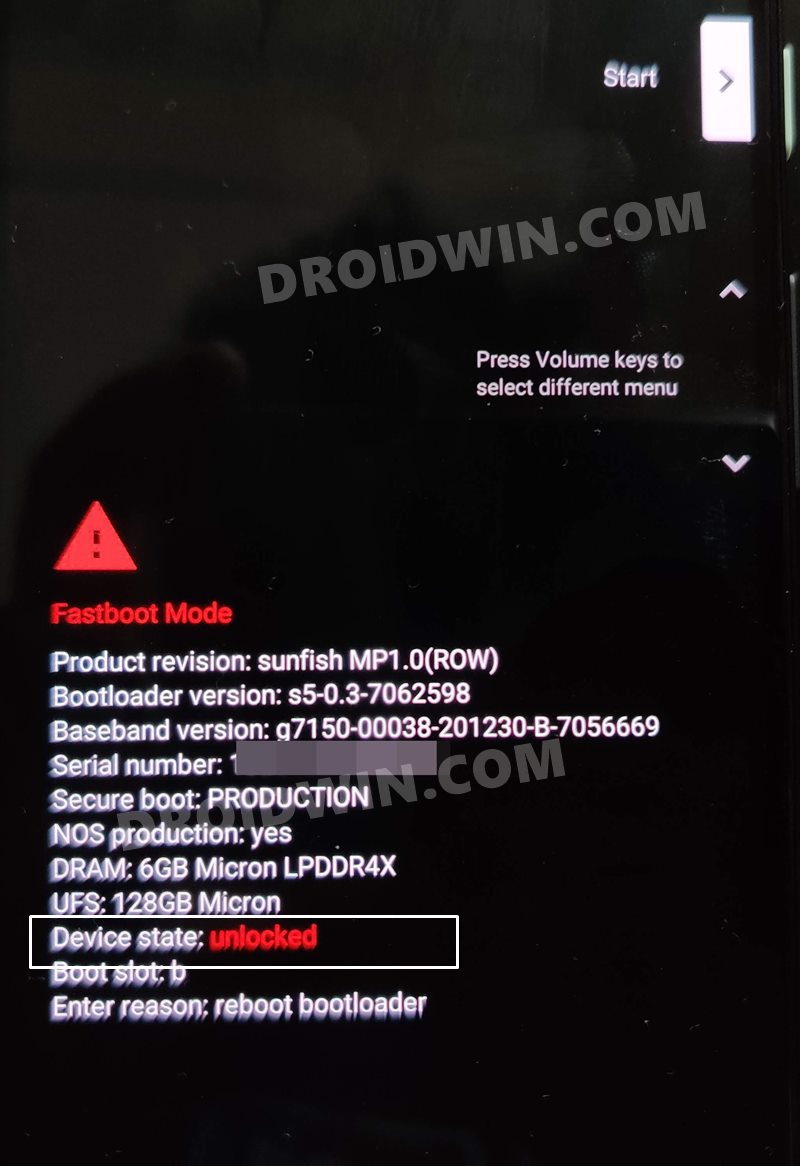
- Now there are two approaches that you could. The first one is to execute the below command and directly flash the magisk patched boot.img file to your device (not usually recommended):
fastboot flash boot --slot=all magisk_patched_boot.img
- The second approach (recommended) is to first boot your device via the patched boot.img using the below command:
fastboot boot magisk_patched_boot.img
- If everything is working well and good, then you could proceed for permanent root. This could be done by launching the Magisk App, then tap on Install > Direct Install > Let’s Go.

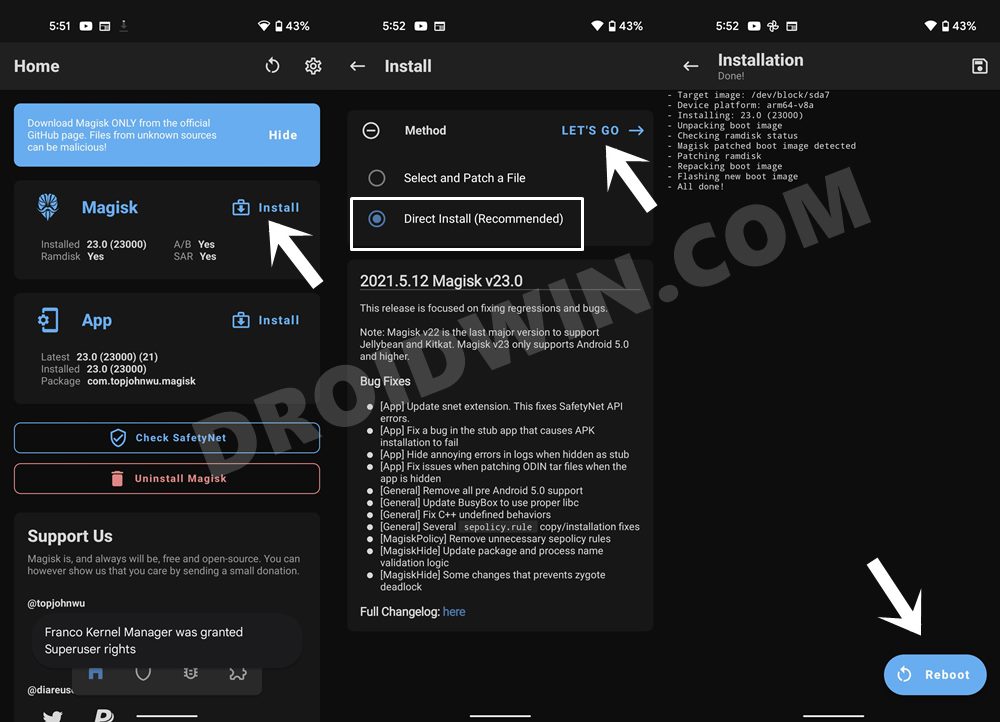
- Now, wait for the process to finish. Once done, tap on the Reboot button situated at the bottom right.
That’s it. These were the three different methods to install OTA Updates on Rooted Pixel 6A/6/Pro devices. If you have any queries concerning the aforementioned steps, do let us know in the comments. We will get back to you with a solution at the earliest. Rounding off, we would like to thank XDA Recognized Contributor v0latyle for sharing this valuable information over at the XDA Forums.
FAQ 1: How to Fix Pixel 6A/6/Pro Stuck in Bootloop
If your device is stuck in a bootloop after trying out Method 2, 3, or 4, then it might be due to disabling of vbmeta [Method 1 doesn’t use vmbeta]. To rectify it, you will have to force reboot your device to Fastboot Mode. Then carry out the entire process as listed before, but this time, do not flash the vbmeta.img file. To be more specific:
- In Method 2, skip the “fastboot flash vbmeta –disable-verity –disable-verification –slot=all vbmeta.img” command.
- In Method 3, instead of “fastboot update –disable-verity –disable-verification image.zip”, you should execute the “fastboot update image.zip” command [without double quotes].
- In Method 4, uncheck Disable Verity and Disable Verification.
FAQ 2: Issues in Installing OTA Updates on Rooted Pixel 6A/6/Pro
If you are facing an issue or two in installing OTA on your rooted Pixel 6/Pro device, then there’s one additional step that you need to try. However, that involves a factory reset of your device. So take a backup beforehand and then refer to the below steps (the underlying concept is the same for all three methods, just the steps are different)
For Method 1 and Method 2:
- Right after you disable the verified boot by flashing the vbmeta.img file (fastboot update –disable-verity –disable-verification image.zip), you will have to execute the below command to perform a factory reset:
fastboot -w
- Once that is done, you may then perform the rest of the steps of patching and flashing the boot.img file as mentioned in their sections.
For Method 3:
Apart from checking the Disable Verity and Disable Verification, you will also need to checkmark the Wipe Device option and then proceed with the rest of the steps as listed in that section.
![]()
![]()
FAQ 3: Do I need to Perform a Factory Reset before installing ‘Every’ Monthly OTA?
No, you don’t have to. Performing the factory reset is only needed the first time after you disable the verified boot. For subsequent OTA updates, you only need to disable the verified boot via the fastboot update –disable-verity –disable-verification image.zip and then proceed with the patching and flashing of the boot.img. No need to reset your device before installing every OTA update on your rooted Pixel 6A/6/Pro device.


J
Appreciate the tutorial & multi methods. I tried to follow from rooted > sideload OTA > flash vbmeta but somehow became boot-looped.
Recovered from it with factory image .bat (subtracting -w to preserve data.)
I tried the disable verity/verification thing again & bootlooped.
Factory image .bat once again & straight to flash both slots patched boot & all well.
Guess I’m still questioning the deal with the vbmeta business…
Dovie Weinstock
For some reason, the direct install option wasn’t there. Was using Method 3