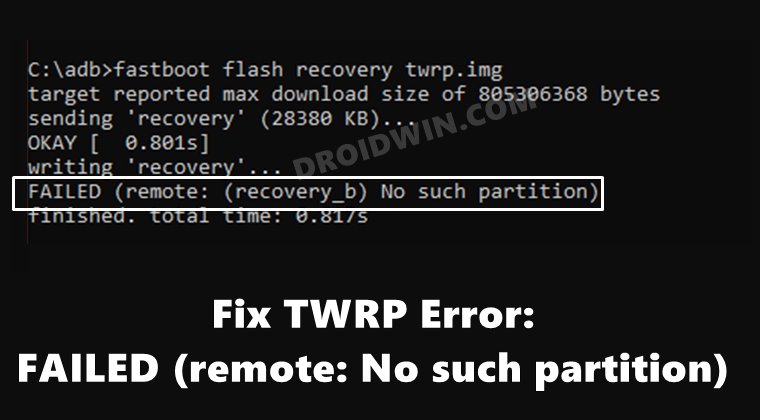
In this guide, we will show you the steps to fix the FAILED (remote: No such partition) error while flashing the TWRP Recovery. When Google introduced the A/B partition scheme back in 2018, it created quite a buzz in the tech community. While the general users were mostly unaffected by it, it was the tech enthusiasts that had some troubles in adopting this change. The reason? Well, there were quite a few ones, however, the biggest among them was the removal of the recovery partition.
As a result, the age-old fastboot flash recovery twrp.img was no longer valid. So how could one flash custom recovery in the absence of the recovery partition? Well, you would now have to take the help of the boot partition to temporarily or permanently install your preferred recovery. And this lead to major confusion among the end-users. They still used the traditional flash command on their A/B partition devices, and upon doing so, they were greeted with the following error message:
sending 'recovery' (45048 KB)...
OKAY [ 1.385s]
writing 'recovery'...
FAILED (remote: No such partition)
finished. total time: 1.405s
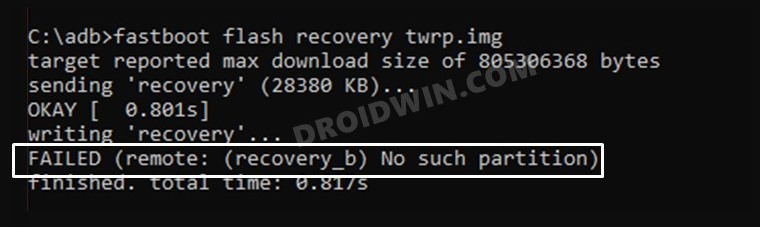
Along the same lines, in some cases, the error message would also specify the slot to which you flashed the recovery: FAILED (remote: (recovery_b) No such partition) or FAILED (remote: (recovery_a) No such partition). If you are also facing any of the two issues, then you have come to the right place. In this guide, we will show you how to fix the FAILED (remote: No such partition) error while flashing the TWRP Recovery. So without any further ado, let’s get started.
Table of Contents
The Prerequisites to Fix TWRP Error: FAILED (remote: No such partition)
While the below process wouldn’t wipe any data on your device, it is still recommended that you take a complete device backup. Droidwin and its members wouldn’t be held responsible in case of a thermonuclear war, your alarm doesn’t wake you up, or if anything happens to your device and data by performing the below steps.
Install Android SDK

First and foremost, you will have to install the Android SDK Platform Tools on your PC. This is the official ADB and Fastboot binary provided by Google and is the only recommended one. So download it and then extract it to any convenient location on your PC. Doing so will give you the platform-tools folder, which will be used throughout this guide.
Enable USB Debugging and OEM Unlocking
Next up, you will also have to enable USB Debugging and OEM Unlocking on your device. The former will make your device recognizable by the PC in ADB mode. This will then allow you to boot your device to Fastboot Mode. On the other hand, OEM Unlocking is required to carry out the bootloader unlocking process.
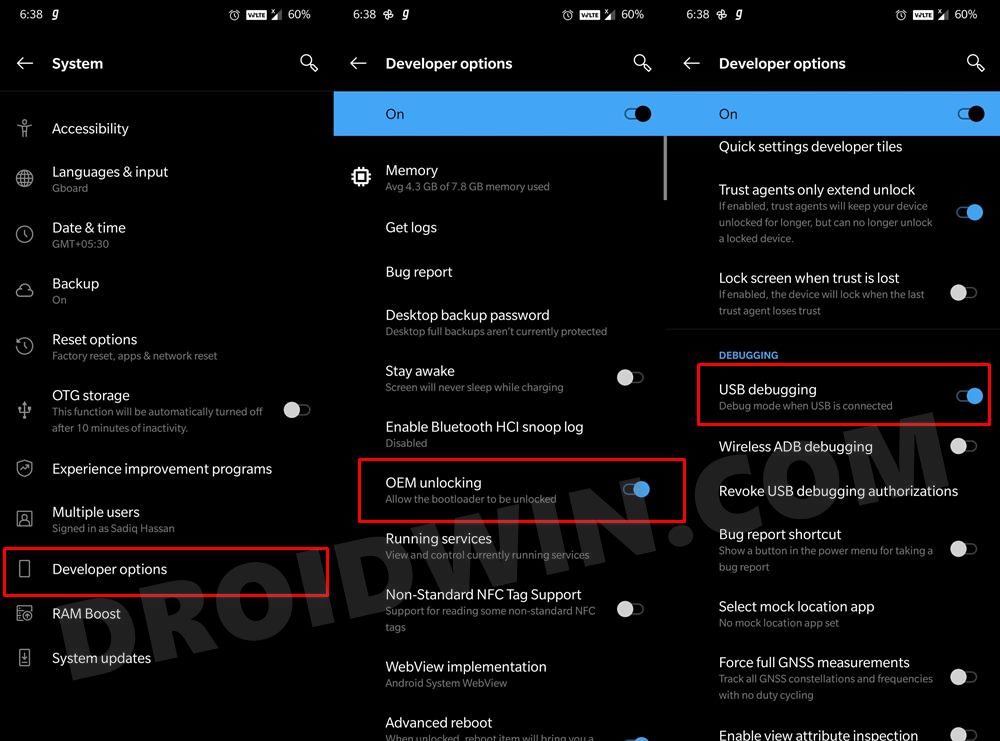
So head over to Settings > About Phone > Tap on Build Number 7 times > Go back to Settings > System > Advanced > Developer Options > Enable USB Debugging and OEM Unlocking.
Unlock Bootloader
You will also have to unlock the device’s bootloader. Since you are trying to fix a TWRP flashing error, most of you would have already unlocked the bootloader. However, if you haven’t done so, then please refer to our guide on How to Unlock the Bootloader on Any Android Device.
Boot to Fastboot Mode
- Now connect your device to the PC via USB cable. Make sure USB Debugging is enabled.
- Then head over to the platform-tools folder, type in CMD in the address bar, and hit Enter. This will launch the Command Prompt.

- Type in the following command in the CMD window to boot your device to Fastboot Mode
adb reboot bootloader

Download TWRP Recovery
Next up, get hold of the TWRP Recovery for your device. You may download it from the TWRP official site or XDA Developers. Some devices have both the ZIP and IMG files, so make sure you download both (if you only have IMG, not an issue, we will use that only). All this will become clear in the below instructions.
These were all the prerequisites. Let’s now start off with various methods to fix the FAILED (remote: No such partition) error while flashing the TWRP Recovery.
Fix 1: Boot TWRP to Boot Partition and then Flash it
In this method, you will have to first temporarily boot your device to the TWRP and then permanently flash it. Here’s how (make sure your device is booted to Fastboot and connected to PC via USB cable).
- To begin with, transfer the recovery IMG file to the platform-tools folder on your PC.
- Rename it to twrp, so that the complete name becomes twrp.img.
- Now, if your device has the recovery ZIP file, then transfer it to your device.
- However, if your device doesn’t have ZIP but only has the IMG file, then transfer that IMG file to your device.
- Then head over to the platform-tools folder, type in CMD in the address bar, and hit Enter. This will launch the Command Prompt
- Now type in the below command in this CMD window to temporary boot your device to TWRP Recovery:
fastboot boot twrp.img
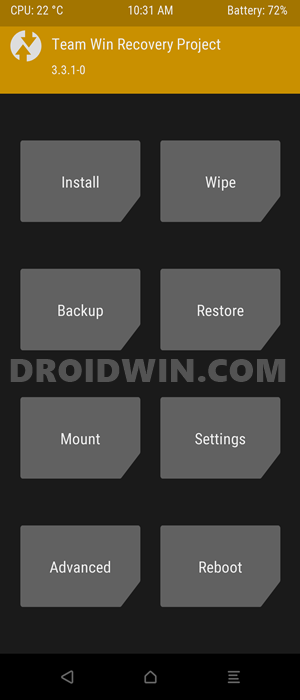
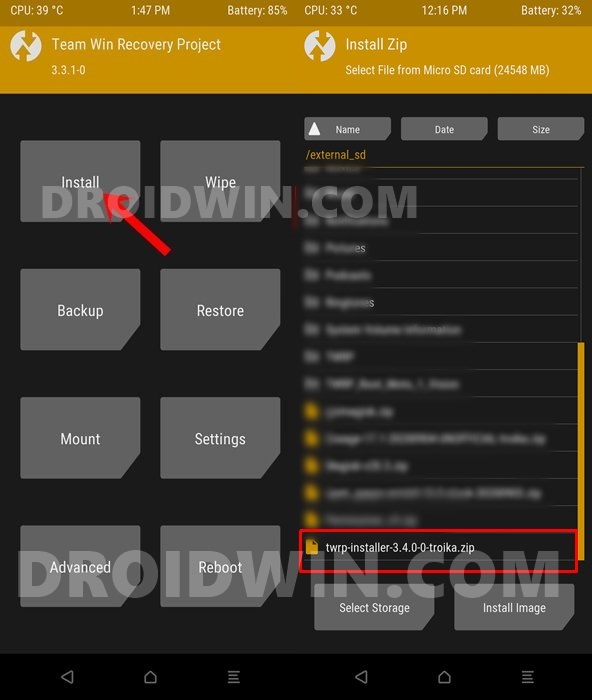
- Your device will boot to TWRP Recovery. Now, if your device has a TWRP ZIP file, then go to Install, select the TWRP.ZIP file and perform a right swipe to flash it.
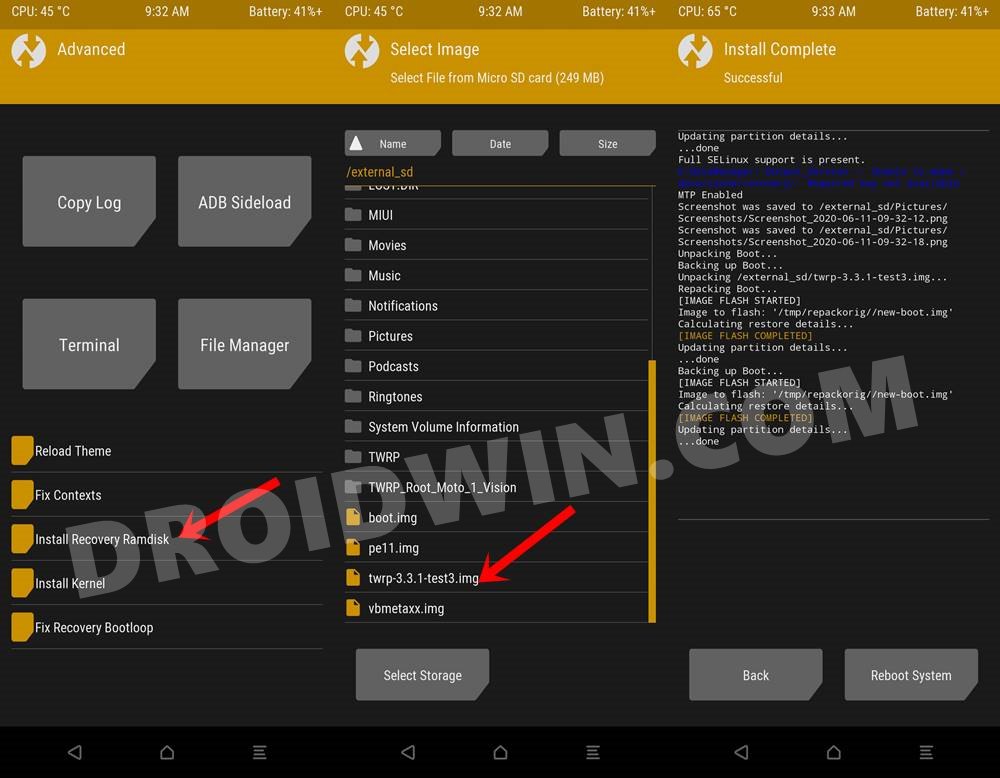
- On the other hand, if your device only has the TWRP IMG file, then go to Advanced and select Install Recovery Ramdisk.
- Navigate to the twrp.img file, select it, and perform a right swipe to flash it. That’s it, the process stands complete.
So this was the first method to fix the FAILED (remote: No such partition) error while flashing the TWRP Recovery. For most of our readers, this should have worked well and good. However, if it didn’t spell out success for you, then here are three other methods that you should try out.
Fix 2: Flash TWRP to the Boot Partition
The second method involves directly flashing the TWRP recovery to the boot partition rather than first booting it via the Boot partition. Here’s how it could be done:
- As before, open the CMD window inside the platform-tools folder and then type in the below command:
fastboot flash boot twrp.img
- That’s it, your device will now boot to the TWRP Recovery and you may now carry out the desired tweak.
So this was the second method to fix the FAILED (remote: No such partition) error while flashing the TWRP Recovery. If it didn’t work out for you, then here are two other workarounds that deserve your attention.
Fix 3: Flash TWRP to Current Active Slot
In this method, we will be explicitly mentioning the slot to which we want to flash the recovery. For that, you will first have to check your current active slot. Here’s how:
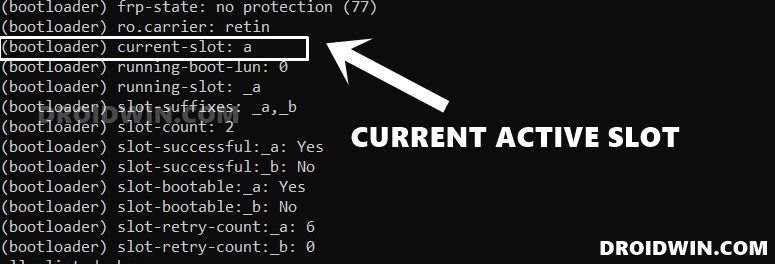
- Open the CMD window inside the platform-tools folder and then type in the below command to get your current active slot:
fastboot getvar current-slot
- Now note down the value next to “(bootloader) current slot”.
- If it comes out to be A, then use the below command to flash TWRP to the A partition:
fastboot flash boot_a twrp.img
- On the other hand, if it is B partition, then use the following command to flash TWRP to the B slot:
fastboot flash boot_b twrp.img
- Your device shall now boot to TWRP. If that doesn’t happen, then you may also use the specific Fastboot Command to do so:
fastboot reboot recovery
So this was the third method to fix the FAILED (remote: No such partition) error while flashing the TWRP Recovery. Let’s now check out the fourth and final approach to rectify this issue.
Fix 4: Flash TWRP to the Inactive Slot
Another approach is to flash the TWRP Recovery to the inactive slot. Then reboot your device and it will switch to the inactive slot. As soon as your device boots to that inactive slot, it will become the active one, with TWRP installed. To try it out, here’s what you need to do:
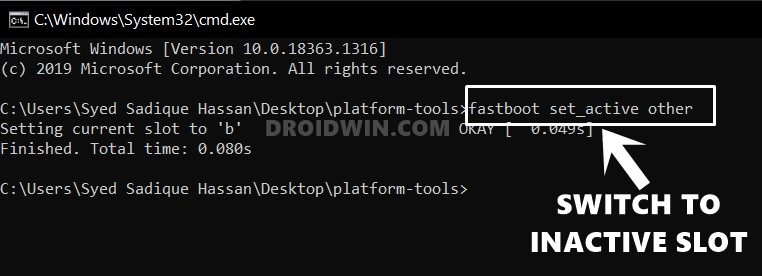
- Open the CMD window inside the platform-tools folder and then type in the below command to switch to the inactive slot:
fastboot set_active other
- The slots would have been changed. You may now proceed ahead and flash TWRP to the boot partition via the below command:
fastboot flash boot twrp.img
- Your device shall now boot to TWRP. If that doesn’t happen, then you may use the below Fastboot Command to do so:
fastboot reboot recovery
So these were the four different methods to fix the FAILED (remote: No such partition) error while flashing the TWRP Recovery. Do let us know in the comments section which method worked out in your favor. If you have any queries concerning the aforementioned steps, drop them in the comments. We will get back to you with a solution at the earliest.


Robert
Perfect help, thank´s a lot
Abde
It says remote: size too large
mario
gracias por el tutorial.
Mahadi
Thank you bro…
Phi
I do the same thing u said and if i boot to recovery my phone is black and i can’t reboot my phone now, can reboot to bootloader only. What should I do? Plz help
CM
Hi
I followed exactly your description but the result was that I now got a bootloop.. i think because I flashed the twrp in the boot partition?..the whole time before when I tried to get the TWRP Recovery installed an ended up with the Failure “there is no such partition b” i could at least boot back into the system and use the Phone.. but now I stuck..so please can you tell me if I can do anything else to get back to system?
befor I forget..I did it on an Mi11 Lite 5G NE on Android 12 and Miui 13.10. and used the unofficial twrp-3.6.0_11-0-lisa.img from the link here.
Greetings
and I hope you can understand what I wrote because I didn’t use english for quite a long time
Fahad Bin Hussain
Download your official rom, search google and download from any trusted site (Mi11 Lite 5G NE on Android 12 and Miui 13.10 in your case) and then extract the rom twice and find the original boot.img and reflash it to your device and it should be alive again.
pep
tanx broooooo
Djoni
Olá,
Conteúdo muito rico e simples de entender.
Parabéns ao autor!!
Kaniyev Enginyan
Thanks to you, I managed to install a recovery that supports android 12 on my poco f3 device.
Azhar Khan
Which Method worked for you?
Scan Devo
All solution worked but the problem I face right now is that Twrp recovery doesn’t decrypt data thereby making flashing of zip files impossible
eddie
thanks