In this guide, we will show you various methods to fix the issue of being unable to flash the vbmeta.img file on your Android device. Stepping into the custom development opens the gates to a plentitude of customizations. From flashing custom ROMs to installing a custom recovery, there’s a lot to look forward to. Along the same lines, you could also gain access to the system partition by rooting the device via Magisk. Apart from that, you could also flash individual partition files via Fastboot Commands.
This is mostly needed in case you wish to flash the stock firmware on your device, repair a corrupted partition or disable verity checks. In this regard, quite a few users have voiced their concern that they are unable to flash the vbmeta.img file to the vbmeta partition on their Android device. In most of these cases, users are flashing the vbmeta file to disable the verification checks. But since the flashing is being failed, their device isn’t able to pass the verity checks and in some instances, couldn’t even boot to the OS.
For the unaware, in a few custom ROMs or most of the GSIs, it is an absolute necessity to disable the verity checks before you could boot to the OS. If you don’t do so, then a bootloop or soft-bricked device is on the cards. So owing to its importance, users have tried quite a few tweaks to flash the vbmeta.img on their Android device, but they aren’t able to do so. If you are also in the same boat, then this guide shall help you fix this issue once and for all. Follow along.
Table of Contents
Fix: Cannot Flash vbmeta.img in Android
The below instructions are listed under separate sections for ease of understanding. Make sure to follow in the exact same sequence as mentioned. Droidwin and its members wouldn’t be held responsible in case of a thermonuclear war, your alarm doesn’t wake you up, or if anything happens to your device and data by performing the below steps.
STEP 1: Install Android SDK

First and foremost, you will have to install the Android SDK Platform Tools on your PC. This is the official ADB and Fastboot binary provided by Google and is the only recommended one. So download it and then extract it to any convenient location on your PC. Doing so will give you the platform-tools folder, which will be used throughout this guide.
STEP 2: Extract vbmeta.img from Stock Firmware
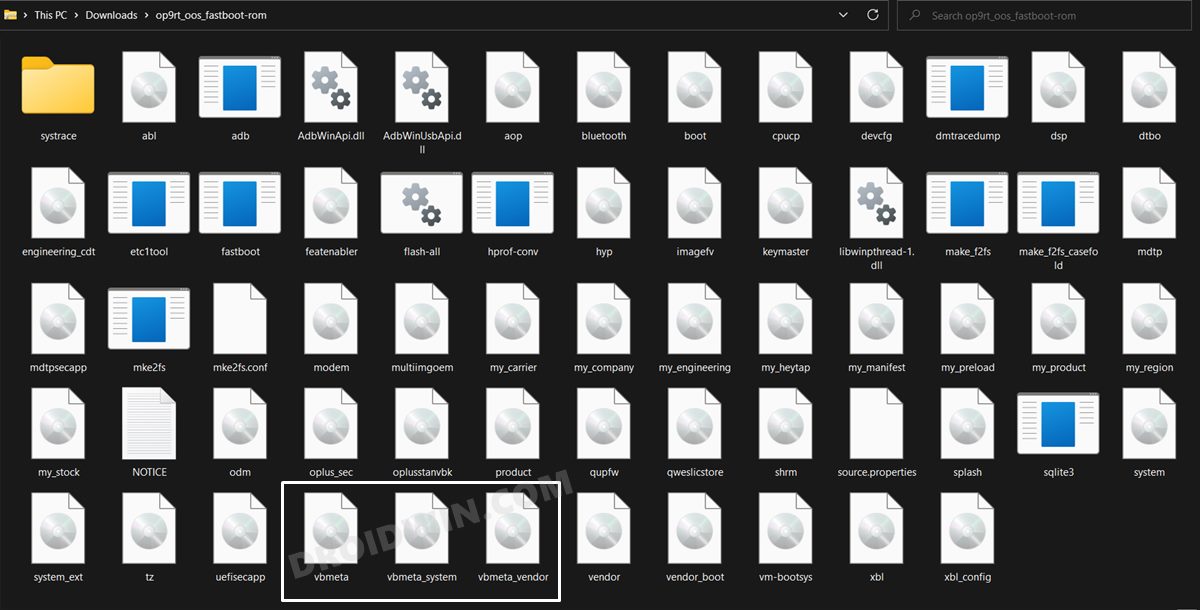
Next up, download the stock firmware for your device and extract it to any convenient location on your PC. Once the extraction is complete, transfer the vbmeta.img file to the platform-tools folder. Apart from that, if your firmware also has the vbmeta_system.img and vbmeta_vendor.img files, then transfer them to the platform-tools folder as well.
STEP 3: Enable USB Debugging and OEM Unlocking
Next up, you will have to enable USB Debugging and OEM Unlocking on your device. The former will make your device recognizable by the PC in ADB mode. This will then allow you to boot your device to Fastboot Mode. On the other hand, OEM Unlocking is required to carry out the bootloader unlocking process.
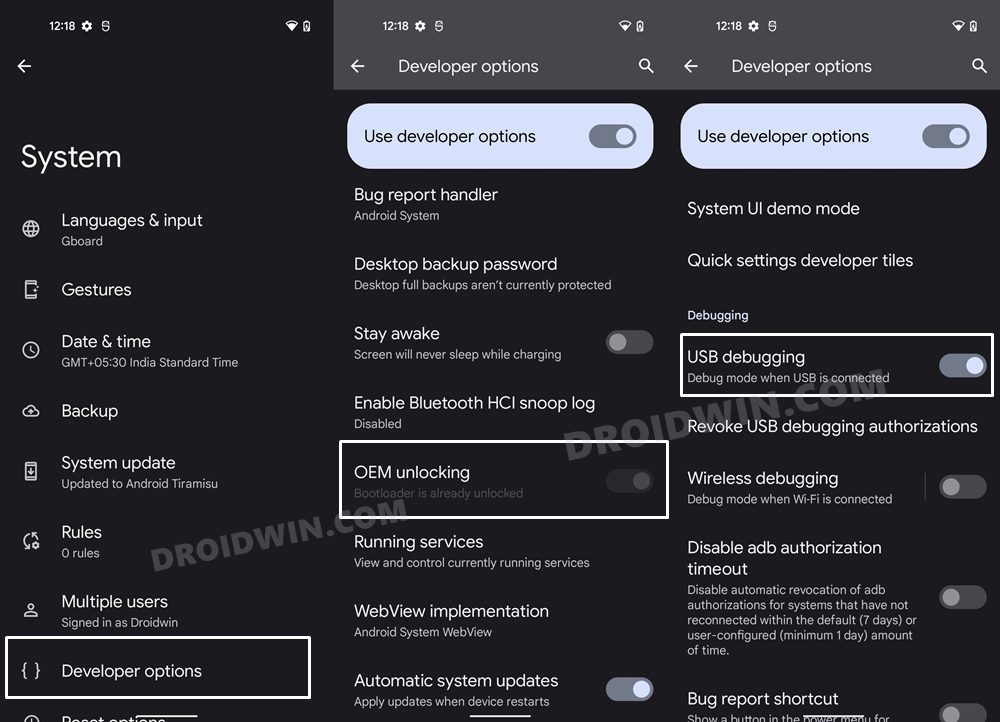
So head over to Settings > About Phone > Tap on Build Number 7 times > Go back to Settings > System > Advanced > Developer Options > Enable USB Debugging and OEM Unlocking.
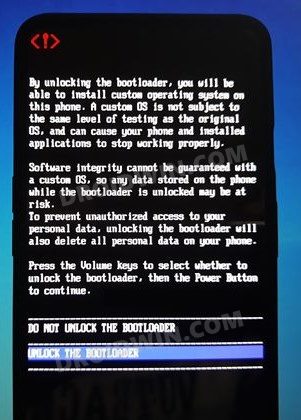
STEP 4: Unlock Bootloader
Next up, you will also have to unlock the device’s bootloader. Do keep in mind that doing so will wipe off all the data from your device and could nullify its warranty as well. So if that’s all well and good, then please refer to our detailed guide on How to Unlock the Bootloader on any Android Device.
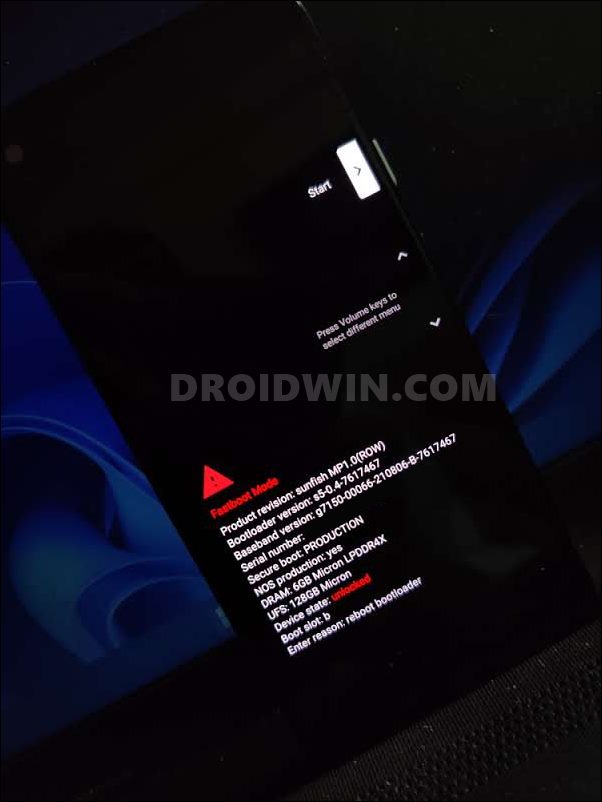
STEP 5: Boot Device to Fastboot Mode
- Connect your device to the PC via USB cable. Make sure USB Debugging is enabled.
- Then head over to the platform-tools folder, type in CMD in the address bar, and hit Enter. This will launch the Command Prompt.

- After that, type in the following command in the CMD window to boot your device to Fastboot Mode
adb reboot bootloader
- To verify the Fastboot connection, type in the below command and you should get back the device ID.
fastboot devices

STEP 6: Flash vbmeta/vbmeta_system/vbmeta_vendor via Fastboot
Given here are all the possible methods to flash the vbmeta files along with the explanation. You may refer to the one that is in sync with your requirement.
When Flashing Stock Firmware
If you are flashing the stock firmware of which vbmeta.img is a part, then you may simply use the below command to flash this vbmeta file:
fastboot flash vbmeta vbmeta.img
When Disabling Verity
If you are flashing vbmeta in order to disable the verity check, then you should execute the below command:
fastboot --disable-verity --disable-verification flash vbmeta vbmeta.img
When Disabling Verity Across Both Slots
In most cases, the aforementioned command would automatically flash the vbmeta file to the required slot. However, in rare instances, you might have to explicitly mention the slots to which you are flashing this file. So in those cases, you may use the below command:
fastboot --disable-verity --disable-verification flash vbmeta_a vbmeta.img
fastboot --disable-verity --disable-verification flash vbmeta_b vbmeta.img
When Disabling Verity via vbmeta_system
If you are facing an issue of two while flashing vbmeta_system, then here is the right command that you might be looking for:
fastboot --disable-verity --disable-verification flash vbmeta_system vbmeta_system.img
When Disabling Verity via vbmeta_system across Both Slots
Use the below commands to disable verification by flashing vbmeta_system across both the slots:
fastboot --disable-verity --disable-verification flash vbmeta_system_a vbmeta_system.img
fastboot --disable-verity --disable-verification flash vbmeta_system_b vbmeta_system.img
When Disabling Verity via vbmeta_vendor
If you are facing an issue of two while flashing vbmeta_system, then here is the right command that you might be looking for:
fastboot flash --disable-verity --disable-verification vbmeta_vendor_a vbmeta_vendor.img
When Disabling Verity via vbmeta_vendor across Both Slots
Use the below commands to disable verification by flashing vbmeta_system across both the slots:
fastboot flash --disable-verity --disable-verification vbmeta_vendor_a vbmeta_vendor.img
fastboot flash --disable-verity --disable-verification vbmeta_vendor_b vbmeta_vendor.img
Using Modified Commands
- The location of the flash keywords in these commands might be variable in nature.
- So you could place either after or before the verification keywords. As a result, both the below commands should do their job.
fastboot --disable-verity --disable-verification flash vbmeta vbmeta.img
fastboot flash --disable-verity --disable-verification vbmeta vbmeta.img
- You could apply this tweak in each of the other commands that we have listed above in case any one of them gives out an error.
So these were the steps to fix the issue of being unable to flash vbmeta.img on an Android device. If you have any queries concerning the aforementioned steps, do let us know in the comments. We will get back to you with a solution at the earliest.


jose
Hello,
In the instructions, is necesary unlock the bootloader prior to flash vbmeta, but in Motorola Moto E (2020) it is the opposite, first flash vbmeta then flash bootloader, the problem is I cannot flash vbmeta, Do you have any idea ti force flashing vbmeta?
Thank you.
shanol
cant insall
> fastboot flash –disable-verity –disable-verification vbmeta vbmeta.img
unknown option — disable-verity always give error