In this tutorial, we will make you aware which device should use fastboot flash recovery twrp.img and which should use the fastboot boot twrp.img command. Furthermore, we will also let you know the reason why two different commands exist in the first place. Moreover, the doubts surrounding why some devices only have the TWRP image file (twrp.img) whereas others have both the TWRP Installer ZIP (twrp.zip) and TWRP image file (twrp.img) files will also be cleared.
Likewise, we will also list out the instructions regarding how to temporarily boot your device to TWRP or permanently flash it. We will also focus on A/B vs A-only partition devices and check out how does this affect the custom recovery flashing process. So without further ado, let’s start off the guide as to which command should you use fastboot flash recovery twrp.img or fastboot boot twrp.img. Follow along.
- Fix TWRP Error 7 (While Flashing Custom ROM via TWRP)
- How to Update Magisk ZIP and Magisk Manager (without TWRP)
- How to Fix TWRP Error 70 [With Screenshots]
- Fix TWRP Error 20 GApps after flashing LineageOS
Table of Contents
The A/B Partitions in Android
Alongside Android 8.0 Oreo we got a bunch of major technical changes. For the general users, this was mostly under the hood and didn’t matter much. But for the tech enthusiasts, this was among the most important changes to this open-source OS to date. Let’s understand this change with the help of a real usage experience.
You might remember how in earlier times, once you have downloaded the OTA, you have to wait for ages for the update to install. During the entire installation process, your device was hijacked by this update and you couldn’t do any task. Even when the update was finished and your device rebooted, the OS began optimizing the apps one at a time. This again took a very time to complete. However, with the introduction of the A/B Partition scheme, all these changed and you could now install the OTA without any interruptions as such. So how this came into the picture?
| PARTITION SIZES | A/B | A-ONLY |
|---|---|---|
| Bootloader | 50MB*2 | 50MB |
| Boot | 32MB*2 | 32MB |
| Recovery | 0 | 32MB |
| Cache | 0 | 100MB |
| Radio | 70MB*2 | 70MB |
| Vendor | 300MB*2 | 300MB |
| System | 2048MB*2 | 4096MB |
| TOTAL | 5000MB | 4680MB |
Well, your device now has two partitions for bootloader, boot, radio, system, and vendor. So suppose your device is currently booted to Partition A, hence this will be your current active slot. As and when you get the OTA and you install it, it will be installed to Partition B (which will be your inactive slot as of now).
Since the update is installed to the inactive slot, you could continue using the device without any issue. Then when you are done with the work, you just need to reboot your device. Upon the reboot, the slot change will take place. As a result, your active partition (which was slot A) now becomes the inactive partition and the inactive partition (which was slot B) becomes the current active partition. And since this newly active slot B had the OTA installed, your device is now running the latest update!
How is TWRP affected by A/B Partition?
As mentioned before, with an A/B partition, your device got two partitions for bootloader, boot, radio, system, and vendor. But did you noticed that the recovery partition was missing? Yes, it’s true. It’s not because there is only one recovery partition, rather there’s a more drastic change. The recovery partition has been removed in A/B partition devices.
This is because most tasks handled by the recovery partition was now taken care of by the system update engine. Hence it was no longer. So all this lead gave birth to the fastboot boot twrp.img command, in addition to the fastboot flash recovery twrp.img command that was already there. The below section should make it all very clear.
- [GUIDE] Flash ROMs/Magisk/TWRP/Kernels on A/B Partition Devices
- Install Custom ROMs on any Android Device- Includes A/B Partition
- How to Flash Various Files in A/B Partition Devices
- How to Replace LineageOS Recovery with TWRP
What does the fastboot boot twrp.img command means
Since the A/B partition devices no longer have a recovery partition, hence you cannot directly send TWRP to the recovery partition via the fastboot flash recovery twrp.img. Rather you will have to send it to the boot partition first so that your device boots to the TWRP. For that, you will use the fastboot boot twrp.img command. However doing so will only temporarily boot your device to TWRP, it hasn’t been permanently installed. Hence to permanently install it, you will have to flash the TWRP ZIP file right from the booted TWRP itself.
Once you do so, TWRP recovery will have made a permanent place in your device. Furthermore, once you have flashed the TWRP ZIP file, you should reboot your device back to Recovery rather than directly to the System. The reason? Well, as of now the recovery is flashed to the inactive slot. Hence to change the partition and switch to the other slot where TWRP is installed, you will have to reboot your device back to Recovery. Once you again boot to the recovery, you may then reboot to the OS.
What about the fastboot flash recovery twrp.img command
Well, this command is used by the A-only devices. This is because these devices have a dedicated recovery partition and you could directly send TWRP to the recovery partition. As a result, you just have to use the fastboot flash recovery twrp.img command and the TWRP will be permanently installed onto your device. As simple as it gets, isn’t it?
How to Check if My Android Device is A-only or A/B Partition
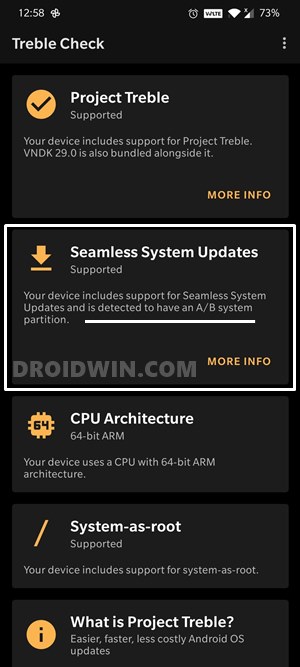
So before listing out the TWRP installation instructions, it is of paramount importance to know if your device is an A/B partition or A-only. For that, download and install the Treble Check app from Play Store. Launch it and then check the Seamless System Updates section. It will let you know if your device has an A/B system partition or the A-only system partition.
- How to Install OTA Updates in Rooted Android Device
- How to Extract payload.bin and get stock boot image file
- Steps to Flash magisk_patched.tar (patched Samsung AP file) via Odin
- How to Patch Samsung AP Firmware via Magisk
Which TWRP Command Should I use: fastboot flash vs fastboot boot
The best way to get the answer to this question is to check the partition scheme on your device. If your device has a recovery partition, then you could directly flash to it. However, if it doesn’t then you’ll have to use the boot partition to get this job done. So either refer to our detailed guide to check your device’s partition scheme or refer to the shorter instructions given below:
- First off, Download and extract the Android SDK Platform Tools folder.
- Having USB Debugging enabled, connect your device to your PC via USB.
- Launch CMD inside the platform tools and execute the below command
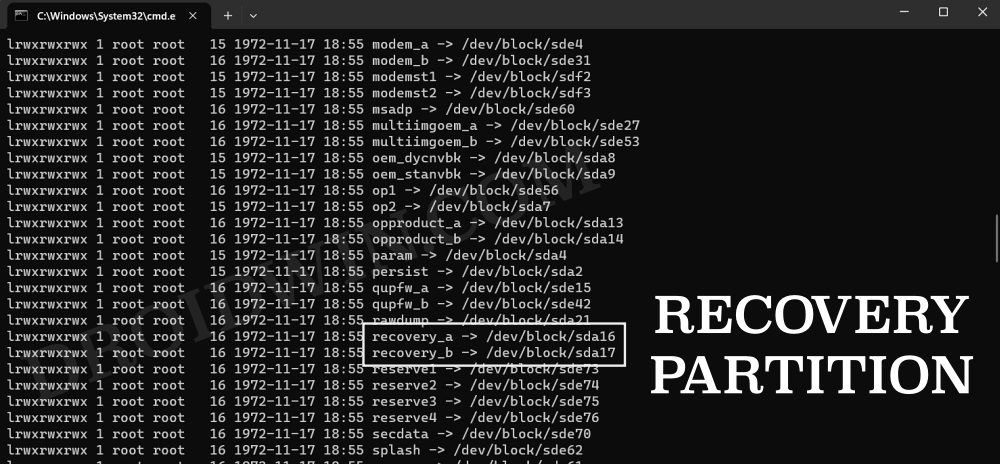
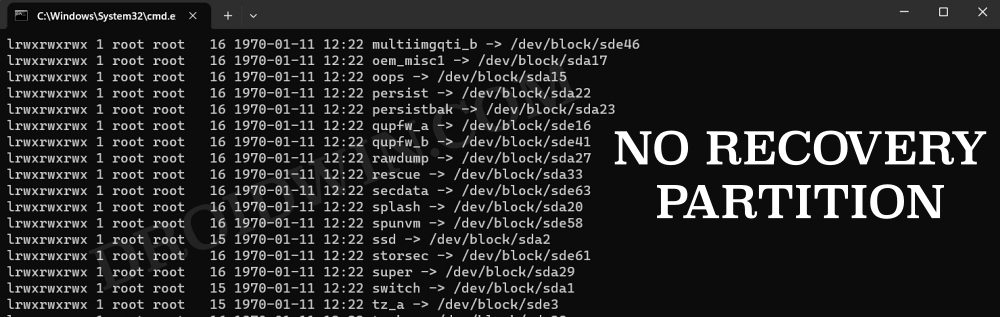
adb shell
cd /dev/block/platform
ls -la /dev/block/bootdevice/by-name

- Check if the output has recovery or recovery_a or recovery_b keywords.
- If it does, then your device has a recovery partition, otherwise, it doesn’t.
How to Flash TWRP in Devices without Recovery Partition
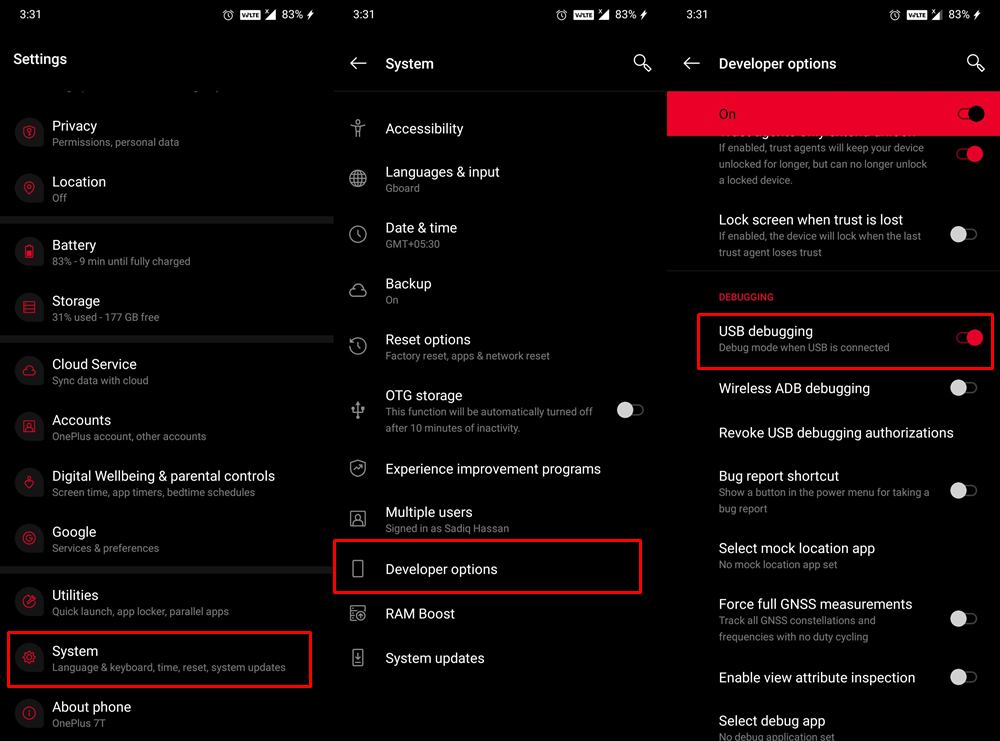
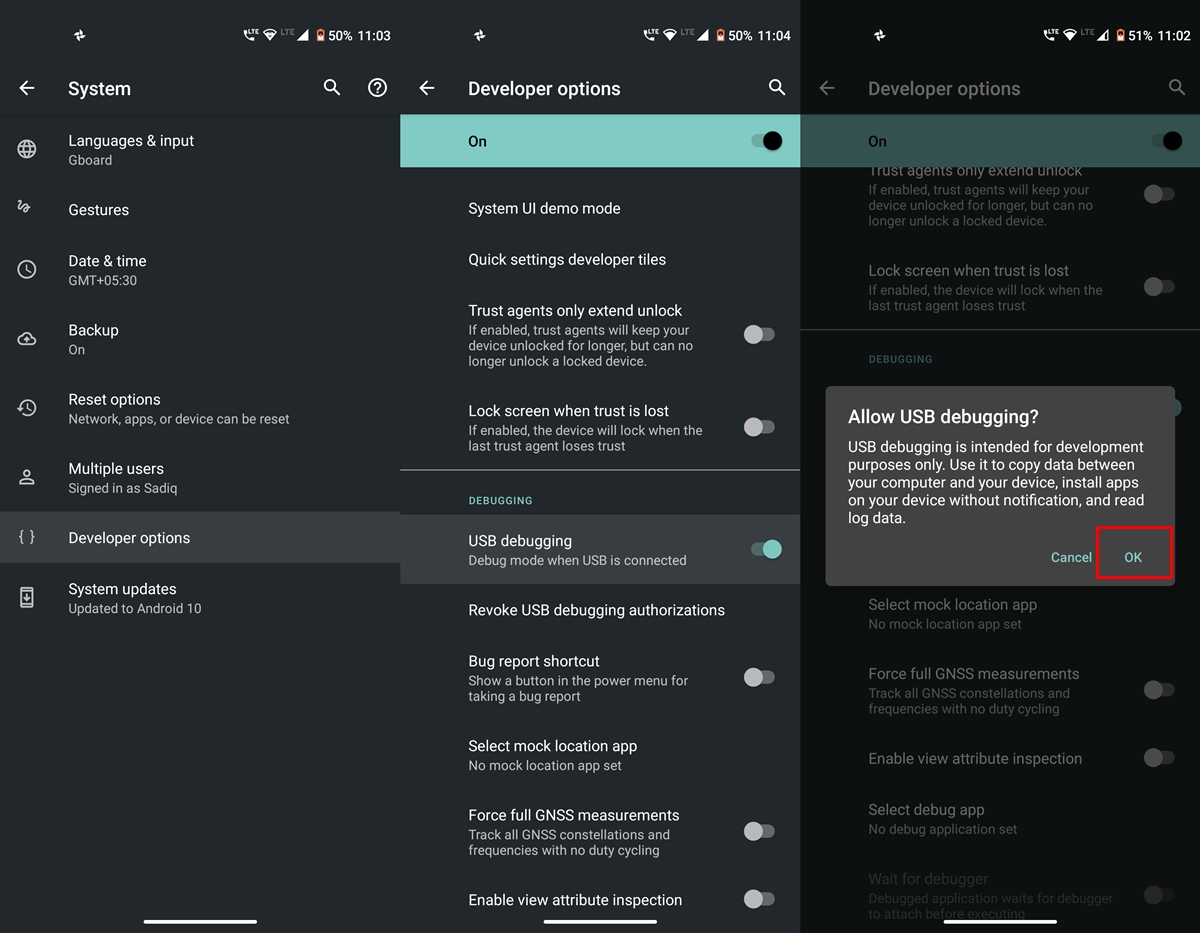
- Make sure that you have unlocked the device’s bootloader and USB Debugging is enabled as well. To enable Debugging, head over to Settings > About Phone > Tap on Build Number 7 times > Go back to Settings > System > Advanced > Developer Options > Enable USB Debugging.
- Then install the Android SDK Platform Tools folder on your PC. This will provide the necessary ADB and Fastboot binaries.
- When that is done, download the TWRP ZIP and IMG files. You could download the official builds from the TWRP website itself. For the unofficial builds, you could search in the XDA Forums.
- Once you have got hold of both the TWRP Recovery files, transfer the TWRP ZIP to your device.
- Then transfer the TWRP IMG file to the platform-tools folder. Rename this recovery image file to twrp, so that the complete name becomes twrp.img.
- Now connect your device to the PC via USB cable. Make sure Debugging is enabled and the bootloader is unlocked.
- After this, type in CMD in this platform-tools folder’s address bar and hit Enter. This will launch the Command Prompt window.
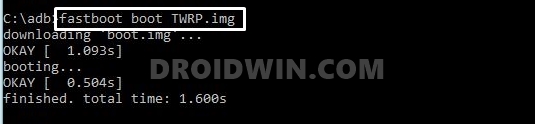
- It’s time to boot your device to the TWRP. Use the below command for that:
fastboot boot twrp. img
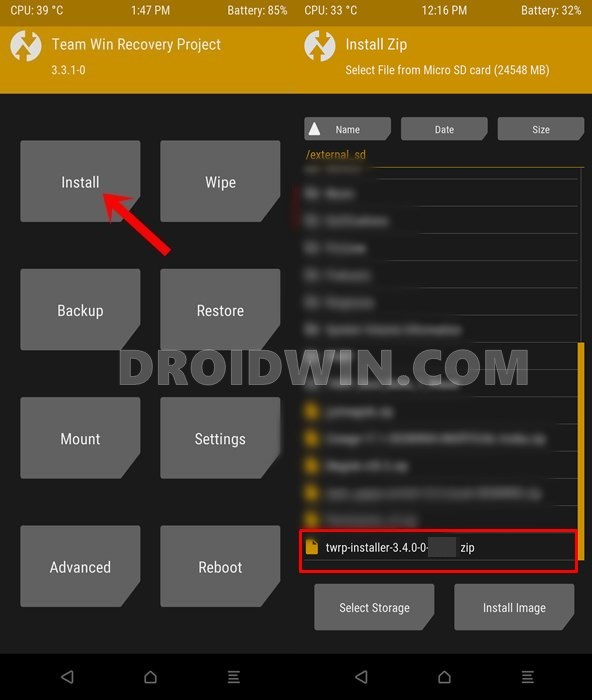
- Once your device boots to TWRP, it’s time to permanently install the TWRP. So go to Install, select the TWRP ZIP file, and perform a right swipe to install it.
If your TWRP doesn’t have the ZIP file, and only comes with the IMG file, then you could either flash TWRP IMG file to the Ramdisk partition or use Flash Current TWRP.
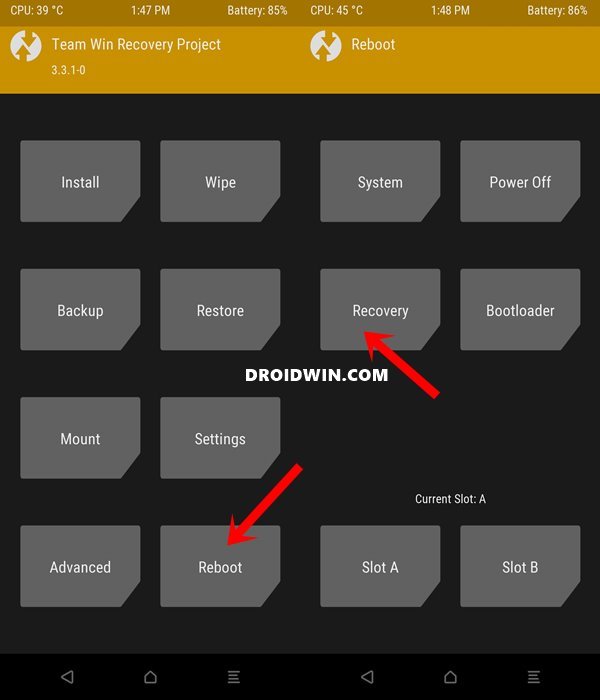
- After this, the slot change will have to take place. So go to Reboot and tap on Recovery. Your device will then again reboot to TWRP.
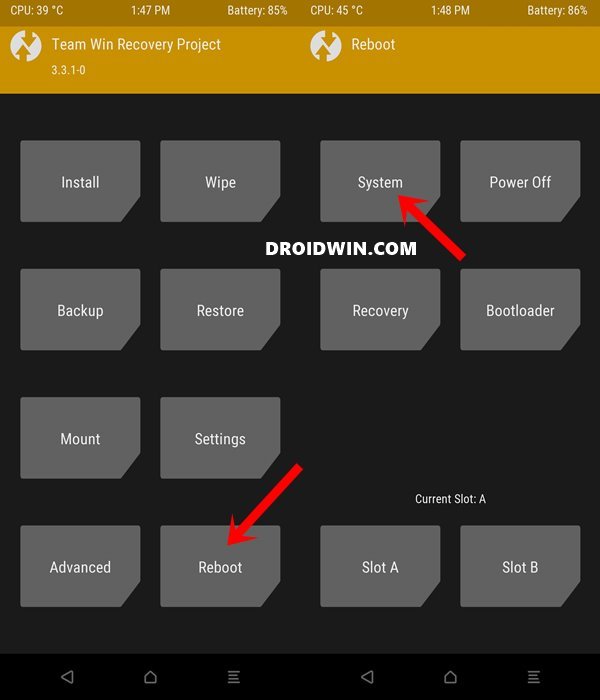
- When that happens, you are now booted to the active partition and you could now reboot the device to the OS by going to Reboot > System.
- That’s it. These were the steps to install TWRP on A/B partition devices. Let’s now turn our attention to A-only devices.
- How to Downgrade Samsung from Android 11 to Android 10 (OneUI 3.0 to 2.0/2.5)
- Root Google Pixel 5 via Magisk without TWRP (Android 11)
- How to Pass Magisk SafetyNet on Rooted Android 11
- Fix Magisk patched boot.img issue while Rooting Android 11
How to Install TWRP in Devices with Recovery Partition
Installing TWRP on A-only devices is quite simple since your device already has the recovery partition. With that said, here are the required instructions:
- Make sure that you have unlocked the device’s bootloader and USB Debugging is enabled as well. To enable Debugging, head over to Settings > About Phone > Tap on Build Number 7 times > Go back to Settings > System > Advanced > Developer Options > Enable USB Debugging. [Don’t Miss: How to Enable USB Debugging on a Broken Android Device’s Screen]
- Then install the Android SDK Platform Tools folder on your PC. This will provide the necessary ADB and Fastboot binaries.
- When that is done, download the TWRP IMG file. You could download the official builds from the TWRP website itself. For the unofficial builds, you could search in the XDA Forums.
- Once you have downloaded the TWRP Image file, transfer it to the platform-tools folder on your PC. Likewise, rename it to twrp, hence the complete name will then be twrp.img
- Now connect your device to the PC via USB cable. Make sure Debugging is enabled and the bootloader is unlocked.
- After this, type in CMD in this platform-tools folder’s address bar and hit Enter. This will launch the Command Prompt window.
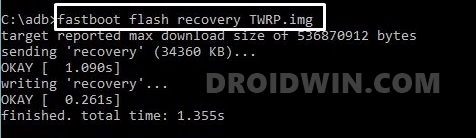
- Finally, type in the below command to flash the TWRP Recovery onto your device:
fastboot flash recovery twrp.img


Can I Directly Flash TWRP even in A/B Partition Devices?
So till now, we have discussed that the A-only partition devices could directly flash the TWRP whereas A/B devices first require to boot to TWRP and then permanently install it. So as a general rule of thumb, it means that A/B devices would have both the TWRP IMG and ZIP whereas the A-only device will have just the TWRP IMG file. Well, that is true, but a little bit of twist.
Some devices (such as Moto One Action) might just have the TWRP IMG file but still would be A/B partition. So how would you then permanently install TWRP then? In those cases, you will have to use Ramdisk on your device and flash TWRP IMG file after booting to TWRP. If you wish to know more in this case, then you should definitely check out this guide: How to Permanently Install TWRP without TWRP ZIP File (only using TWRP.img file).
So with this, we conclude the guide on TWRP: fastboot flash vs fastboot boot commands. If you still have any queries regarding the aforementioned explanations, feel free to reach out to us via the comments section. We will get back to you with a solution at the earliest.


XiaomieuViennui
On A/B devices like Xiaomi with 8Gen1/2/3 only use
fastboot flash recovery_ab twrp.img
If you boot to twrp.img you get error
To exit the Fastboot Loop:
fastboot erase misc
fastboot set_active a
Jame
Hello.
My phone is realme gt2 master explorer android 12. I’ve tried to excute this command: fastboot boot twrp.img
But failed. My phone is an A/B partition devices
C:\1platform-tools>fastboot boot twrp.img
Sending ‘boot.img’ (102400 KB) OKAY [ 2.403s]
Booting FAILED (Status read failed (Too many links))
fastboot: error: Command failed
Roni
Hi need help just commend the fastboot flash boot twrp.img and im stuck on the twrp and cant go to the phone you cant help pls you thanks(🙁)
Alkadamy
The command is wrong you shoud use fastboot boot twrp.img
Now yu need the stock boot of your device and and flash it fastboot flash boot boot.img
Ruud
when I say, “fastboot boot twrp.img” then I have 0 Mb storage and I don’t see twrp.zip either. Do you also have a solution for this. Thank you very much for all the effort.
Victor
So with this, does it mean thatthe steps you gave on how to install ota update on a rooted device using magisk is only for A/B partion devices.