In this guide, we will show you how to create a combination firmware for your Samsung device and then flash it via Odin. First off, we will make you aware of what exactly is a combination firmware. Then we will list out the various advantages of this firmware. After this, we will show you how to manually create this firmware. Finally, the steps to flash this combination firmware via Odin will be shared. So without further ado, let’s get on with the guide.
- How to Downgrade Samsung from Android 11 to Android 10 (OneUI 3.0 to 2.0/2.5)
- How to Install Android 11 (OneUI 3.0) on any Samsung Phone via Odin
- Steps to Boot Rooted Samsung to Recovery Mode and Rooted OS
- How to Download Samsung Stock Firmware/ROM via Frija Tool
Table of Contents
What is a Samsung Combination Firmware
A Combination FIrmware is a customized firmware for Samsung devices that are created by using the AP and BL files from the stock firmware. To be more precise, this firmware consists of boot.img.lz4, and system.img.lz4 and sboot.img.lz4 files. This firmware is then packed into a TAR format and then flashed via Odin Tool. But what is the real need for this firmware? Well, let’s check it out.
Benefits of Samsung Combination Firmware
Well, there are a lot of reasons as to why you might want to create a combination firmware for your Samsung device and then flash it via Odin. Here are some of the noteworthy ones:
Bypass FRP
Factory Reset Protection is a security mechanism introduced by Google in Android 5.0 Lollipop and later devices. It prevents unauthorized access to your device after it has been formatted. To continue using the device, you will have to enter the Google Account ID and password that you have signed in to your device. While this is all well and good, but what if you forgot the ID and Password? Well in those cases, you could easily bypass this FRP lock via this combination firmware.
Fix Softbrick or Bootloop
Flashing a combination firmware can be used to fix the bootloop or Softbrick issues on your Samsung device. Likewise, it could also be used to fix the issue of the device getting stuck in the Recovery Mode or at the Samsung logo during device boot up.
Fix IMEI
Flashing custom binary might prove to be risky in some instances and could even corrupt the EFS partition of your device. This is the same partition where your device’s IMEI number is stored. So any issues with this partition might be a cause of concern for the end-user. But if that happens, you may create a combination firmware for your Samsung device and then flash it via Odin. This will repair the EFS partition and would hence fix issues with the IMEI number as well.
For Debug Purposes
This firmware could also be flashed for testing purposes. it allows you to enable the Service test menu and carry out various hardware/software tests. Along the same lines, you could also debug underlying device issues using this file. Not to mention the fact that it also spells out complete device formation related to each component which might come in useful for tech geeks.
So these were some of the useful features of this firmware. Let’s now check out its installation steps.
- How to Unlock Bootloader on any Samsung Device [New VaultKeeper Method]
- How to Patch Samsung AP Firmware via Magisk
- Steps to Flash magisk_patched.tar (patched Samsung AP file) via Odin
- How to Root any Samsung device via Magisk and Odin
How to Create Samsung Combination Firmware and Flash it via Odin
Now that you are aware of this firmware and its usage, let’s get on to the crux of this article. All the instructions are given in a separate instruction set for ease of understanding. Follow along.
STEP 1: Download Samsung Firmware
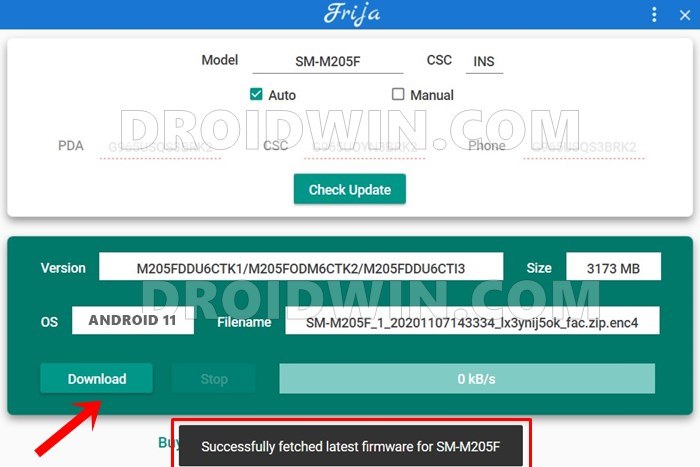
First and foremost, you will have to download the stock firmware for your Samsung device. In this regard, you may refer to our comprehensive coverage on this topic: How to Download Samsung Stock Firmware/ROM via Frija Tool. In short: install the Frija Tool on your PC, type in your device’s CSC and Model Number, and hit the Download button.
STEP 2: Extract Samsung Firmware
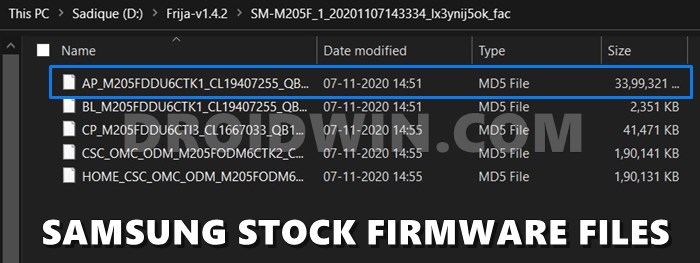
Once you have downloaded the firmware, it will be in compressed format (ZIP). So use an extraction software such as WinZIP or WinRAR to extract the contents of that file. Upon extracting, you will get the following five files (all in .MD5 format): AP, BL, CP, CSC, and Home_CSC.
STEP 3: Create Samsung Combination Firmware
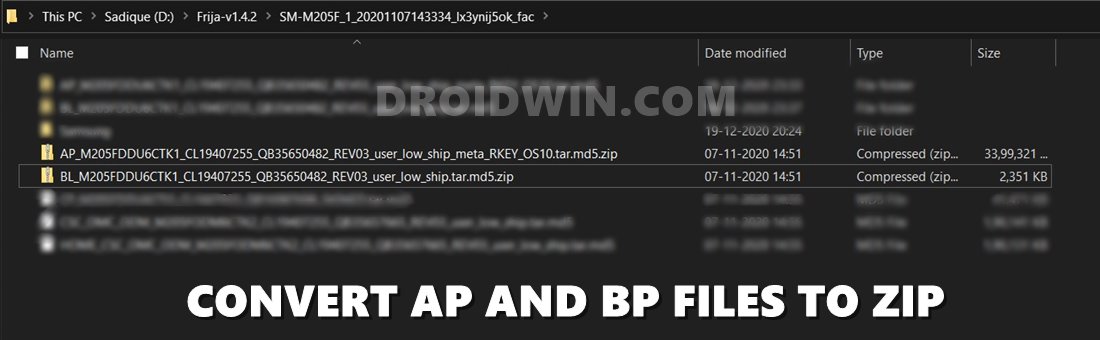
It’s now time to create the Samsung Combination firmware which will then be flashed via Odin. To begin with, you will have to convert the AP and BL file to ZIP. Here’s how:
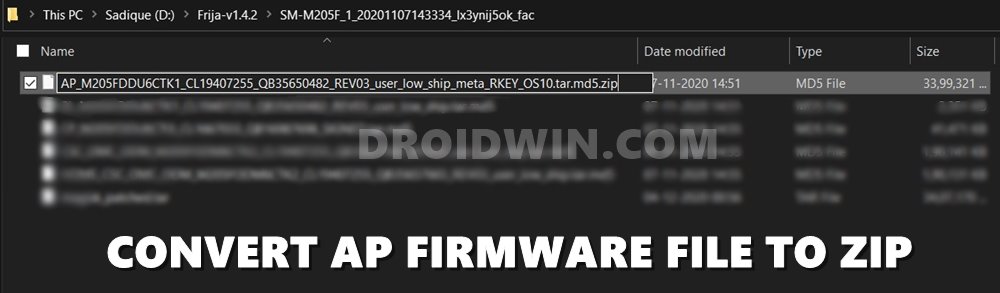
- First off, right-click on the AP firmware file and select Rename. Then add .zip after .md5.

- So if the original AP file name was:
AP_M205FDDU6CTK1_xxx_user_low_ship_meta_RKEY_OS10.tar.md5
- It should be renamed to:
AP_M205FDDU6CTK1_xxx_user_low_ship_meta_RKEY_OS10.tar.md5.zip
- You will get a Rename confirmation dialog box, tap on Yes.
- In the same manner, also add .zip after .md5 in the BL firmware file. For example, if the BL file name was:
BL_M205FDDU6CTK1_xxx_user_low_ship.tar.md5
- It should be renamed to:
BL_M205FDDU6CTK1_xxx_user_low_ship.tar.md5.zip
- Again, you will have to reply in the affirmative in the confirmation dialog box that appears.
- Once you have converted both the files to ZIP, it’s time to extract them. First off, extract the AP file via 7ZIP. (WinZIP/WinRAR software gave me encryption issues, only 7ZIP was able to handle this task).
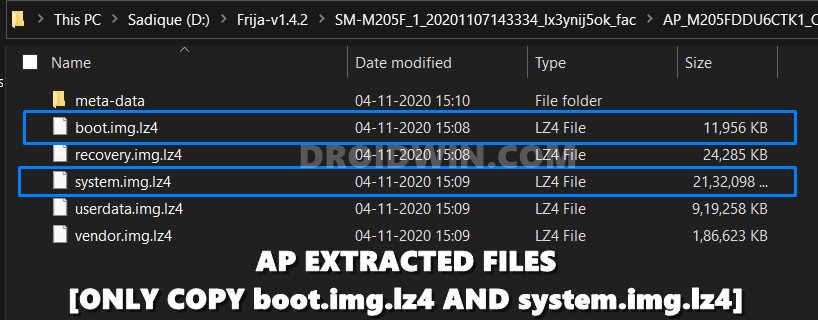
- After you have extracted the AP file, you will get a few partition files in LZ4 format as shown below. Copy the boot.img.lz4, and system.img.lz4 files from there and paste them inside a new folder (let’s name this new folder Samsung for the sake of simplicity).
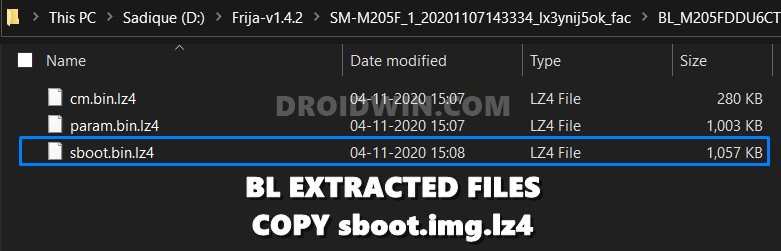
- Likewise, extract the BL firmware file via 7ZIP and you will again get a few LZ4 files. Copy the sboot.img.lz4 file from here and move it to the Samsung folder where you have pasted the other two files (boot.img.lz4, and system.img.lz4).
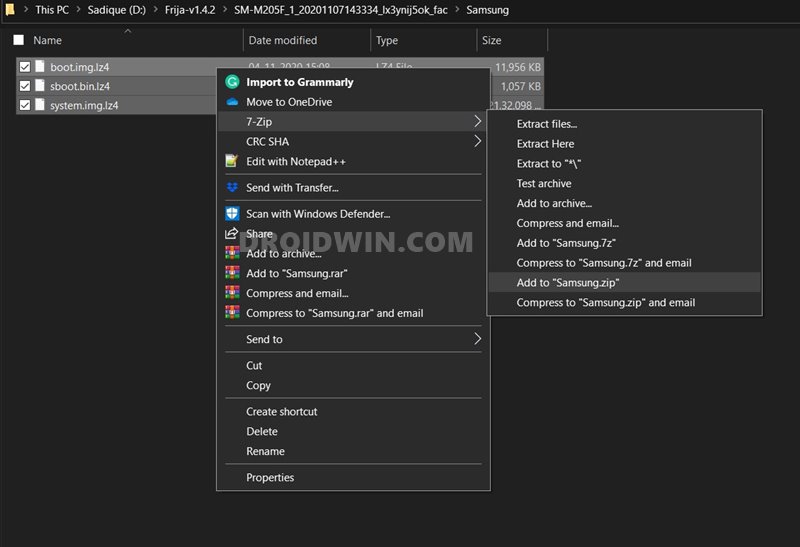
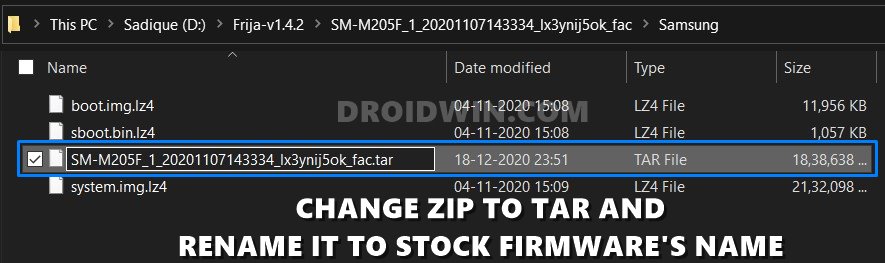
- Now select all these three files of the newly created Samsung folder. Then right-click on it and create a new compressed folder having these three files. For example, WinZIP and 7ZIP will show you the option to Compress to Samsung.ZIP.
- Once the ZIP file is created, give it the same name as that of the stock downloaded firmware. And change the extension from ZIP to TAR.
- As an example, my stock firmware has the name:
SM-M205F_1_20201107143334_lx3ynij5ok_fac
- So I will rename the Samsung.zip folder to:
SM-M205F_1_20201107143334_lx3ynij5ok_fac.tar

That’s it. You have successfully created the Samsung Combination Firmware, it’s now time to flash this file via Odin. Follow along.
- How to fix ADB Device not found [List of Devices Attached is blank]
- How to fix FAILED (status read failed (Too many links))
- Fix Magisk patched boot.img issue while Rooting Android 11
- Fix Android stuck in Recovery Mode: No Command screen
STEP 4: Reset Samsung Device and Enable USB Debugging
Before installing the combination firmware, you will have to reset your device. If you are able to access it, then you could perform a reset from the Settings page itself. On the other hand, if you are stuck in the setup screen (FRP Lock), then you wouldn’t be able to access the Settings page on your device. In that case, you will have to perform the reset from the Recovery mode. Instructions for both are given hereby.
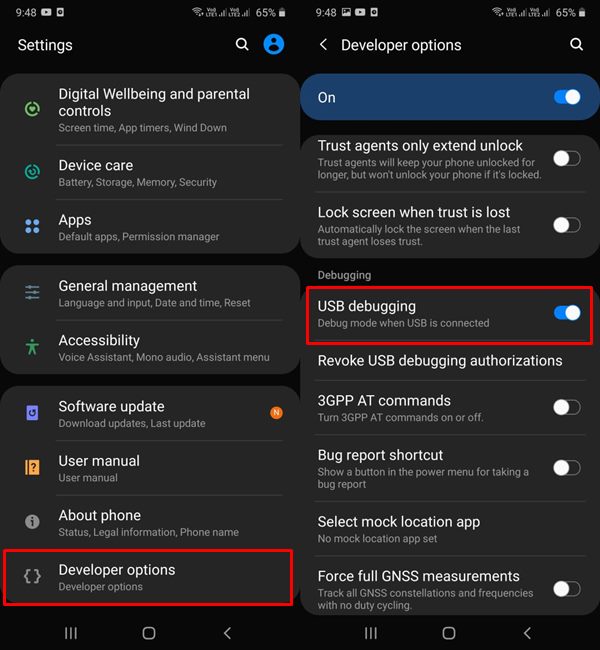
First off, if you could reset from the Settings, then take a backup beforehand. After that, go to Settings > General Management > Reset > Factory Data Reset. Once the reset is complete, go to Settings and enable Developer Options and USB Debugging.
On the other hand, if you are stuck in FRP, then you will have to boot your device to the stock recovery using the hardware key combinations. Once you boot to Recovery, use the Volume keys to select Wipe Data/Factory Reset and then hit the Power Key to confirm the selection. After the wipe is complete, select the ‘Reboot system now’ option via Volume Keys and press the Power key to confirm it.
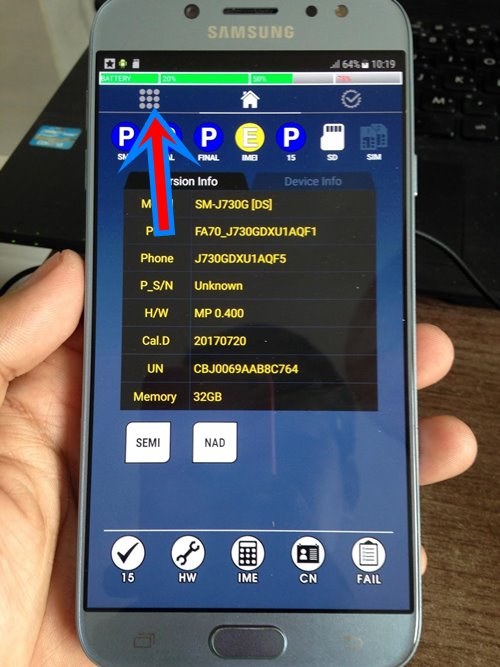
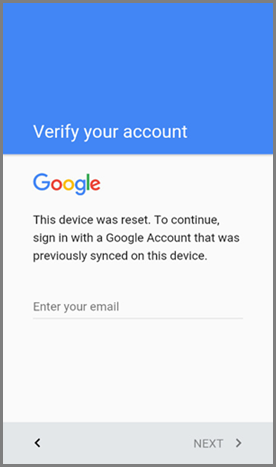
Once your device boots up, you might be taken to the factory binary screen. Tap on the three rows of dots present at the top left (see above image) and go to Settings > Developer Options > Enable USB Debugging. Once you have performed the reset and enabled USB Debugging, proceed with the below steps to flash the Samsung Combination Firmware via Odin
STEP 5: Download and Install Modified Odin
In some cases, the original Odin tool might not come in handy. This is usually when you are flashing a cross-region firmware and getting the “FAIL! Blocked carrier”, bypassing FRP via Combination firmware, fixing the FAIL! SHA256 is invalid! error and the likes. In those cases, you will need the Modified Odin Tool.
We have shared four different builds of the Modified Odin Tool, you could try out any one of these (unless the developer has specifically mentioned you try a said variant). As a general rule though, it is suggested to use the Odin3 3.14.1 3B PatcheD for devices released after 2018 and Odin3 3.13.3 3B PatcheD for older Samsung devices.
- PrinceComsyModifiedODIN.zip
- Odin3 3.14.1 3B PatcheD.zip
- Odin3 3.13.3 3B PatcheD.zip
- Modded Odin 3.13.1 Raymond.zip
STEP 6: Boot Samsung Device To Download Mode
Odin Tool could only interact with your device when it is booted to the Download Mode. In this regard, different Samsung devices follow different hardware combinations to boot your device to Download. So you could refer to our comprehensive guide for this: How to Boot any Samsung Device to Download Mode.
STEP 7: Install Samsung Combination Firmware via Odin
Now that you have created the Samsung Combination firmware, it’s time to flash/install it via Odin. Here are the required instructions for the same:
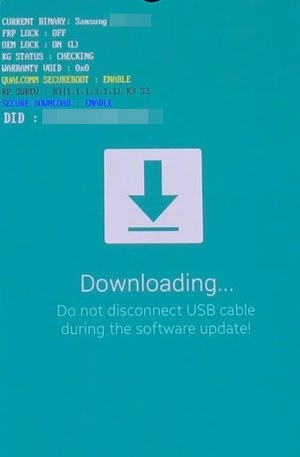
- With your Samsung device booted to Download Mode, connect it to your PC via USB.
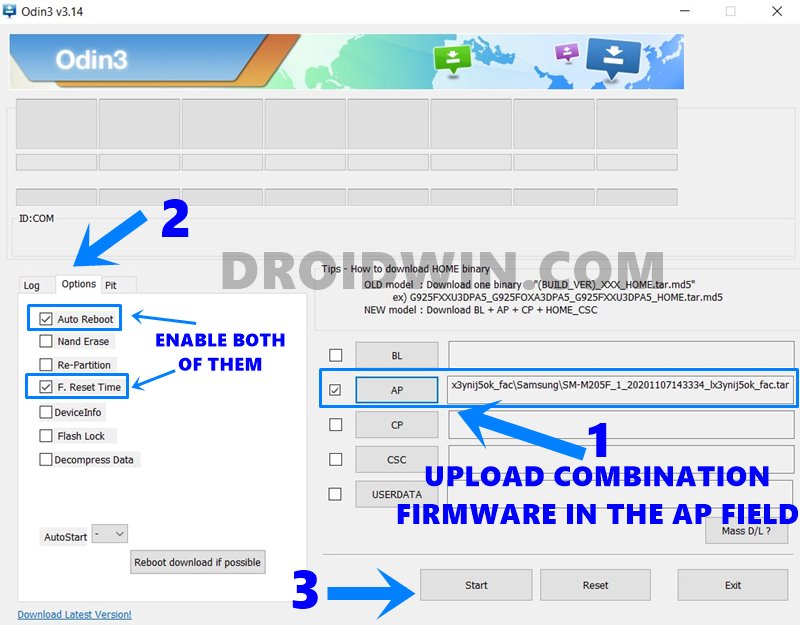
- Launch the Odin tool on your PC. You should then see the ID:COM section being highlighted, indicating that the device has been recognized by your PC.
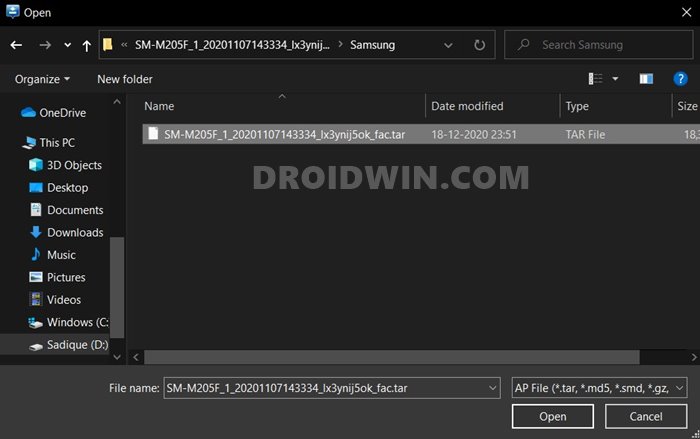
- Now click on the AP button and load the Combination firmware that you have created.
- After this, head over to the Options section of Odin Tool and enable Auto Reboot and F. Reset Time options (rest all should remain disabled).
- Finally, hit the Start button and wait for the process to complete. Once done, you should get the Pass message and your device will reboot automatically. You may now unplug the device from your PC and close Odin as well.


That’s it. These were the steps to create a Samsung Combination Firmware file and flash it via Odin. If you have any queries, do let us know in the comments section below. We will get back to you with a solution at the earliest.


qad
not work
device s8+ sm-g955fd uc
binary 12
android 9
ineed help me
Tazwat Shized
Answer us you idiot
Mike B.
Sadique…Is there a difference between Samsung FRP lock and Google FRP lock? I believe you have opened a can of worms when you try to figure out Samsung firmware. I don’t think they have any standard format for their firmware. Even firmware for the same devices. My Galaxy Tab s4 SM-T830 also doesn’t have the sboot.bin.lz4. Samsung wifi tablets do not have the CP binary to flash in Odin. My tablet is FRP locked and OEM locked. I have been searching for a month for a combination file to unlock this. I have even attempted making my own from a few different SM-T830 firmware for my tablet. I have tried repartitioning with a PIT file extracted from the firmware. They all fail in Odin. The only thing that gives me hope is that I can still access download mode. I will probably get another tablet and keep this one as a hobby project. Someday I will fix it and let everyone know how I fixed this particular tablet. Also…I will not root any Samsung product that I need for serious work.
Luis
Hi Sadique, great tutorial. But…
I downloaded firmware files via Frija (Samsung S9, model:SM-G960U1 CSC:XAA). I could not find all the three files.
– boot.img.lz4: found in AP folder.
– system.img.lz4: no such file in AP folder, but there is a file with name “system.img.ext4.lz4”. could be the same?
– sboot.img.lz4: no such file in BL folder, and no file with “boot” in its name.
Thanks for your feedback.
Emil Hansen
If I only need these three partitions for a combination file,
is it also a possibility to simply extract these files to boot.img, sboot.bin and system.img
and then flash these files using Heimdall or is there a reason for using odin ?
carcio
could you send me a tutorial on how to create a Combination file for the SM-A225M ,A325 A03s can I pay my zap +55 83 988068522
carco
could you send me a tutorial on how to create a Combination file for the SM-A225M ,A325 A03s can I pay
Jamin
I get to step 3-10 and sboot isn’t in my BL folder.
Everette Gould
I found a combination file for a different firmware of the same model phone that I have, changed the extension to zip, extracted the files and wrote the names down. Then, one by one I extracted the md5 files from the stock firm using 7zip. One by one I went the four tar/Md5 files and each one that corresponded with a file name I had written down, I put into a new folder together. Then I named it, zipped it, then changed the extension to ..tar.md5
hexXamphetamine
Presumably if sboot.bin was just renamed it would still be a .bin file…so there is only one possibility in the BL folder…however, cant be sure there isn’t one or more other files needed besides the 3 originally supposed to be used. I will try to view the contents of both the older & new firmware & see hw they compare.
Doel
STEP 3 point 10 article says extracted file from BL is sboot.img.lz4 but what is in the picture clerly shows as sboot.bin.lz4.
Please kindly clarify.
Thanks
Doel
Hi,
Please kindly clarify or confirm that the extracted file name from BL is NOT sboot.img.lz4 but sboot.bin.lz4 as shown in the picture under point 12.
Thanks …
Syed Fahad
Sir, odin in not detecting this file which I have made with the same tutorial which you have mentiond above.My Samsung S8 G950FD with the latest binary 12 is stuck on (Encryption Failed) error and the KG State in Download Mode is Prenormal so I can’t do anything and I am facing this issue since July 2021.What is the solution..?
Thanks in advance….
Syed Fahad
Sir, odin in not detecting this file which I have made with the same tutorial which you have mentiond above.My Samsung S8 G950FD with the latest binary 12 is stuck on (Encryption Failed) error and the KG State in Download Mode is Prenormal so I can’t do anything and I am facing this issue since July 2021.What is the solution please send me your contact number.Thanks in advance….
Arastos
Hi I have a SM-A107M, CSC – ARO. I was not able to locate an sboot.img.lz4 in BL. Is there an alternative file that can be used or can the combination file be created without it.
Brandon
Hey i have all the correct firmware CSC is TLS smasung S9 SM-960WVLSFUA1
I cant find the sboot file. I have the boot file and the system file but when i open the BL file and unzip it there is
abl.elf, aop.mbn.lz4, apdp.mbn.lz4, bksecapp.mbn.lz4, cmnlib.mbn.lz4, cmnlib64.mbn.lz4, devcfg.mbn.lz4, engmode.mbn.lz4, hyp.mbn.lz4, keymaster64.mbn.lz4, msadp.mbn.lz4, NON-HLOS.bin.lz4, pmic.elf.lz4, qupv3fw.elf.lz4, sec.dat.lz4, storsec.mbn.lz4, tz.mbn.lz4, vaultkeeper.mbn.lz4, xbl.elf.lz4, xbl_config.elf.lz4
thats all i get though. this is driving me nuts. took me all night yesterday to find the correct firmware. although figuring out that these combination files can be created was very interesting. I dont want to screw this up. I definitely know how detrimental improper firmware installation can be.
Brandon
also if i extract the boot.img file from the boot.img.lz4 it says it is corrupted. is that an issue or is it just something windows says because it cant read it properly?
Eric
I followed your directions exactly. i am trying to remove FRP.
tried several versions of odin and created my own combination files as directed.
the files flash normally so i know the files are good, but when i create the combination file and try it (using the same source files for lz4 files) it hangs at file analysis. Samsung A10e SM-A102U A102USQSBAUE1 version
Eugene
My Firmware is password protected, when I rename and trying to extract.
Galaxy 51 SM-S515DL, region tfn
Oscar Chiquillo
hello i hope that this thread is still being looked and answered. your guide is prefect only issue is AP has the boot.img.lz4 but no system.img.lz4 and the BL has no sboot.img.iz4. i followed your instruction to the T. could it be the files have been renamed? i have 2 phones one Is a SM-A015T1_1_20210906164135_a0rwhbdhna_fac from metro pcs. the other is a SM-N970U1_2_20210622205537_ln1bb8phow_fac which i have not tried lol that one is in advance just in case . i hope you can help again very well made guide.
Mr Creosote
Step 4: How can it possibly boot into the factory binary screen after factory resetting it, when we haven’t flashed the combination file yet?
At this point, the phone will still be running normal stock firmware, and factory resetting from the recovery menu it will just take you to the beginning of the normal setup process.
Something is messed up in the order of this tutorial, as it is on a few other tutorials, which all seem to have been copied from the same source without checking it properly.
tom
its to get rid of encryption for those that cant boot into os
Jeffm
I was thinking the same thing lol
Bud
The sboot does not show up for me in the BL FILE what can I do
Note ten plus sm-n975u
Vzw
Please need your input please