In this tutorial, we will be sharing different methods through which you could boot your Android device to TWRP Recovery. Android ecosystem, thanks to its open-source nature, allows for tons of customizations. For everyday users, they could try out custom launchers, icon packs, themes and plentitude of other modifications. And for the tech geeks, well it gets even better. They could altogether install a new ROM based on Android. All that is required is that your device should have an unlocked bootloader, and then the floodgates get opened. Not only the custom ROMs, but there are many other tweaks like Magisk Modules, Xposed Frameworks, and Substratum Themes. Well, this is just the tip of the iceberg, if we go on writing all the benefits, then the limits will know no bounds.
And as soon as you unlock the device’s bootloader, one thing that you might be doing (or should do) is to replace your stock recovery with custom recovery. This is because, once the bootloader is unlocked, you get the passage to tweak the device’s system files. And this has unforeseen risks attached. If you end up in a bricked state or in a bootloop, then you can’t just access your device or even the stock recovery for that matter.
There are just two things that you could get your hands on: the Fastboot/ Bootloader Mode and a Custom Recovery. And once you are inside the Recovery, there’s no stopping you from getting your device back to normal working condition. This is just one of the many benefits associated with the TWRP Recovery. Before checking out the steps to boot your Android device to TWRP, let’s have a look at some of these benefits. Also, check out our guide on How To Transfer or Install Files via TWRP Recovery.
Table of Contents
TWRP & It’s Benefits
Team Win Recovery Project, or popularly known as TWRP is capable of performing tons of useful functionalities. The one we mentioned above is usually known as creating and restoring a Nandroid backup. Moreover, everything from installing a custom ROM to rooting your device requires a working custom recovery. Furthermore, flashing different types of ZIP and Image files is also carried out via TWRP. There’s also some technical stuff inside the Advanced options such as an in-built terminal window.
Well, these are just some of the benefits associated with TWRP. With that in mind, let’s check out how you could boot your device to TWRP Recovery. But before doing so, it goes without saying that your device should have a workling recovery installed in the first place. If it isn’t head over to our detailed guide on the steps to Install TWRP Recovery on any Android Device. Now proceed with the steps to boot your device to TWRP Recovery.
How to Boot your device to TWRP Recovery
Let’s check out some of the methods to boot your device to TWRP Recovery:
Method 1: Boot using Hardware keys
Different devices have different hardware keys for this purpose. But most of the devices follow the Volume Down and Power key combination. So try turning off your device and then press the Power and Volume buttons to boot your device to TWRP recovery. However, if that doesn’t do the job for you, then a simple Google search will definitely. Or there’s a universal method for the same, but for that, you need to carry out an additional step. Let’s check out.
Method 2: Use the ADB Command (Universal Method)
- You could also boot your Android device to TWRP Recovery using ADB Commands. But for that, you need to download and install Android SDK and Platform Tools on your PC.
- Next up, enable USB Debugging on your device as well. The same could be done from Developer Options (which in turn could be enabled by tapping on Build Number 7 times in the About Phone section).
- Once you have enabled USB Debugging, connect your device to PC via USB Cable. Now go to the platform-tools folder (of Android SDK), type cmd in the address bar and hit Enter. This will open the Command Prompt. Finally, enter the below command to boot your Android device to TWRP Recovery:
adb reboot recovery
- If you have rooted your device, there’s another method to try out. Check out.
Method 3: Using a Third-Party App
There are many third-party apps that are capable of booting your device to TWRP Recovery. They are just meant for this purpose and does its job pretty well. For all such apps to work, our device should be rooted. if it is rooted, then you must be having the Magiks Manager app installed on your device as well. In that case, you could ditch all the other apps and simply use Magisk to boot your Android device to TWRP Recovery. Here is how it could be done:
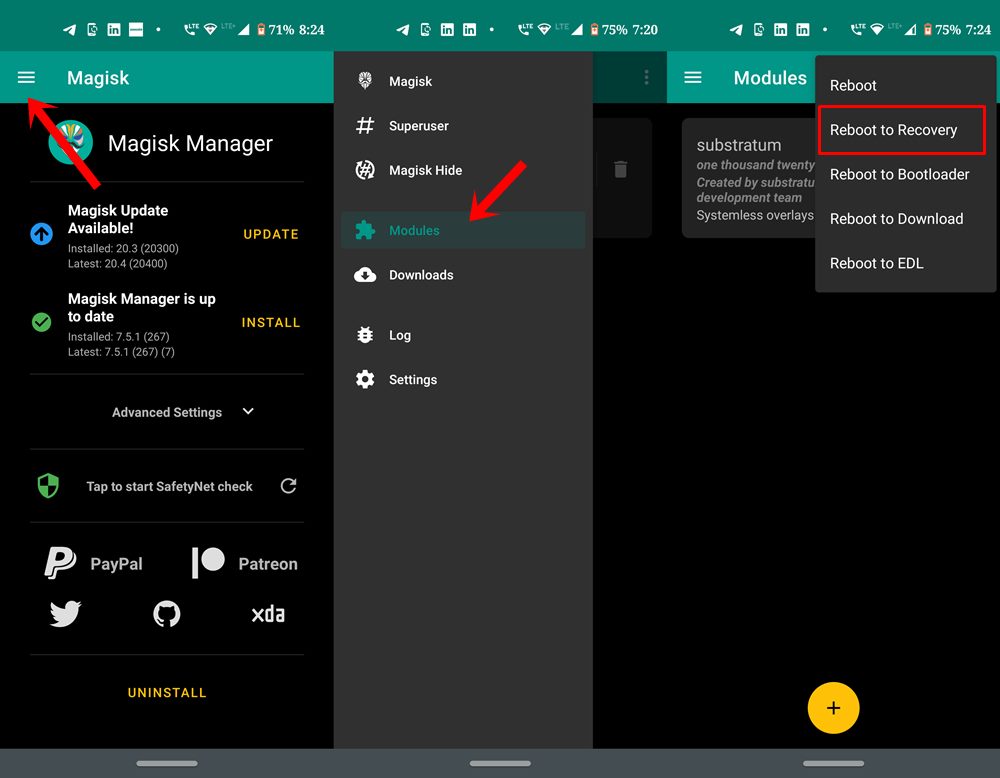
- Open the Magisk Manager app on your Android device.
- Tap on the hamburger menu situated at the top left and select Modules.
- Inside the Modules menu, tap on the overflow icon situated at the top right. Select Reboot to Recovery.
- That’s it. Doing so will directly boot your Android device to TWRP. Apart from that, you could also boot your device to Fastboot/Bootloader Mode and EDL Mode (if supported).
Also Read: [GUIDE] Flash ROMs/Magisk/TWRP/Kernels on A/B Partition Devices
Method 4: Temporary Boot to TWRP
Well, the above three methods required that your device should have TWRP Recovery installed. And doing so will replace the Stock Recovery. But what if you don’t wish to give up your stock recovery but still want to use TWRP for a single task. Well, that is indeed possible. To do so, follow the below steps:
- First of all, download the TWRP Recovery for your device from this article’s Downloads section. make sure only to download the image (.img) file.
- Next up, rename the recovery to twrp so that the complete name becomes twrp.img. Transfer it to the platform-tools folder.
- Connect your device to PC via USB cable and enter the below command to boot your Android device to Fastboot/Bootloader mode
adb reboot bootloader
- Your device will now be booted to the Fastboot mode. Now enter the below command to boot your device to TWRP Recovery.
fastboot boot twrp.img
- Here twrp.img is the name of the TWRP recovery that we have just renamed to. If you haven’t renamed it, then enter the exact same file name instead of the above.
- Once the device boots to TWRP Recovery, flash all that you need to do, without rebooting your device to System. Because once you do so, TWRP will be replaced with the stock recovery. In that case, you will again have to execute the above command
Don’t Miss: Install Custom ROMs on any Android Device- Includes A/B Partition
Conclusion
So with this, we come to the end of this guide on how to boot your Android device to TWRP Recovery. We have shared four different methods for the same. Do let us know which one is your preferred method. Likewise, if you have any queries, drop them in the comments section below. We will be back with the solution as quickly as possible. Happy Flashing!


fakeall
G’Day,
The Lenovo P12 Pro, for one, will not temporarily boot TWRP using
fastboot boot twrp.img
it returns a Command failed message.
Is there an alternative command/method to temporarily boot twrp?